6
Contents
IMPORTANT INFORMATION
............................................
1
DEAR SHARP CUSTOMER
..............................................
3
IMPORTANT SAFETY PRECAUTIONS
............................
3
Contents
............................................................................
6
Supplied Accessories
......................................................
7
Preparation
.......................................................................
8
Installing Batteries in the Remote Control
...................
8
Using the Remote Control
...........................................
8
Antenna Connection
...................................................
9
Power Connection
.....................................................
10
Part Names of Main Unit
................................................
11
Listening with Headphones
.......................................
11
How to Fix the Cables
...............................................
12
Part Names of Remote Control
.....................................
13
TV Signals in Your Region
.............................................
13
EZ SETUP (With AUTO CLOCK Setting)
......................
14
EZ SETUP during the First Power On
........................
14
Setting the CLOCK
.........................................................
15
AUTO CLOCK Setting
...............................................
15
MANUAL CLOCK Setting
..........................................
16
TIME DISPLAY
...........................................................
16
Basic Operation
..............................................................
17
Turning On and Off the Main Power
..........................
17
Standby
.....................................................................
17
Switching the Input Modes
(INPUT1/INPUT2/INPUT3/TV)
.............................
17
Sound Volume
...........................................................
18
Changing Channels
..................................................
18
Selecting Menu Items
................................................
19
Basic Adjustment Settings
............................................
21
AV MODE
..................................................................
21
OPC
...........................................................................
21
BACKLIGHT
..............................................................
22
PICTURE Adjustments
..............................................
22
COLOR TEMPERATURE
...........................................
23
AUDIO Adjustments
..................................................
23
Useful Features
..............................................................
24
CH-SETTING
.............................................................
24
SETUP
.......................................................................
25
V-CHIP Settings
.........................................................
26
CLOSED CAPTION
...................................................
31
VIEW MODE
..............................................................
32
AUDIO ONLY
.............................................................
32
BLUE SCREEN
..........................................................
32
SLEEP TIMER
............................................................
33
WAKE-UP TIMER
.......................................................
33
NO SIGNAL OFF
.......................................................
34
NO OPERATION OFF
................................................
34
PICTURE FLIP
...........................................................
34
Connecting External Devices
........................................
35
Example of External Devices that can be
Connected
..........................................................
35
Outputting Video and Audio (Video Output)
.............
35
Connecting a VCR, DVD Player or a Camcorder
to INPUT1/INPUT2/INPUT3
................................
36
Troubleshooting
.............................................................
37
Specifications
.................................................................
38
Calling for Service
..........................................................
39
LIMITED WARRANTY
.....................................................
39
Dimensional Drawings
•
The dimensional drawings for the LCD TV set are shown on
the inside back cover.
 1
1 2
2 3
3 4
4 5
5 6
6 7
7 8
8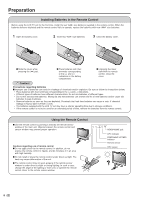 9
9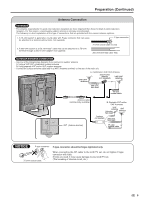 10
10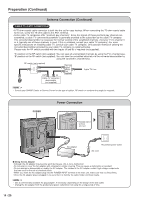 11
11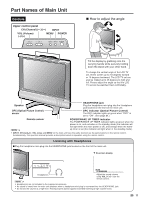 12
12