Sharp PN-H701 Operations Manual - Page 31
Controlling the Monitor with a PC (RS-232C), PC connection, Communication conditions, Communication
 |
View all Sharp PN-H701 manuals
Add to My Manuals
Save this manual to your list of manuals |
Page 31 highlights
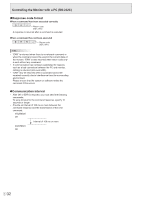
Controlling the Monitor with a PC (RS-232C) You can control this monitor from a PC via RS-232C (COM port) on the PC. TIPS • You cannot use RS-232C and LAN control simultaneously. PC connection Connect the COM port on the PC (RS-232C connector) to the CONTROL terminal (RS-232C input terminal) on the monitor using the RS-232C conversion cable (supplied) and an RS232 straight cable (commercially available). CONTROL terminal (RS-232C input terminal) PC To COM port Communication conditions Set the RS-232C communication settings on the PC to match the monitor's communication settings as follows: Baud rate Data length Parity bit 9600 bps 8 bits None Stop bit 1 bit Flow control None Communication procedure nCommand format When a command is sent from the PC to the monitor, the monitor operates according to the received command and sends a response message to the PC. Return code C1 C2 C3 C4 P1 P2 P3 P4 Command field Parameter field (4 prescribed (4 character string comprised of: alphanumerical characters) 0-9, +, -, space, ?) RS-232 straight cable (commercially available) RS-232C conversion cable (supplied) Example: VOLM0030 VOLM 30 * Be sure to input 4 characters for the parameter. Pad with spaces (" ") if necessary. (" " is a return code (0DH or 0AH)) Wrong : VOLM30 Right : VOLM 30 When inputting a negative value, specify a numerical value in three digits. Example: BLVL-005 If a command has "R" listed for "DIRECTION" in the "Control command table" on page 33, the current value can be returned by using "?" as the parameter. Example: VOLM ? ? ? ? 30 ← From PC to monitor (How much is current volume setting?). ← From monitor to PC (Current volume setting: 30). 31 E
-
 1
1 -
2
-
3
-
4
-
5
-
6
-
7
-
8
-
9
-
10
-
11
-
12
-
13
-
14
-
15
-
16
-
17
-
18
-
19
-
20
-
21
-
22
-
23
-
24
-
25
-
 26
26 -
 27
27 -
 28
28 -
 29
29 -
 30
30 -
 31
31 -
 32
32 -
 33
33 -
 34
34 -
 35
35 -
 36
36 -
37
-
38
-
39
-
40
-
41
-
42
-
43
-
44
-
45
-
46
-
47
-
48
-
49
-
50
-
51
-
52
-
53
-
54
-
55
-
56
-
57
-
58
-
59
-
60
 |
 |
