Sharp XV-Z9000U XVZ9000U Operation Manual - Page 18
Using the Adjustment Feet, Using the Lens Shift
 |
UPC - 074000358126
View all Sharp XV-Z9000U manuals
Add to My Manuals
Save this manual to your list of manuals |
Page 18 highlights
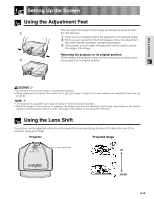
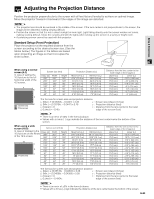
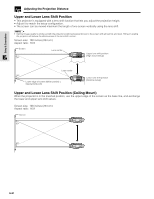
Setting Up the Screen Using the Adjustment Feet You can adjust the height of the image by raising the projector with 1 the foot releases. 1 Press the foot releases and lift the projector to the desired angle. 2 Remove your hands from the foot releases. Once the adjustment feet have locked in position, release the projector. 3 If the screen is at an angle, the adjusters can be used to adjust the angle of the image. Returning the projector to its original position While holding the projector, press the foot releases and slowly lower 3 the projector to its original position. Setup & Connections CAUTION • Do not hold the lens when lifting or lowering the projector. • When lowering the projector, be careful not to get your fingers caught in the area between the adjustment feet and the projector. • The projector is adjustable up to approximately 5° from the standard position. • When the height of the projector is adjusted, the image may become distorted (keystoned), depending on the relative positions of the projector and the screen. See page 19 for details on the keystone correction. Using the Lens Shift The picture can be adjusted within the shift range of the lens by rotating the lens shift dial on the top of the projector using your finger. Projector Projected Image Lens shift dial UP DOWN UP DOWN E-18
-
 1
1 -
2
-
3
-
4
-
5
-
6
-
7
-
8
-
9
-
10
-
11
-
12
-
 13
13 -
 14
14 -
 15
15 -
 16
16 -
 17
17 -
 18
18 -
 19
19 -
 20
20 -
 21
21 -
 22
22 -
 23
23 -
24
-
25
-
26
-
27
-
28
-
29
-
30
-
31
-
32
-
33
-
34
-
35
-
36
-
37
-
38
-
39
-
40
-
41
-
42
-
43
-
44
-
45
-
46
-
47
-
48
-
49
-
50
-
51
-
52
-
53
-
54
-
55
-
56
-
57
-
58
-
59
-
60
-
61
 |
 |
