Snapper 150Z Operater's Manual - Page 27
Engine Maintenance Items, Maintenance - oil filter
 |
View all Snapper 150Z manuals
Add to My Manuals
Save this manual to your list of manuals |
Page 27 highlights
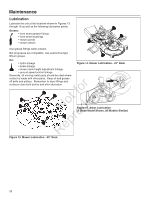
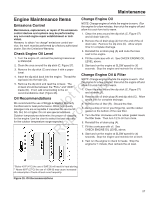
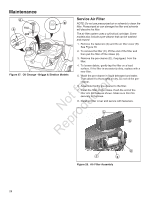
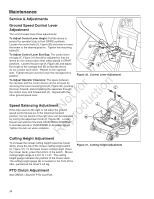
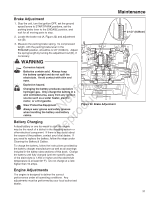
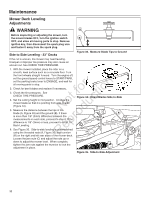
Maintenance Engine Maintenance Items Emissions Control Maintenance, replacement, or repair of the emissions control devices and systems may be performed by any non-road engine repair establishment or individual. However, to obtain "no charge" emissions control service, the work must be performed by a factory authorized dealer. See the Emissions Warranty. Check Engine Oil Level Change Engine Oil NOTE: Change engine oil while the engine is warm. Run the engine for a few minutes, then shut the engine off and allow it to cool from hot to warm. 1. Clean the area around the dip stick (C, Figure 27) and oil drain tube (A). 2. Remove the oil drain plug (A) from the end of the oil drain tube. Remove the dip stick (C). Allow ample time for complete drainage. 3. Reinstall the oil drain plug (A) and route the hose next to the engine. 1. Turn the engine off, and set the parking brake lever to ENGAGE. 4. Fill the crankcase with oil. See CHECK ENGINE OIL LEVEL above. 2. Clean the area around the dip stick (C, Figure 27). 5. Start and run the engine at SLOW speed for 30 3. Remove the dip stick (C) and clean it with a paper seconds. Stop the engine and recheck the oil level. towel. Change Engine Oil & Filter 4. Insert the dip stick back into the engine. Thread the cap back into the tube (D). 5. Remove the dip stick and read the oil level. The r n oil level should be between the "FULL" and "ADD" fo tio marks (D). If not, add oil according to the oil recommendations chart (Figure 26). t c Oil Recommendations o We recommend the use of Briggs & Stratton Warranty u Certified oils for best performance. Other high-quality N d detergent oils are acceptable if classified for service SF, SG, SH, SJ or higher. Do not use special additives. o Outdoor temperatures determine the proper oil viscosity r for the engine. Use the chart to select the best viscosity Rep for the outdoor temperature range expected. NOTE: Change engine oil while the engine is warm. Run the engine for a few minutes, then shut the engine off and allow it to cool from hot to warm. 1. Clean the area around the dip stick (C, Figure 27) and oil drain (A). 2. Remove the oil drain plug (A) and dip stick (C). Allow ample time for complete drainage. 3. Remove the oil filter (B). Discard the filter. 4. Using a drop of oil on your finger tip, wet the rubber gasket on the bottom of the new filter. 5. Turn the filter clockwise until the rubber gasket meets the filter base. Then turn 1/2 to 3/4 turn more. 6. Reinstall the oil drain plug (A). 7. Fill the crankcase with oil. See CHECK ENGINE OIL LEVEL above. 8. Start and run the engine at SLOW speed for 30 seconds. Stop the engine and recheck the oil level. 9. Test run the engine to check for leaks. Stop the engine for 1 minute, then recheck the oil level. * Below 40°F (4°C) the use of SAE 30 will result in hard starting. ** Above 80°F (27°C) the use of 10W-30 may cause increased oil consumption. Check oil level more frequently. Figure 26. Oil Recommendations 27
-
 1
1 -
2
-
3
-
4
-
5
-
6
-
7
-
8
-
9
-
10
-
11
-
12
-
13
-
14
-
15
-
16
-
17
-
18
-
19
-
20
-
21
-
 22
22 -
 23
23 -
 24
24 -
 25
25 -
 26
26 -
 27
27 -
 28
28 -
 29
29 -
 30
30 -
 31
31 -
 32
32 -
33
-
34
-
35
-
36
-
37
-
38
-
39
-
40
-
41
-
42
-
43
-
44
 |
 |
