Snapper 150Z Operater's Manual - Page 28
Service Air Filter
 |
View all Snapper 150Z manuals
Add to My Manuals
Save this manual to your list of manuals |
Page 28 highlights
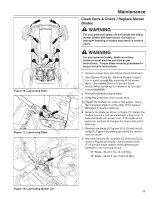
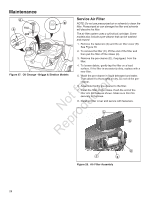
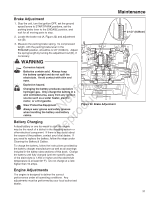
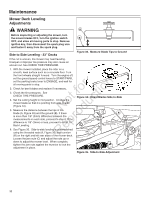
Maintenance D A Service Air Filter B NOTE: Do not use pressurized air or solvents to clean the filter. Pressurized air can damage the filter and solvents will dissolve the filter. The air filter system uses a cylindrical cartridge. Some models also include a pre-cleaner that can be washed and reused. 1. Remove the fasteners (A) and the air filter cover (B). See Figure 28. 2. To remove the filter (C), lift the end of the filter and then pull the filter off the intake (D). 3. Remove the pre-cleaner (E), if equipped, from the C filter. 4. To loosen debris, gently tap the filter on a hard surface. If the filter is excessively dirty, replace with a new filter. Figure 27. Oil Change - Briggs & Stratton Models 5. Wash the pre-cleaner in liquid detergent and water. Then allow it to thoroughly air dry. Do not oil the precleaner. r n 6. Assemble the dry pre-cleaner to the filter. fo tio 7. Install the filter on the intake. Push the end of the filter into the base as shown. Make sure filter fits securely in the base. t c 8. Install air filter cover and secure with fasteners. No du A Repro B D C E Figure 28. Air Filter Assembly 28
-
 1
1 -
2
-
3
-
4
-
5
-
6
-
7
-
8
-
9
-
10
-
11
-
12
-
13
-
14
-
15
-
16
-
17
-
18
-
19
-
20
-
21
-
22
-
 23
23 -
 24
24 -
 25
25 -
 26
26 -
 27
27 -
 28
28 -
 29
29 -
 30
30 -
 31
31 -
 32
32 -
 33
33 -
34
-
35
-
36
-
37
-
38
-
39
-
40
-
41
-
42
-
43
-
44
 |
 |
