Sony 400K Operating Instructions - Page 14
Operation panel under the AUDIO adjustment cover, AUDIO LEVEL CH-1/CH-2 audio channel 1/2
 |
View all Sony 400K manuals
Add to My Manuals
Save this manual to your list of manuals |
Page 14 highlights
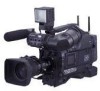
Chapter 1 Overview Operation panel under the AUDIO adjustment cover 1 MONITOR OUT CHARACTER switch 2 MONITOR SELECT switch 3 PRESET/REGEN/CLOCK switch 4 Lithium battery compartment CH-1 MIX CH-2 ON OFF MONITOR MONITOR OUT SELECT CHARACTER AUDIO LEVEL LITHIUM BATT PRESET REGEN CLOCK FRONT MIC LOW OUT ON OFF F-RUN SET R-RUN AUTO MANUAL AUDIO SELECT REC TRIGGER CH-1 CH-1 AUDIO IN PARALLEL INT ONLY EXT ONLY FRONT WRR REAR 5 Arrow key 6 AUDIO LEVEL controls 7 F-RUN/SET/R-RUN switch 8 AUDIO SELECT switches 9 AUDIO IN switches 0 REC TRIGGER switch qa FRONT MIC LOW CUT switch a MONITOR OUT (monitor output) CHARACTER switch Selects to superimpose text information on the monitor output. b MONITOR SELECT (audio monitor selection) switch Selects audio output via the built-in speaker or earphones. CH-1: Channel 1 audio MIX: Mixed audio (channels 1 and 2) CH-2: Channel 2 audio c PRESET/REGEN (regeneration)/CLOCK switch Selects whether to set a new time code or to utilize the existing time code. PRESET: Records a new time code. REGEN: Records time code continuous with the existing time code recorded on the tape. Regardless of the setting of the F-RUN/SET/R-RUN switch, the camcorder operates in R-RUN mode. CLOCK: Records time code synchronized to the internal clock. Regardless of the setting of the F-RUN/SET/RRUN switch, the camcorder operates in F-RUN mode. d Lithium battery compartment Attach the supplied CR2032 Lithium Battery. Details on how to attach the lithium battery, see "Attaching and Replacing the Lithium Battery" on page 27. e Arrow key Sets the time code and the user bit. Push the key towards left or right so that the digit you want to change flashes. Pushing the key upward increases the value of the flashing digit, and pushing it downward decreases the value. f AUDIO LEVEL (CH-1/CH-2) (audio channel 1/2 recording level) controls If the audio is input via the AUDIO IN CH-1/CH-2 connectors, adjusts the audio levels of channels 1 and 2 when the AUDIO SELECT (CH-1/CH-2) switches (see below) are set to MANUAL. g F-RUN/SET/R-RUN (free run/set/recording run) switch Selects the operating mode for the internal time code generator. The operating mode is set as explained below, depending on the position of the switch. F-RUN: Time code keeps advancing, regardless of the operating state of the VTR. Use this setting when synchronizing the time code with an external time code. SET: Sets the time code or user bits. R-RUN: The time code value advances only during recording. Use this setting to have a consecutive time code on the tape. For details, see "To set the time code" on page 57 and "To set the user bits" on page 58. h AUDIO SELECT (CH-1/CH-2) (audio channel 1/2 adjustment method selection) switches Select the audio level adjustment method for each of audio channels 1 and 2. AUTO: Automatic adjustment MANUAL: Manual adjustment 14 Location and Function of Parts
-
 1
1 -
2
-
3
-
4
-
5
-
6
-
7
-
8
-
 9
9 -
 10
10 -
 11
11 -
 12
12 -
 13
13 -
 14
14 -
 15
15 -
 16
16 -
 17
17 -
 18
18 -
 19
19 -
20
-
21
-
22
-
23
-
24
-
25
-
26
-
27
-
28
-
29
-
30
-
31
-
32
-
33
-
34
-
35
-
36
-
37
-
38
-
39
-
40
-
41
-
42
-
43
-
44
-
45
-
46
-
47
-
48
-
49
-
50
-
51
-
52
-
53
-
54
-
55
-
56
-
57
-
58
-
59
-
60
-
61
-
62
-
63
-
64
-
65
-
66
-
67
-
68
-
69
-
70
-
71
-
72
-
73
-
74
-
75
-
76
-
77
-
78
-
79
-
80
-
81
-
82
-
83
-
84
-
85
-
86
-
87
-
88
-
89
-
90
-
91
-
92
-
93
-
94
-
95
-
96
-
97
-
98
-
99
-
100
-
101
-
102
-
103
-
104
-
105
-
106
-
107
-
108
-
109
-
110
-
111
-
112
-
113
-
114
-
115
-
116
-
117
-
118
-
119
-
120
-
121
-
122
-
123
-
124
-
125
-
126
-
127
-
128
-
129
-
130
-
131
-
132
-
133
-
134
-
135
-
136
-
137
-
138
-
139
-
140
 |
 |
