Sony 400K Operating Instructions - Page 16
For DSR-400/400P/450WS/450WSP, GENLOCK IN connector BNC type - dsr 400 k
 |
View all Sony 400K manuals
Add to My Manuals
Save this manual to your list of manuals |
Page 16 highlights
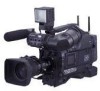
Chapter 1 Overview f Viewfinder fitting shoe Attach the DXF-801 Viewfinder. g LIGHT (video light) connector (2-pin, female) A video light with a maximum power consumption of 50 W, such as the Anton Bauer Ultralight 2 or equivalent can be connected (page 33). Rear section h MIC IN (microphone input) (+48V) connector (XLR type, 3-pin, female) Connect the supplied microphone to this connector. A microphone other than the one supplied may also be connected as long as it can operate with power source supplied by external equipment. The power (+48 V) is supplied via this connector. i Fitting for optional microphone holder Fit an optional CAC-12 Microphone Holder (page 34). 1 Attachment shoe for large viewfinder 4 EJECT switch and tape indicator 5 Cassette lid 2 GENLOCK IN connector 3 MONITOR OUT connector 6 Shoulder pad 7 TC IN connector 8 TC OUT connector a Attachment shoe for large viewfinder Attach an optional electronic viewfinder (page 31). b GENLOCK IN connector (BNC type) Use for the following two purposes. • For DSR-400/400P/450WS/450WSP: Inputs a reference signal when the camcorder is to be genlocked or when time code is to be synchronized with external equipment. Use the GENLOCK page of the MAINTENANCE menu to adjust the genlock H-phase (phase of horizontal sync signal) and the sub-carrier phase. • For DSR-450WS/450WSP only: Inputs an external video signal. Installing a CBK-SC01 Composite Input Board allows you to record external analog composite video signals input via this connector. Non-standard video signals, such as VHS, cannot be recorded. For details, see "Recording Analog Composite Signals (with a CBK-SC01 Installed- DSR-450WS/450WSP only)" on page 64. c MONITOR OUT connector Outputs a composite video signal for a video monitor. Depending on menu settings, menus, time code, and shot data can be superimposed on the image on the monitor. Like the VIDEO OUT connector (page 18), this connector can also be used to synchronize the time code of an external VTR with the time code of the camcorder. d EJECT switch and tape indicator (inside the cassette lid) Press to eject a cassette when the power is supplied to the camcorder. The indicator lights up as below. Continuous: When the cassette is in the camcorder. Blinking: While the cassette is loading or ejecting. Lights-out: When the cassette is not in the camcorder. e Cassette lid Slide the OPEN lever on the top of the camcorder to open the lid. Press the side of the lid to close it. 16 Location and Function of Parts
-
 1
1 -
2
-
3
-
4
-
5
-
6
-
7
-
8
-
9
-
10
-
 11
11 -
 12
12 -
 13
13 -
 14
14 -
 15
15 -
 16
16 -
 17
17 -
 18
18 -
 19
19 -
 20
20 -
 21
21 -
22
-
23
-
24
-
25
-
26
-
27
-
28
-
29
-
30
-
31
-
32
-
33
-
34
-
35
-
36
-
37
-
38
-
39
-
40
-
41
-
42
-
43
-
44
-
45
-
46
-
47
-
48
-
49
-
50
-
51
-
52
-
53
-
54
-
55
-
56
-
57
-
58
-
59
-
60
-
61
-
62
-
63
-
64
-
65
-
66
-
67
-
68
-
69
-
70
-
71
-
72
-
73
-
74
-
75
-
76
-
77
-
78
-
79
-
80
-
81
-
82
-
83
-
84
-
85
-
86
-
87
-
88
-
89
-
90
-
91
-
92
-
93
-
94
-
95
-
96
-
97
-
98
-
99
-
100
-
101
-
102
-
103
-
104
-
105
-
106
-
107
-
108
-
109
-
110
-
111
-
112
-
113
-
114
-
115
-
116
-
117
-
118
-
119
-
120
-
121
-
122
-
123
-
124
-
125
-
126
-
127
-
128
-
129
-
130
-
131
-
132
-
133
-
134
-
135
-
136
-
137
-
138
-
139
-
140
 |
 |
