Sony CCD-FX420 Primary User Manual - Page 11
Sony CCD-FX420 Manual
 |
View all Sony CCD-FX420 manuals
Add to My Manuals
Save this manual to your list of manuals |
Page 11 highlights
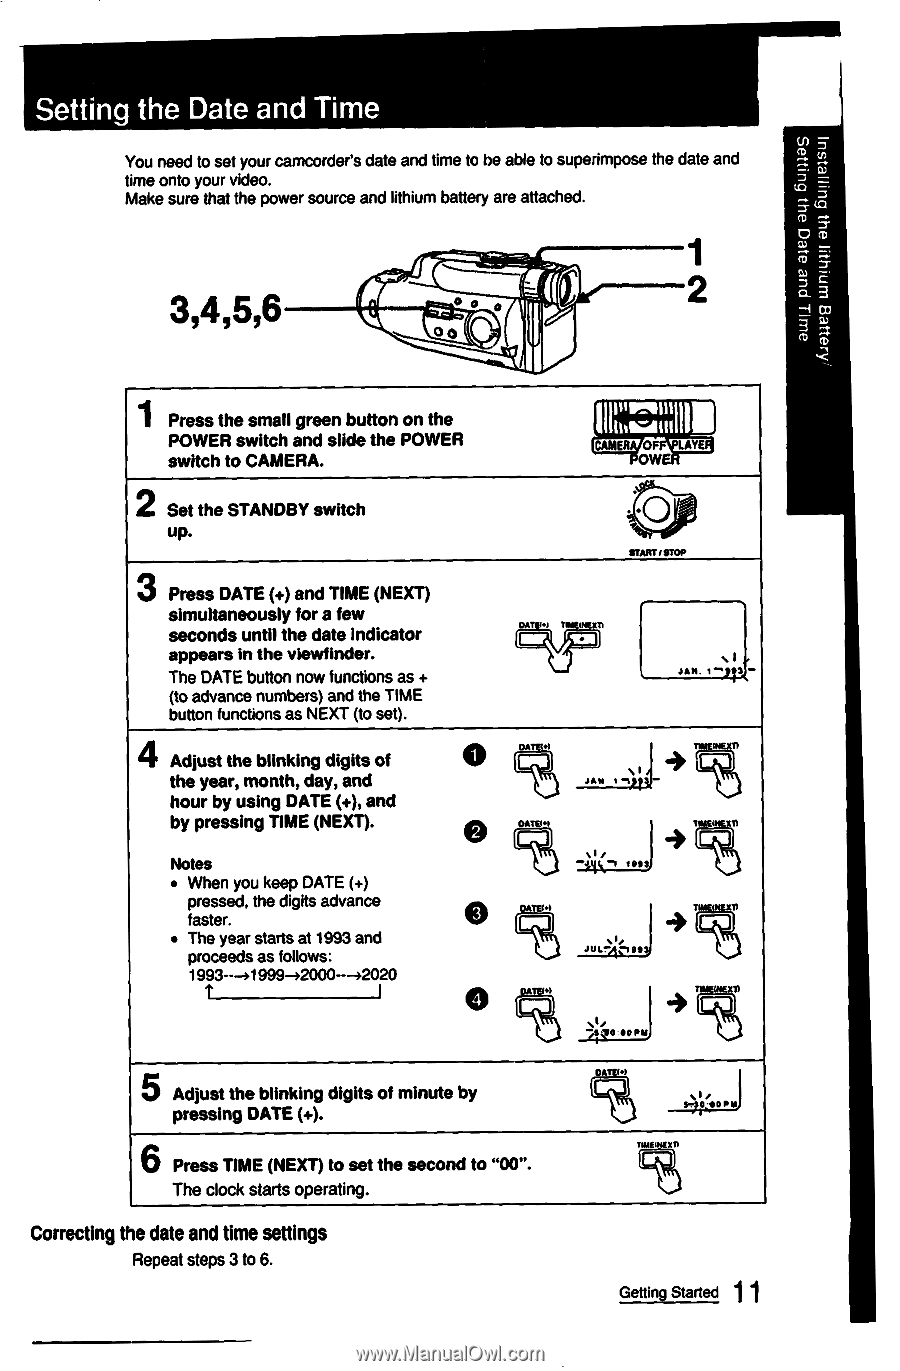
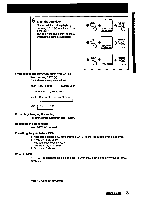
Setting the Date and Time You need to set your camcorders date and time to be able to superimpose the date and time onto your video. Make sure that the power source and lithium battery are attached. 3,4,5,6 2 00 1 Press the small green button on the POWER switch and slide the POWER switch to CAMERA. O 'LAVE' OWE 2 Set the STANDBY switch up. 3 Press DATE (+) and TIME (NEXT) simultaneously for a few seconds until the date indicator appears in the viewfinder. + The DATE button now functions as (to advance numbers) and the TIME button functions as NEXT (to set). 4 Adjust the blinking digits of the year, month, day, and hour by using DATE (+), and by pressing TIME (NEXT). Notes • When you keep DATE (+) pressed, the digits advance faster. • The year starts at 1993 and proceeds as follows: 1993 -- -)1999 - )2000 --- +2020 T I ..•O WART/STOP OA.T/S utIESTI • JAN1.4, Z- DA / JAW1-v\It j - + OATEN + .gin 1SW) ..014. -i DATED1 j I ATI ...) JU..L:,VI•199 DATED/ -\,I140:00PM 5 Adjust the blinking digits of minute by pressing DATE (+). 6 Press TIME (NEXT) to set the second to "00". The clock starts operating. DAMN 4KAOPM Til IP Correcting the date and time settings Repeat steps 3 to 6. Getting Started 1 1
-
 1
1 -
2
-
3
-
4
-
5
-
 6
6 -
 7
7 -
 8
8 -
 9
9 -
 10
10 -
 11
11 -
 12
12 -
 13
13 -
 14
14 -
 15
15 -
 16
16 -
17
-
18
-
19
-
20
-
21
-
22
-
23
-
24
-
25
-
26
-
27
-
28
-
29
-
30
-
31
-
32
-
33
-
34
-
35
-
36
-
37
-
38
-
39
-
40
-
41
-
42
-
43
-
44
-
45
-
46
-
47
-
48
-
49
-
50
-
51
-
52
 |
 |