Sony CCD-FX420 Primary User Manual - Page 14
Record
 |
View all Sony CCD-FX420 manuals
Add to My Manuals
Save this manual to your list of manuals |
Page 14 highlights
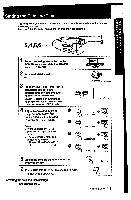
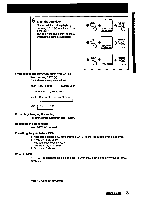
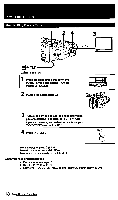
Chapter 2: Basic Camera Operation How to Record Before you record one-time events, make a trial recording to make sure that your camcorder is working properly. Keep the lens clean, or the focus cannot be adjusted properly. It is very easy to start recording scenes. 3 4 1 Hold the camcorder by putting your hand through the grip belt so that your thumb can easily press the red START/STOP button. 2 By pressing the release on the lens cap, remove and attach it to the grip belt. ) Press 1 o 3 0 co 0 o e • .. 7 immemiss• 3 Press the small green button on the POWER switch and slide the POWER switch to CAMERA. This puts the camcorder in the camera • recording mode. 4 Set the PROGRAM AE (Auto Exposure) switch to the green position. I'lllir l ::u::i1111 rq. . t4.1oF %Ir'ilk • OWE' Ci ) 5 Set the STANDBY switch up. . • MY "STBY" appears in the viewfinder. Now, • you can see through the viewfinder. STARTI STOP 6 Press START/STOP (red button) once. The camera is recording when the word "REC" appears on the viewfinder screen and the red lamp lights in the viewfinder. You can also confirm the start of recording with beep sound when you have the BEEP switch turned on. . • START i STOP REC eo red lamp In the viewfinder you can see a black and white picture of what you are recording and information that indicates what the camcorder is now doing. 14 Basic Camera Operation
-
 1
1 -
2
-
3
-
4
-
5
-
6
-
7
-
8
-
 9
9 -
 10
10 -
 11
11 -
 12
12 -
 13
13 -
 14
14 -
 15
15 -
 16
16 -
 17
17 -
 18
18 -
 19
19 -
20
-
21
-
22
-
23
-
24
-
25
-
26
-
27
-
28
-
29
-
30
-
31
-
32
-
33
-
34
-
35
-
36
-
37
-
38
-
39
-
40
-
41
-
42
-
43
-
44
-
45
-
46
-
47
-
48
-
49
-
50
-
51
-
52
 |
 |
