Sony CCD-TR40 Primary User Manual
Sony CCD-TR40 Manual
 |
View all Sony CCD-TR40 manuals
Add to My Manuals
Save this manual to your list of manuals |
Sony CCD-TR40 manual content summary:
- Sony CCD-TR40 | Primary User Manual - Page 1
SONY® 3-758-458-21 (1) Video Camera Recorder 8 CCD-TR40 Operation Manual Before operating the unit, please read this manual thoroughly and retain it for future reference. Owner's Record The model and serial numbers are located on the bottom. Record the serial number in the - Sony CCD-TR40 | Primary User Manual - Page 2
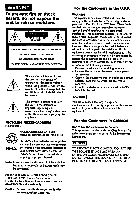
to the presence of important operating and maintenance (servicing) instructions in the literature accompanying the appliance. RECYCLING NICKEL-CADMIUM cautioned that any changes or modifications not expressly approved in this manual could void your authority to operate this equipment. For the - Sony CCD-TR40 | Primary User Manual - Page 3
that you can enjoy for years to come. Table of Contents Before You Begin About This Manual 4 Checking Supplied Accessories 5 Getting Started Charging and Installing the Battery Pack 6 Tips for Remote Commander 41 Specifications 43 Trouble Check 44 Indicators in the Viewfinder 47 I Index 48 1 I i - Sony CCD-TR40 | Primary User Manual - Page 4
If you want to shoot as soon as possible, read the chapters "Getting Started" and "Basic Operations" first. As you read through this manual, buttons and settings on the camcorder are shown in capital letters. e.g. Set the POWER switch to CAMERA. Note on TV Color Systems IV color systems - Sony CCD-TR40 | Primary User Manual - Page 5
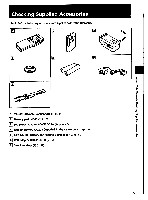
About This Manual / Checking Supplied Accessories Checking Supplied Accessories Check that the following accessories are supplied with your camcorder. O O E Wireless Remote Commander (I) (p. 41) E Battery pack NP-55 (I) (p. 6) E AC - Sony CCD-TR40 | Primary User Manual - Page 6
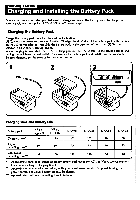
messing .seurseti Charging and Installing the Battery Pack Before using your camcorder, you first need to charge and install the battery pack. To charge the battery pack. use the supplied AC-V25/V25A AC power adaptor. Charging the Battery Pack Charge the battery pack on a flat place without - Sony CCD-TR40 | Primary User Manual - Page 7
Important! Use the battery completely before re-charging! Before you recharge the battery, make sure the battery has been used up (discharged) completely. Repeated charging while some capacity remains causes a lowering of battery capacity. However, the original battery capacity can be recovered if - Sony CCD-TR40 | Primary User Manual - Page 8
Charging and Installing the Battery Pack Removing the Battery Pack (1) Lift up the viewfinder. (2) While pressing BATT, slide the battery pack to the left. Tips for Using the Battery Pack This section shows you how you can get the most out of your battery pack. Preparing the Battery Pack Always - Sony CCD-TR40 | Primary User Manual - Page 9
Tips for Using the Battery Pack When to Replace the Battery Pack While you are using your camcorder, the remaining battery indicator decreases gradually as battery power is used up. AM 4 (I= When the remaining battery indicator reaches the lowest point, the .Cci indicator appears and starts - Sony CCD-TR40 | Primary User Manual - Page 10
Tips for Using the Battery Pack Note on Charging A Brand-new Battery A brand-new battery pack is not charged. Before using the battery pack, charge it completely. Before Recharging a Used Battery Pack • Make sure to use up the battery before recharging. • If recording is completed before the .to - Sony CCD-TR40 | Primary User Manual - Page 11
Inserting a Cassette Make sure that the power source is installed. (1) While pressing the small blue button on the EJECT knob, slide it down. The cassette holder automatically lifts up and opens. (2) Insert a cassette with the window facing out. (3) Close the cassette holder by pressing the "PUSH" - Sony CCD-TR40 | Primary User Manual - Page 12
. Cal • Place your right elbow against your side. • Place your left hand under the camcorder to support it. • Place your eye firmly against the viewfinder eyecup. • Use the viewfinder frame as a guide to determine the horizontal plane. • You can also record in a low position to get an interesting - Sony CCD-TR40 | Primary User Manual - Page 13
Basic Operations Camera Recording Make sure that the power source is installed and a cassette is inserted. When you start recording, the date is automatically recorded for 10 seconds (AUTO DATE feature). This feature works only once a day. You can use the Remote Commander to record yourself with - Sony CCD-TR40 | Primary User Manual - Page 14
Camera Recording Note on the tape counter The tape counter indicates the recording or playback time. Use it as a guide. There will be a time lag of several seconds from the actual time. To set the counter to zero, press COUNTER RESET. Note on the AUTO - Sony CCD-TR40 | Primary User Manual - Page 15
Using the Zoom Feature Zooming is a recording technique that lets you change the size of the subject in the scene. You can also use the zoom to decide on a shooting angle before you start recording. However, when you use the WIDE ANGLE, zooming is automatically set to the maximum wide-angle setting, - Sony CCD-TR40 | Primary User Manual - Page 16
Camera Recording Using the WIDE ANGLE The WIDE ANGLE delivers wide-angle pictures easily. Set the WIDE ANGLE switch in the direction of the arrow. \, • I eg, WIDE ANGLE rt'IllIAM it + • Note on using the WIDE ANGLE • When you use the WIDE ANGLE, the power zoom button does not function. • When you - Sony CCD-TR40 | Primary User Manual - Page 17
Recording the Date or Time While you are recording, press DATE (+) or TIME (NEXT). The date or time displayed in the viewfinder is recorded with the picture. You cannot record the date and time at the same time. Except for the date or time indicator, no indicator in the viewfinder is recorded. DATE - Sony CCD-TR40 | Primary User Manual - Page 18
Camera Recording Checking the Recorded Picture in the Viewfinder Using EDITSEARCH, you can review the last recorded scene or check the recorded picture in the viewfinder. (1) While pressing the small green button on the POWER switch, slide it to CAMERA. (2) Turn STANDBY up. (3) Press the - ( (g) ) - Sony CCD-TR40 | Primary User Manual - Page 19
Connections for Playback You can use this camcorder as a VCR by connecting it directly to your TV for playback. There are two ways to connect the camcorder to your TV. Connecting to a TV without Audio/Video Input Jacks Connect the camcorder to the TV using the supplied RFU adaptor. Make sure that - Sony CCD-TR40 | Primary User Manual - Page 20
Playing Back a Tape You can monitor the playback picture in the viewfinder. You can also monitor the picture on a TV screen, after connecting the camcorder to a TV or VCR (p. 19). You can use the supplied Remote Commander to control playback, if you want. Before using the Remote Commander, make sure - Sony CCD-TR40 | Primary User Manual - Page 21
Various Playback Modes To view a still picture Press II during playback. To resume playback, press ii or c.. To locate a scene (Picture search) Keep pressing 404 or polw during playback. To resume normal playback, release the button. To monitor the high-speed picture during fastforward or rewind ( - Sony CCD-TR40 | Primary User Manual - Page 22
Advanced Operations Using Alternate Power Sources You can choose any of the following power sources for your camcorder: battery pack (p. 6). house current, and 12/24 V car battery. Choose the appropriate power source depending on where you want to use your camcorder. Place Indoors Power source - Sony CCD-TR40 | Primary User Manual - Page 23
Using a Car Battery Use the DCP-77 DC pack (not supplied). Connect the cord of the DC pack to the cigarette lighter socket of the car (12 V or 24 V). Connect the DC pack to the battery mounting surface of the camcorder. To remove the DC pack The DC pack is removed in the same way as the battery pack - Sony CCD-TR40 | Primary User Manual - Page 24
Using the PROGRAM AE Function You can select from three PROGRAM AE (Auto Exposure) modes to suit your shooting situation. When you use PROGRAM AE, you can get a Portrait effect (the subject is in focus and the background is out of focus) or capture high-speed action. Selecting the Best Mode Select - Sony CCD-TR40 | Primary User Manual - Page 25
Using the PROGRAM AE Function / Using the World Clock Using the World Clock The clock is set to the East Coast Standard Time at the factory. Reset the clock according to the local time zone by pressing AREA. First, find the area name in the 'Time Zone Chart" on page 26. (1) While pressing the small - Sony CCD-TR40 | Primary User Manual - Page 26
Using the World Clock Time Zone Chart P. ,-c-fii •... -4....... x..,1/1 LI•Ira.'_1 441,17 T- • ti - ''',/ - .i..e....• 0 . .-.-.1_,,„Orr - 7_7:;\ 0 le L..:(L. :w ..._, ilI. ] Area number is i4 is 1111 20 22 -°Ill 24 2 .;- 4 II J•-•., 1 Irliir..rlb00„ 411 L.- v. ... .0 $ 10 12 .i4 - Sony CCD-TR40 | Primary User Manual - Page 27
Editing onto Another Tape You can create your own video program by editing with any other la 8 mm, I U Hi8, MIS VHS, SMN S-VHS, SSP VHSC, SSW S-VHSC or RI Betamax VCR that has audio/video inputs. Before Editing Connect the camcorder to the VCR using an A/V connecting cable (not supplied). (p. 19) - Sony CCD-TR40 | Primary User Manual - Page 28
Additional Information Changing the Lithium Battery Your camcorder is supplied with the lithium battery installed. The lithium battery lasts for about I year under normal operation. When the lithium battery becomes weak or dead, the 4,* indicator flashes in the viewfinder for about 5 seconds when - Sony CCD-TR40 | Primary User Manual - Page 29
Resetting the Date and Time Your camcorder's clock is adjusted to East Standard Time, but you can reset the date and time. Set the POWER switch to CAMERA and turn STANDBY up. Adjust the digits in the viewfinder. (1) Press DATE (+) and TIME (NEXT) simultaneously until the area name and number appear - Sony CCD-TR40 | Primary User Manual - Page 30
Resetting the Date and Time To Correct the Date and Time Settings Press TIME (NEXT) repeatedly until the minute digits stop flashing. Then repeat steps 1 to 4. To Check the Preset Date and Time Press DATE (+) or TIME (NEXT). When you press the same button again, the indicator goes off. To Set to - Sony CCD-TR40 | Primary User Manual - Page 31
. It may damage the video heads. Note If the V8-25CLH deaning cassette is not available in your area, consult your Sony service facility. Removing Dust from inside the Viewfinder (1) Pull out the viewfinder barrel until the illustrated mark appears. (2) Turn the viewfinder counterclockwise until - Sony CCD-TR40 | Primary User Manual - Page 32
Maintenance Information and Precautions To Reattach the Viewfinder Barrel (1) Align the mark on the viewfinder barrel with the mark on the viewfinder and push in the viewfinder barrel until it clicks. (2) Turn it clockwise until it stops and push it in. 2 • O 0I/ te• Removing Dust from inside - Sony CCD-TR40 | Primary User Manual - Page 33
Moisture Condensation If the camcorder is brought directly from a cold place to a warm place, moisture may condense inside the camcorder, on the surface of the tape, or on the lens. In this condition, the tape may stick to the head drum and be damaged or the unit may not operate correctly. To - Sony CCD-TR40 | Primary User Manual - Page 34
Operation • Operate the camcorder on 6.0 V (battery pack) or 7.5 V (AC power adaptor). • For DC or AC operation, use the accessories recommended in this manual. • Should any solid object or liquid fall into the casing. unplug the camcorder and have it checked by qualified personnel before operating - Sony CCD-TR40 | Primary User Manual - Page 35
AC Power Adaptor Charging • Repeated charging while some capacity remains causes a lowering of battery capacity. However, the original battery capacity can be recovered if you use the battery completely and charge it fully again. • Charge the battery on a flat place without vibration. • The battery - Sony CCD-TR40 | Primary User Manual - Page 36
Using Your Camcorder Abroad Each country has its own electricity and TV color system. Before using your camcorder abroad, check the following points. Power Sources You can use your camcorder in any country with the supplied AC power adaptor within 110 V to 240 V AC, 50/60 Hz. Use a commercially - Sony CCD-TR40 | Primary User Manual - Page 37
Identifying the Parts EI r \s„ -- 1 , .lai I ' Ir EE E POWER switch (p. 13, 20) El EJECT knob (p. 11) E Power zoom button (p. 15) E Cassette holder (p. 11) 4313 0 El REMOTE le (LANG) control jack MIC jack (PLUG IN POWER) stands for Local Application Control Bus te System. The control jack - Sony CCD-TR40 | Primary User Manual - Page 38
Identifying the Parts STOP REWC:) -PLAY- OFF PAUSE O Er .0. S • 21 I E Tape transport buttons (p. 20) 0 STOP 404 REW (rewind) PLAY (playback) FF (advancing the tape) II PAUSE 14 EDITSEARCH button (p. 18) E Built-in microphone g Remote sensor (p. 42) Aim the Remote Commander here for remote - Sony CCD-TR40 | Primary User Manual - Page 39
II 4 II 0 E EDIT switch (p. 27) g REMOTE COMMANDER switch (p. 42) E DATE (+) and TIME (NEXT) buttons (p. 29) E Lithium battery compartment (bottom of the camcorder) (p. 28) g PROGRAM AE dial (p. 24) =1 BAIT (battery eject) knob (p. 8) g DST (Daylight Saving Time) button E AREA button g Battery - Sony CCD-TR40 | Primary User Manual - Page 40
Identifying the Parts Operation Indicators For details on each indicator, refer to the pages indicated in the parenthesis. I 0:00:00 Is t lel- CP CM LENS COVER EMI Ihè M DON AUTC DATEI iC et? I12110 AMI 0 E PROGRAM AE indicator (p. 24) E Power zoom indicator (p. 15) E Warning indicators (p. - Sony CCD-TR40 | Primary User Manual - Page 41
Remote Commander The buttons that have the same name on the Remote Commander and on the camcorder function identically. • 00" 3 El Transmitter Point toward the remote sensor to control the camcorder after turning on the POWER switch on the camcorder. E Tape transport buttons El DISPLAY button - Sony CCD-TR40 | Primary User Manual - Page 42
Identifying the Parts Using the Remote Commander Make sure that the REMOTE COMMANDER switch on the camcorder is set to ON. • Remote Control Direction REMOTE COMMANDER ON [9 t OFF • of 5113*. (5m) Note on the Remote Commander • Keep the remote sensor away from strong light sources such as direct - Sony CCD-TR40 | Primary User Manual - Page 43
Specifications Video Camera Recorder System Video recording system Two rotary heads, Helical scanning FM system Audio recording system Two rotary heads, FM system Video signal NTSC color, EIA standards Usable cassette 8 mm video format cassette (standard 8 mm) Tape speed SP mode Approx. - Sony CCD-TR40 | Primary User Manual - Page 44
Trouble Check If you run into any problem using the camcorder, use the following table to troubleshoot the problem. Should the difficulty persist, disconnect the power source and contact your Sony dealer or local authorized Sony service facility. Camcorder Symptom Cause Corrective Actions Page - Sony CCD-TR40 | Primary User Manual - Page 45
Symptom Cause Corrective Actions page The image on the The viewfinder lens is not Adjust the viewfinder lens. viewfinder screen is not adjusted. 11 clear. A vertical band appears The contrast between the The camcorder is not when a subject such as subject and background is malfunctioning. - Sony CCD-TR40 | Primary User Manual - Page 46
Trouble Check AC power adaptor AC Power Adaptor Symptom The POWER lamp does not . - 0 1 If the CHARGE lamp goes out after a while, the problem is with the battery firstly installed. The CHARGE lamp flashes. - 0 The problem is with the AC power adaptor. Please contact your Sony dealer. • If you - Sony CCD-TR40 | Primary User Manual - Page 47
The tab on the tape is out (red). E Moisture condensation has occurred. (p. 33) El The video heads may be contaminated. (p. 31) E Some other trouble has occurred. Disconnect the power source and contact your Sony dealer or local authorized facility. E The lithium battery is weak or is not installed - Sony CCD-TR40 | Primary User Manual - Page 48
Supplied accessories 24 13 13 5 Power zoom I5 T, U, V, W, X, If, Z D, E PROGRAM AE 24 Tape counter 14 DATE/TIME 29 Tripod mounting 12 DISPLAY 21 Trouble check 44 DST 25 WIDE ANGLE 16 EDIT 27 World clock 25 Editing 27 Zoom 15 EDITSEARCH 18 EJECT 11 Eyecup 12 For
-
 1
1 -
 2
2 -
 3
3 -
 4
4 -
 5
5 -
 6
6 -
 7
7 -
8
-
9
-
10
-
11
-
12
-
13
-
14
-
15
-
16
-
17
-
18
-
19
-
20
-
21
-
22
-
23
-
24
-
25
-
26
-
27
-
28
-
29
-
30
-
31
-
32
-
33
-
34
-
35
-
36
-
37
-
38
-
39
-
40
-
41
-
42
-
43
-
44
-
45
-
46
-
47
-
48
 |
 |

SONY®
3-758-458-21
(1)
Video
Camera
Recorder
CCD-TR40
8
Operation
Manual
Before
operating
the
unit,
please
read
this
manual
thoroughly
and
retain
it
for
future
reference.
Owner's
Record
The
model
and
serial
numbers
are
located
on
the
bottom.
Record
the
serial
number
in
the
space
provided
on
the
right
hand.
Refer
to
these
numbers
whenever
you
call
upon
your
Sony
dealer
regarding
this
product.
Model
No.
CCD-TR40
Serial
No.
Model
No.
AC-V25/V25A
Serial
No.
Video8
Handycam
iO1994
by
Sony
Corporation