Sony CCD-TRV43 Operating Instructions - Page 27
Selecting the mode setting of each item
 |
UPC - 027242550872
View all Sony CCD-TRV43 manuals
Add to My Manuals
Save this manual to your list of manuals |
Page 27 highlights
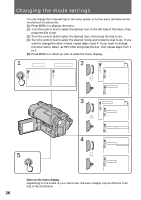
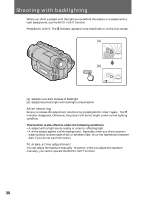
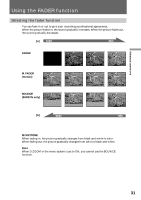
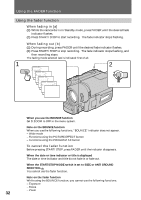
Advanced operations Changing the mode settings Notes on changing the mode setting •Menu items differ depending on the setting of the POWER switch to PLAYER or CAMERA. •When you let the subject monitor the shot (mirror mode), the menu display does not appear. Selecting the mode setting of each item Items for both CAMERA and PLAYER modes LCD B. L.* •Normally select BRT NORMAL. •Select BRIGHT when the LCD screen is dark. When you select BRIGHT, battery life is about 10 percent shorter during recording. When you use the power sources other than the battery pack, BRIGHT is automatically selected, and LCD B.L. is not displayed in the menu. LCD COLOR* Select this item to adjust the color on the LCD screen. Ò REMAIN* •Select AUTO when you want to display the remaining tape bar: -for about 8 seconds after the camcorder is turned on and calculates the remainder of the tape. - for about 8 seconds after a cassette is inserted and the camcorder calculates the remainder of the tape. - for about 8 seconds after ( is pressed in PLAYER mode. - for about 8 seconds after DISPLAY is pressed to display the screen indicators. - for the period of tape rewinding, forwarding or picture search in PLAYER mode. •Select ON to always display the remaining tape indicator. AUTO TV ON* (CCD-TRV43/TRV46 only) You can use this feature only with Sony TVs. •Select ON to turn on the TV automatically when using the LASER LINK function. •Select OFF not to turn on the TV. TV INPUT* (CCD-TRV43/TRV46 only) Select 1 or 2 or 3 of the video input on the TV which the IR receiver (not supplied) is connected to when using the LASER LINK function. LTR SIZE* •Normally select NORMAL. •Select 2x to display selected menu item by twice size of normal. BEEP* •Select ON so that beeps sound when you start/stop recording, etc. •Select OFF when you do not want to hear the beep sound. 27
-
 1
1 -
2
-
3
-
4
-
5
-
6
-
7
-
8
-
9
-
10
-
11
-
12
-
13
-
14
-
15
-
16
-
17
-
18
-
19
-
20
-
21
-
 22
22 -
 23
23 -
 24
24 -
 25
25 -
 26
26 -
 27
27 -
 28
28 -
 29
29 -
 30
30 -
 31
31 -
 32
32 -
33
-
34
-
35
-
36
-
37
-
38
-
39
-
40
-
41
-
42
-
43
-
44
-
45
-
46
-
47
-
48
-
49
-
50
-
51
-
52
-
53
-
54
-
55
-
56
-
57
-
58
-
59
-
60
-
61
-
62
-
63
-
64
-
65
-
66
-
67
-
68
-
69
-
70
-
71
-
72
-
73
-
74
-
75
-
76
-
77
-
78
-
79
-
80
-
81
-
82
-
83
-
84
 |
 |
