Sony CCD-TRV43 Operating Instructions - Page 54
Editing onto another tape
 |
UPC - 027242550872
View all Sony CCD-TRV43 manuals
Add to My Manuals
Save this manual to your list of manuals |
Page 54 highlights
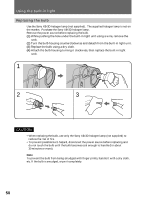
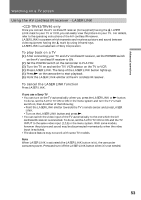
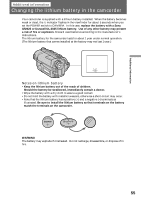
Editing onto another tape You can create your own video program by editing with any other h 8 mm, H Hi8, mini DV, DV, j VHS, k S-VHS, VHSC, K S-VHSC, l Betamax or ¬ ED Betamax VCR that has video/audio inputs. Before editing Connect the camcorder to the VCR using the supplied A/V connecting cable. Set the input selector on the VCR to LINE, if available. Set EDIT to ON in the menu system (p. 29). Starting editing Turn down the volume of the camcorder while editing. Otherwise, picture distortion may occur. (1) Insert a blank tape (or a tape you want to record over) into the VCR, and insert your recorded tape into the camcorder. (2) Play back the recorded tape on the camcorder until you locate the point just before where you want to start editing, then press P to set the camcorder in playback pause mode. (3) On the VCR, locate the recording start point and set the VCR in recording pause mode. (4) First press P on the camcorder, and after a few seconds press P on the VCR to start editing. To edit more scenes Repeat steps 2 to 4. To superimpose the title while you are editing You can superimpose the title while you are editing. Refer to "Superimposing a title" (p. 44). To stop editing Press p on both the camcorder and the VCR. Note on Fine Synchro Edit If you connect a video deck that has the Fine Synchro Edit feature to the LANC l jack of the camcorder, using a LANC cable (not supplied), the edit will be even more precise. 54
-
 1
1 -
2
-
3
-
4
-
5
-
6
-
7
-
8
-
9
-
10
-
11
-
12
-
13
-
14
-
15
-
16
-
17
-
18
-
19
-
20
-
21
-
22
-
23
-
24
-
25
-
26
-
27
-
28
-
29
-
30
-
31
-
32
-
33
-
34
-
35
-
36
-
37
-
38
-
39
-
40
-
41
-
42
-
43
-
44
-
45
-
46
-
47
-
48
-
 49
49 -
 50
50 -
 51
51 -
 52
52 -
 53
53 -
 54
54 -
 55
55 -
 56
56 -
 57
57 -
 58
58 -
 59
59 -
60
-
61
-
62
-
63
-
64
-
65
-
66
-
67
-
68
-
69
-
70
-
71
-
72
-
73
-
74
-
75
-
76
-
77
-
78
-
79
-
80
-
81
-
82
-
83
-
84
 |
 |