Sony CCD-TRV70 Primary User Manual
Sony CCD-TRV70 Manual
 |
View all Sony CCD-TRV70 manuals
Add to My Manuals
Save this manual to your list of manuals |
Sony CCD-TRV70 manual content summary:
- Sony CCD-TRV70 | Primary User Manual - Page 1
this manual thoroughly, and retain it for future reference. Owner's Record The model and serial numbers are located on the bottom. Record the serial number in the space provided below. Refer to these numbers whenever you call upon your Sony dealer regarding this product. Model No. CCD-TRV70 Serial - Sony CCD-TRV70 | Primary User Manual - Page 2
Handycam is loaded with advanced features, but at the same time it is very easy to use. You will soon be producing home video that you can enjoy for years to come. WARNING To prevent fire or shock hazard, do not expose the unit to rain or moisture. For the Sony Service (servicing) instructions in - Sony CCD-TRV70 | Primary User Manual - Page 3
and Fade-out 25 Using the PROGRAM AE Function 26 Enjoying Picture Effect 28 Focusing Manually 30 Shooting with Backlighting 32 Releasing the STEADY SHOT Function 33 Changing the Mode Settings Your Camcorder Abroad 49 Trouble Check 50 Specifications 53 Identifying the Parts 54 Warning Indicators 62 Index 63 - Sony CCD-TRV70 | Primary User Manual - Page 4
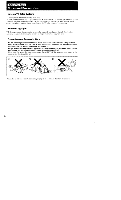
differ from country to country. To view your recordings on a TV, you need an NTSC system based TV. When you want to use a PALM system based TV, you will need a NTSC/PAL-M transcoder (as this is an NTSC system based camcorder). Please check the list on page 49 to see the TV color - Sony CCD-TRV70 | Primary User Manual - Page 5
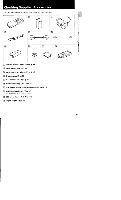
Notes and Precautions/Checking Supplied Accessories Checking Supplied Accessories Check that the following accessories are supplied with your camcorder. 1 2 3 •s>cC>(p4), 4 5 6 Ec:D= 7 8 9 10 ant=33 ▪ Wireless Remote Commander (1) (p. 58) • NP-66 Battery pack (1) (p. 6) • - Sony CCD-TRV70 | Primary User Manual - Page 6
Getting Started Charging and Installing the Battery Pack Before using your camcorder, you first need to charge and install the battery pack. To charge the battery pack, use the supplied AC power adaptor. Charging the Battery Pack Charge the battery pack on a flat place without vibration. (1) Connect - Sony CCD-TRV70 | Primary User Manual - Page 7
Charging and Installing the Battery Pack Battery Life Battery pack NP-66 NP-98198D NP-80/80D NP-66H/68 NP-C65 (supplied) While LCD open2 recording') LCD close 30 (60) 40 (80) 60 (115) 85 (165) 50 (100) 80 (150) 35 (70) 55 (105) 30 (55) 40 (80) While playing back on LCD') 60 120 110 - Sony CCD-TRV70 | Primary User Manual - Page 8
Charging and Installing the Battery Pack Installing the Battery Pack (1) Lift up the viewfinder. (2) Align the right side of the battery pack with white line on the camcorder, and slide the battery pack to the right. 1 2 0 Removing the Battery Pack (1) Lift up the viewfinder. (2) While pressing BATT - Sony CCD-TRV70 | Primary User Manual - Page 9
Charging and Installing the Battery Pack/Inserting a Cassette Inserting a Cassette Make sure that a power source is installed. (1) While sliding the lid release knob, lift up the lid. Then open it. (2) Press EJECT. The cassette compartment automatically lifts up and opens. (3) Insert a cassette ( - Sony CCD-TRV70 | Primary User Manual - Page 10
Basic Operations Camera Recording Make sure that the power source is installed and a cassette is inserted. The date is automatically recorded for 10 seconds after you start recording (AUTO DATE feature). This feature works only once a day. You can hear the beep sound to confirm your operation. - Sony CCD-TRV70 | Primary User Manual - Page 11
record tapes in SP (standard play) mode only. Note on the tape counter The tape counter indicates the recording or playback time. Use it as a guide. There will be a time lag of several seconds from the actual time. To set the counter to zero, press COUNTER RESET located behind the LCD - Sony CCD-TRV70 | Primary User Manual - Page 12
Camera recording Using the Zoom Feature Zooming is a recording technique that lets you change the size of the subject in the scene. For more professional-looking recordings, use the zoom sparingly. "T" side: for telephoto (subject appears closer) "W" side: for wide-angle (subject appears farther - Sony CCD-TRV70 | Primary User Manual - Page 13
Shooting with the LCD Screen You can also record the picture while looking at the LCD screen. You cannot monitor the sound from the speaker during recording. (1) While pressing PUSH OPEN, open the LCD panel. (2) Adjust the angle of the LCD panel. The LCD panel moves about 90 degrees to this side and - Sony CCD-TRV70 | Primary User Manual - Page 14
AUTO DATE feature is turned on. When recorded it will be normal. - the STBY indicator appears as MI and REC as •. - the Steady Shot and manual focus operate even though the (c7/), and a , indicators do not appear. • When closing the LCD panel, turn it vertically until it clicks. [a] • When turning - Sony CCD-TRV70 | Primary User Manual - Page 15
It • Place your right elbow against your side. • Place your left hand under the camcorder to support it. • Place your eye firmly against the viewfinder eyecup. • Use the viewfinder frame as a guide to determine the horizontal plane. • You can record in a low position to get an interesting recording - Sony CCD-TRV70 | Primary User Manual - Page 16
attach a tripod to the adaptor. [c] Do not leave the tripod adaptor on the camcorder if the camcorder is not mounted on a tripod. When attaching a non-Sony tripod, make sure that the length of the tripod screw is less than 9/32 inches (6.5 mm). Otherwise, the screw may damage the inner parts of - Sony CCD-TRV70 | Primary User Manual - Page 17
Checking the Recorded Picture The EDITSEARCH function is used to view the recorded picture for a moment during recording. Using EDITSEARCH, you can review the last recorded scene or check the recorded picture on the LCD screen. You can also review the picture in the viewfinder. (1) While pressing - Sony CCD-TRV70 | Primary User Manual - Page 18
Playing Back a Tape You can monitor the playback picture on the LCD screen. (1) While pressing the small green button on the POWER switch, turn it to VTR. The operation keys light on. (2) Insert the recorded tape with the window facing out. (3) While pressing PUSH OPEN, open the LCD panel. Adjust - Sony CCD-TRV70 | Primary User Manual - Page 19
When watching on the LCD screen Turn the LCD panel vertically until it clicks, turn it over and move back to the body. [a] The stand on the bottom is useful. [b] [a] [b] 2 Note on DISPLAY button Press DISPLAY to erase the screen indicators on the LCD screen. To display the indicators, press it - Sony CCD-TRV70 | Primary User Manual - Page 20
Playing Back a Tape Various Playback Modes You can enjoy pictures with little noise on the LCD screen during still, slow and picture search. (CRYSTAL-CLEAR still/slow/picture search) To View a Still Picture (Playback pause) Press II during playback. To resume playback, press II or C%-. To Locate a - Sony CCD-TRV70 | Primary User Manual - Page 21
Searching for the End of the Picture You can go to the end of the recorded portion. It is convenient when you restart recording after you played back the recorded portion. This function works when the POWER switch is set to either CAMERA or VTR. (1) While pressing PUSH OPEN, open the LCD panel. - Sony CCD-TRV70 | Primary User Manual - Page 22
camcorder. (3) Set the selector to VTR (DC OUT). 1 p 1*, a O oQ a 0 ccoo O POWER -E • w--VTR(DC OVO WARNING Power cord must only be changed at qualified service shop. PRECAUTION The unit is not disconnected from the AC power source as long as it is connected to the wall outlet, even if - Sony CCD-TRV70 | Primary User Manual - Page 23
Notes on the POWER lamp • The POWER lamp will remain lit for a while even if the unit is unplugged after use. This is normal. • If the POWER lamp does not light, set the selector to the center position and disconnect the power cord. After about one minute, reconnect the power cord and set the - Sony CCD-TRV70 | Primary User Manual - Page 24
Recording with the Date or Time You can record the date or time displayed on the LCD screen or in the viewfinder with the picture. You cannot record the date and time at the same time. Except for the date or time indicator, no indicator on the LCD screen or in the viewfinder is recorded. The clock - Sony CCD-TRV70 | Primary User Manual - Page 25
Fade-in and Fade-out You can fade in or out to give your recording a professional appearance. When fading in, the picture gradually fades in from black or mosaic while the sound increases. When fading out, the picture gradually fades to black or mosaic while the sound decreases. When Fading in [a] - Sony CCD-TRV70 | Primary User Manual - Page 26
Using the PROGRAM AE Function You can select from four PROGRAM AE (Auto Exposure) modes to suit your shooting situation. When you use PROGRAM AE, you can get a Portrait effect (the subject is in focus and the background is out of focus), capture high-speed action or record night views. Selecting the - Sony CCD-TRV70 | Primary User Manual - Page 27
Using the PROGRAM AE Function Each press of PROGRAM AE changes the mode. Repeat pressing PROGRAM AE until the desired mode appears. The indicator of the selected PROGRAM AE mode appears in the viewfinder or on the LCD screen. a PROGRAM O E L L. Note on shutter speed The shutter speed in each - Sony CCD-TRV70 | Primary User Manual - Page 28
Enjoying Picture Effect You can make interesting pictures, like those of television with Picture Effect function. Selecting the Best Modes Select one of seven modes, referring to the following. [a] [b] [c] MOSAIC k [d] [e] STRETCH MOSAIC [a] The picture becomes mosaic. SOLARIZE [b] The - Sony CCD-TRV70 | Primary User Manual - Page 29
Using the Picture Effect Function Each press of PICTURE EFFECT changes the mode. Repeat pressing PICTURE EFFECT until the desired mode appears. The indicator of the selected PICTURE EFFECT mode appears in the viewfinder or on the LCD screen. You can check the changed picture in the viewfinder or on - Sony CCD-TRV70 | Primary User Manual - Page 30
In the following cases you should obtain better results by adjusting the focus manually. [a] [b] [c] [d] • Insufficient light [a] • Subjects with little contrast - walls, sky, etc.[b] • Too much brightness behind the subject [c] • Horizontal stripes [d] • Bright subject or subject reflecting - Sony CCD-TRV70 | Primary User Manual - Page 31
stops. (3) Turn the focus dial to achieve a sharp focus. (4) Set the desired shot length using the power zoom button. FOCUS AUTO MANUAL w PAUUTSOH' NEAR 4 FAR To Reactivate Auto Focusing Set FOCUS to AUTO. The Q indicator in the viewfinder disappears. Shooting in relatively dark places - Sony CCD-TRV70 | Primary User Manual - Page 32
Shooting with Backlighting When you shoot a subject with the light source behind the subject or a subject with a light background, use the BACK LIGHT function. n Press BACK LIGHT. The indicator appears in the viewfinder or on the LCD screen. [a] N _ [b] BACK LIGHT [a] Subject is too dark because - Sony CCD-TRV70 | Primary User Manual - Page 33
6uuy6gpeg tmm 6unootis Releasing the STEADY SHOT Function tp, When you shoot, the indicator appears in the viewfinder or on the LCD screen. This indicates that the Steady Shot function is working and the camcorder compensates for camera-shake. You can release the Steady Shot function. Do not use - Sony CCD-TRV70 | Primary User Manual - Page 34
Changing the Mode Settings You can change the mode settings in the menu system to further enjoy the features and functions of the camcorder. The menu contents of CAMERA mode are different from those of VTR mode. (1) While pressing PUSH OPEN, open the LCD panel. (2) Press MENU to display the menu on - Sony CCD-TRV70 | Primary User Manual - Page 35
Selecting the Mode Setting of Each Item Items in CAMERA and VTR Modes COMMANDER • Select ON when using the supplied wireless Remote Commander for the camcorder. • Select OFF when not using the Remote Commander for the camcorder. BEEP • Select ON to turn the beep sound on. • Select - Sony CCD-TRV70 | Primary User Manual - Page 36
Watching on a TV Screen You can use the camcorder as a VCR. Connect the camcorder to the TV by using the supplied A/V connecting cable. There are two ways to connect the camcorder to your TV. When monitoring the playback picture by connecting the camcorder to your TV, we recommend you use the house - Sony CCD-TRV70 | Primary User Manual - Page 37
Editing onto Another Tape You can create your own video program by editing with any other Eli 8 mm, Hi 0 Hi8, VIIS VHS, Svcs S-VHS, [VII5M VHSC, S111150 S-VHSC, or la Betamax VCR that has video/audio inputs. Before Editing Connect the camcorder to the VCR - Sony CCD-TRV70 | Primary User Manual - Page 38
Recording from a VCR or TV You can record a tape from another VCR or a TV program from a TV that has video/audio outputs. Connect the camcorder to the VCR or TV. Turn down the volume of the camcorder while editing. Otherwise, the picture distortion may occur. (1) Turn the POWER switch to VTR. (2) - Sony CCD-TRV70 | Primary User Manual - Page 39
POWER switch to CAMERA. In this case, replace the battery with the Sony CR2025 or Duracell DL2025 lithium battery. Use of any other battery may present sure to insert the lithium battery with the positive side facing out. d` SONY INC& r•ir t" (+) WARNING The battery may explode if mistreated. Do - Sony CCD-TRV70 | Primary User Manual - Page 40
Resetting the Date and Time You can reset the date and time in the menu system in CAMERA mode. (1) While pressing PUSH OPEN, open the LCD panel. (2) Press MENU to display the menu on the LCD screen. (3) Press I` or 4, to select CLOCK SET, then press EXECUTE. (4) Press 4' or 4, to adjust the year, - Sony CCD-TRV70 | Primary User Manual - Page 41
back the tape using a standard 8 mm video recorder/player, you should record in the standard 8 mm tape. To play back in Recording using cassette type Hi8 Standard 8 Fli Ei I1 When You Play Back The playback mode (SP or LP) is selected automatically according to the format in which the tape - Sony CCD-TRV70 | Primary User Manual - Page 42
Tips for Using the Battery Pack This section shows you how you can get the most out of your battery pack. Preparing the Battery Pack Always Carry Additional Batteries Have sufficient battery pack power to do 2 to 3 times as much recording as you have planned. Battery Life is Shorter in Cold - Sony CCD-TRV70 | Primary User Manual - Page 43
Notes on the Rechargeable Battery Pack The Battery Pack Heats Up During charging or recording, the battery pack heats up. This is caused by energy that has been generated and a chemical change that has occurred inside the battery pack. This is not cause for concern. Battery Pack Care • Remove the - Sony CCD-TRV70 | Primary User Manual - Page 44
Tips for Using the Battery Pack Notes on Charging A Brand-new Battery Pack A brand-new battery pack is not charged. Before using the battery pack, charge it completely. Before Recharging a Used Battery Pack • Make sure to use up the battery before recharging. • If recording is completed before the - Sony CCD-TRV70 | Primary User Manual - Page 45
Tips for Using the Battery Pack/Maintenance Information and Precautions Maintenance Information and Precautions Moisture Condensation If the camcorder is brought directly from a cold place to a warm place, moisture may condense inside the camcorder, on the surface of the tape, or on the lens. In - Sony CCD-TRV70 | Primary User Manual - Page 46
cleaning cassette. It may damage the video heads. Note If the V8-25CLH cleaning cassette is not available in your area, consult your nearest Sony dealer. Removing Dust from Inside the Viewfinder (1) While holding down RELEASE on the viewfinder barrel, turn the eyecup in the direction of the arrow - Sony CCD-TRV70 | Primary User Manual - Page 47
• For DC or AC operation, use only the accessories recommended in this manual. • Should any solid object or liquid get inside the casing, unplug the camcorder and have it checked by your nearest Sony dealer before operating it any further. • Avoid rough handling or mechanical - Sony CCD-TRV70 | Primary User Manual - Page 48
locations that are: - Extremely hot or cold - Dusty or dirty - Very humid - Vibrating If any difficulty should arise, unplug the unit and contact your nearest Sony dealer. 48 - Sony CCD-TRV70 | Primary User Manual - Page 49
system based TV. When you want to use a PAL-M system based TV, you will need an NTSC/PAL-M transcorder. Check the following alphabetical list. NTSC system countries Bahama Islands, Bolivia, Canada, Central America, Chile, Colombia, Ecuador, Jamaica, Japan, Korea, Mexico, Peru, Surinam, Taiwan, the - Sony CCD-TRV70 | Primary User Manual - Page 50
Trouble Check If you run into any problem using the camcorder, use the following table to troubleshoot the problem. Should the difficulty persist, disconnect the power source and contact your Sony dealer or local authorized Sony service facility. Camcorder Power Symptom Cause Corrective Actions - Sony CCD-TRV70 | Primary User Manual - Page 51
not activate. suitable for autofocusing operation. The FOCUS switch is set to MANUAL. Set to AUTO. The lens is dirty. Clean the lens with is "noisy". The video heads may be dirty. Clean the heads using Sony V825CLH cleaning cassette. The picture does not appear in The LCD panel is open - Sony CCD-TRV70 | Primary User Manual - Page 52
Trouble Check AC Power Adaptor Symptom The POWER lamp does not light. The lamp goes out after a while, the problem is with the battery pack firstly installed. The CHARGE lamp flashes. The problem is with the AC power adaptor. Please contact your nearest Sony dealer. " If you use a battery pack - Sony CCD-TRV70 | Primary User Manual - Page 53
Trouble Check/Specifications Specifications Video Camera Recorder System Video recording system Two rotary heads, Helical scanning, FM system Audio recording system Rotary heads, FM system Video signal NTSC color, EIA standards Usable cassette 8 mm video format cassette ( Hi8 CCD Application Sony - Sony CCD-TRV70 | Primary User Manual - Page 54
Identifying the Parts 4 5 • Is 7 Tape transport buttons (p. 18, 32) O STOP REW (rewind) L>. PLAY (playback) FF (fast-forward) II PAUSE • REC These buttons will function in VTR mode. El Power zoom button (p. 12) EDITSEARCH button (p. 17) 17 POWER switch (p. 10, 18) Camera recording/battery lamp (p. - Sony CCD-TRV70 | Primary User Manual - Page 55
14 15 15 17 • 1 lgb n rl§i 20 M Speaker El LCD screen (p. 18, 61) El TIME button (p. 24) El Recording lamp (p. 13) El DISPLAY button (p. 19) END SEARCH button (p. 21) N STEADY SHOT switch (p. 33) El COUNTER RESET button (p. 11) 4 DATE button (p. 24) 0 MENU operation buttons (p. 34, 40) El - Sony CCD-TRV70 | Primary User Manual - Page 56
identifying the Parts 28 361 g 9] N 16- 37 30 F38 31 39 32 40 133I 1341 1351 42 M START/STOP button (p. 13) It is useful when recording in low position. N FOCUS switch (p. 31) M Focus dial (p. 31) a LCD BRIGHT dial (p. 13) 2 Tripod receptacle (p. 19) Attach the supplied tripod - Sony CCD-TRV70 | Primary User Manual - Page 57
431 49 144 50 11 51 45 52 46 53 54 47 48 55 M M Cassette compartment lid (p. 9) EJECT button (under the lid ) (p. 9) 45 LANC C control jack C Connect the LANC connecting cable to a wired remote control unit such as an editing controller. In this case, set the COMMANDER mode to OFF in - Sony CCD-TRV70 | Primary User Manual - Page 58
Identifying the Parts Attaching the shoulder strap Attach the supplied shoulder strap to the hooks for the shoulder strap al on page 56). 3 Remote Commander The buttons that have the same name on the Remote Commander and on the camcorder function identically. 1 2 3 r6i 6 4 rj Transmitter Point - Sony CCD-TRV70 | Primary User Manual - Page 59
Preparing the Remote Commander To use the Remote Commander, you must insert two size AA (R6) batteries. Use the supplied size AA (R6) batteries. (1) Remove the battery cover from the Remote Commander. (2) Insert both of the size AA (R6) batteries with correct polarity. (3) Put the battery cover back - Sony CCD-TRV70 | Primary User Manual - Page 60
camcorder works at commander mode VTR 2. The commander mode (1, 2, and 3) are used to distinguish this camcorder from other Sony VCRs to avoid remote control misoperation. If you use another Sony VCR at commander mode VTR 2, we recommend you change the commander mode or cover the remote sensor of - Sony CCD-TRV70 | Primary User Manual - Page 61
DATE) 112:00:00AMI 4. 0 8 17 9 18 Wind indicator (p. 35) LI Manual focusing indicator (p. 31) LI PROGRAM AE mode indicator (p. 26, 27) 1 Steady 28, 29) A Warning indicators (p. 62) LI Playing back or recording in Hi8 format LI Playing back a tape recorded in LP mode (p. 41) UTape transport - Sony CCD-TRV70 | Primary User Manual - Page 62
out (red) (p. 9). [I Moisture condensation has occurred (p. 45). E] The video heads may be contaminated (p. 46). Some other trouble has occurred. Disconnect the power source and contact your Sony dealer or local authorized facility. The lithium battery is weak or the lithium battery is not installed - Sony CCD-TRV70 | Primary User Manual - Page 63
57 LCD panel 13 Lithium battery 39 M, N, 0 M. FADER 25 Manual focus 30 Menu system 34 MIC (microphone) jack 57 P Picture effect 28 mode STEADY SHOT Supplied accessories U, V, W, X, Y, Z Tape counter Tripod mounting Trouble check Twilight mode VOLUME Zoom 58 26 10 11 33 5 11, 61 16
-
 1
1 -
 2
2 -
 3
3 -
 4
4 -
 5
5 -
 6
6 -
 7
7 -
8
-
9
-
10
-
11
-
12
-
13
-
14
-
15
-
16
-
17
-
18
-
19
-
20
-
21
-
22
-
23
-
24
-
25
-
26
-
27
-
28
-
29
-
30
-
31
-
32
-
33
-
34
-
35
-
36
-
37
-
38
-
39
-
40
-
41
-
42
-
43
-
44
-
45
-
46
-
47
-
48
-
49
-
50
-
51
-
52
-
53
-
54
-
55
-
56
-
57
-
58
-
59
-
60
-
61
-
62
-
63
 |
 |

SONY
3-798-741-21
(1)
Video
Camera
Recorder
Hi
8
Operation
Manual
Before
operating
the
unit,
please
read
this
manual
thoroughly,
and
retain
it
for
future
reference.
Owner's
Record
The
model
and
serial
numbers
are
located
on
the
bottom.
Record
the
serial
number
in
the
space
provided
below.
Refer
to
these
numbers
whenever
you
call
upon
your
Sony
dealer
regarding
this
product.
Model
No.
CCD-TRV70
Model
No.
AC
-V26
Serial
No
Serial
No.
2
0
too
video
H
i8
Handgun
CCD-TRV70
©
1995
by
Sony
Corporation