Sony DAV-DZ175 Operating Instructions - Page 50
Transferring tracks on an audio CD or MP3 files on a DATA CD/DATA DVD onto a USB device
 |
View all Sony DAV-DZ175 manuals
Add to My Manuals
Save this manual to your list of manuals |
Page 50 highlights
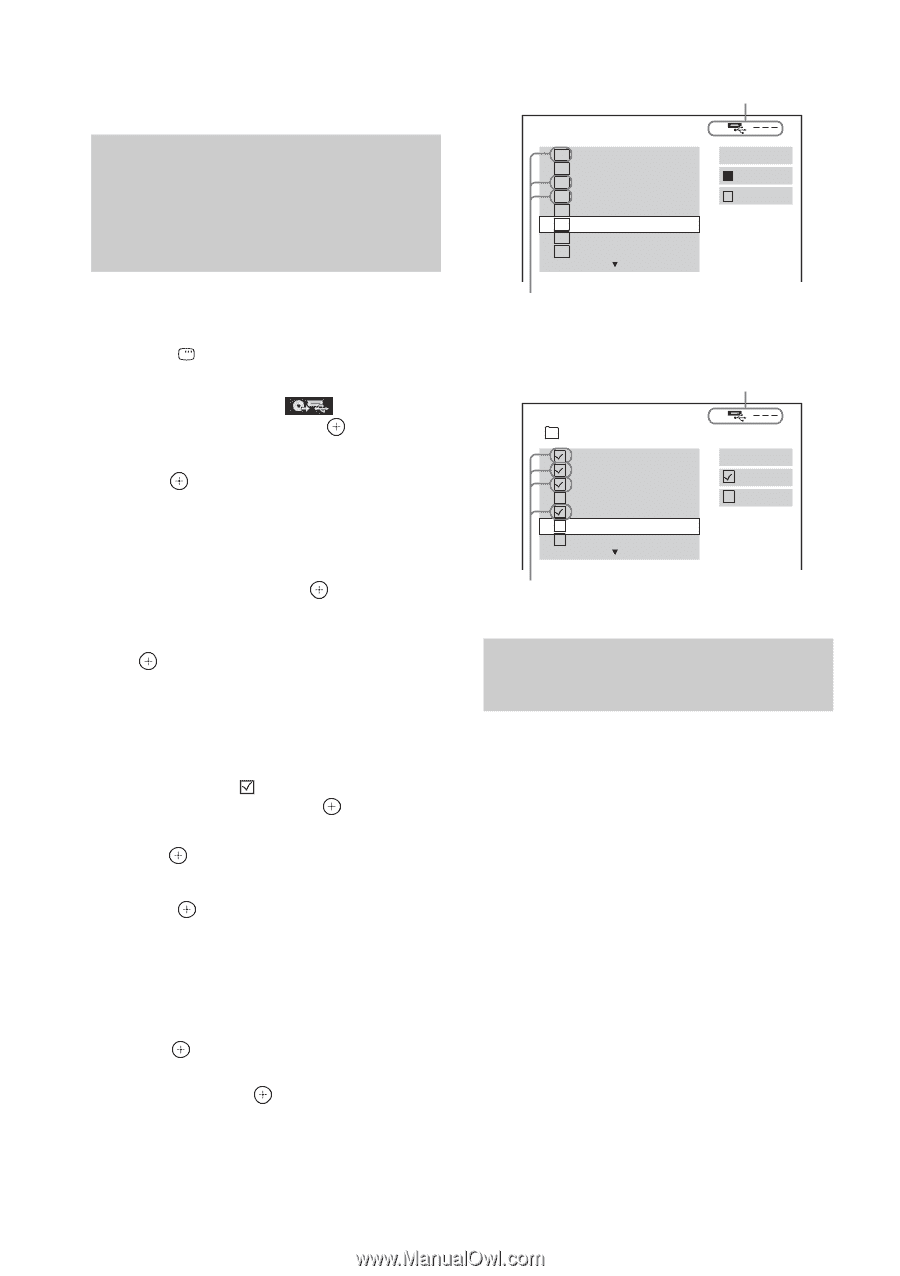
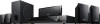
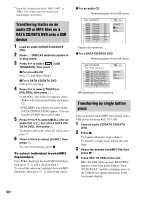
4)A new file is transferred in the "REC1-MP3" or "REC1-CD" folder each time single-track transferring is performed. Transferring tracks on an audio CD or MP3 files on a DATA CD/DATA DVD onto a USB device 1 Load an audio CD/DATA CD/DATA DVD. 2 Press DISPLAY while the system is in stop mode. 3 Press X/x to select [USB TRANSFER], then press . x For an audio CD Press and skip to Step 5. x For a DATA CD/DATA DVD Follow the next Step. 4 Press X/x to select [TRACK] or [FOLDER], then press . • [TRACK]: The folder list appears. Press X/x to select the desired folder, then press . • [FOLDER]: The folders recorded on the DATA CD/DATA DVD appear. You can transfer all MP3 files in the folder. 5 Press C/X/x/c to select [x ALL] (for an audio CD) or [ ALL] (for a DATA CD/ DATA DVD), then press . To deselect all tracks, select [s ALL], then press . 6 Press C/X/x/c to select [START], then press . To cancel transferring, press x. To select individual tracks/MP3 files/folders Press X/x to highlight the track/MP3 file/folder, then press to add a check in Step 5. To cancel the selection, highlight the track/MP3 file/folder, then press to remove the check. x For an audio CD Remaining space of the USB device USB TRANSFER 1 TRACK 01 TRACK 02 2 TRACK 03 3 TRACK 04 TRACK 05 TRACK 06 TRACK 07 TRACK 08 START ALL ALL Tracks to be transferred. x For a DATA CD/DATA DVD Remaining space of the USB device USB TRANSFER 2002_Remixes 01_Back_Seat_O... 02_One_Nights_... 03_Are_You_Ma... 04_I_Can_Lose_... 05_Soul_Survivo... 06_Strangers_B... 07_Stay_maxi_ve... START ALL ALL MP3 files/folders to be transferred. Transferring by single button press You can transfer tracks/MP3 files simply onto a USB device by using REC TO USB. 1 Load an audio CD/DATA CD/DATA DVD. 2 Press x. To transfer all tracks, skip to Step 4. To transfer a single track, follow the next Step. 3 Select the desired track/MP3 file, then press N. 4 Press REC TO USB on the unit. REC TO USB lights up and "READING" appears in the front panel display. Then, "PUSH PLAY" and the remaining space of the USB device appear alternately in the front panel display. 50US
-
 1
1 -
2
-
3
-
4
-
5
-
6
-
7
-
8
-
9
-
10
-
11
-
12
-
13
-
14
-
15
-
16
-
17
-
18
-
19
-
20
-
21
-
22
-
23
-
24
-
25
-
26
-
27
-
28
-
29
-
30
-
31
-
32
-
33
-
34
-
35
-
36
-
37
-
38
-
39
-
40
-
41
-
42
-
43
-
44
-
 45
45 -
 46
46 -
 47
47 -
 48
48 -
 49
49 -
 50
50 -
 51
51 -
 52
52 -
 53
53 -
 54
54 -
 55
55 -
56
-
57
-
58
-
59
-
60
-
61
-
62
-
63
-
64
-
65
-
66
-
67
-
68
-
69
-
70
-
71
-
72
-
73
-
74
-
75
-
76
 |
 |