Sony DAV-DZ175 Operating Instructions - Page 64
Troubleshooting
 |
View all Sony DAV-DZ175 manuals
Add to My Manuals
Save this manual to your list of manuals |
Page 64 highlights
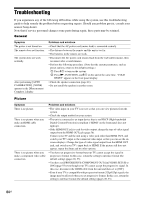
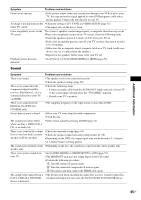
Troubleshooting If you experience any of the following difficulties while using the system, use this troubleshooting guide to help remedy the problem before requesting repairs. Should any problem persist, consult your nearest Sony dealer. Note that if service personnel changes some parts during repair, these parts may be retained. General Symptom The power is not turned on. The remote does not function. The system does not work normally. After performing [AUTO CALIBRATION], [NONE] appears in the [Measurement Complete.] display. Problems and solutions • Check that the AC power cord (mains lead) is connected securely. • The distance between the remote and the unit is too far. • The batteries in the remote are weak. • Disconnect the AC power cord (mains lead) from the wall outlet (mains), then reconnect after several minutes. • Perform the following procedure. (Note that the system parameters, such as preset stations, return to the default settings.) 1 Press "/1 to turn on the system. 2 Press N, FUNCTION, and "/1 on the unit at the same time. "COLD RESET" appears in the front panel display. • Check the speaker connection (page 21). • Do not install the speaker in another room. Picture Symptom There is no picture. There is no picture when you make an HDMI cable connection. There is no picture when you make a component video cable connection. Problems and solutions • The video input on your TV is not set so that you can view pictures from the system. • Check the output method on your system. • The unit is connected to an input device that is not HDCP (High-bandwidth Digital Content Protection) compliant ("HDMI" on the front panel does not light up). • If the HDMI OUT jack is used for video output, change the type of video signal output from the HDMI OUT jack (page 56). Connect your TV and the unit using a video jack other than HDMI OUT, and switch your TV's input to the connected video input so that you can see the onscreen displays. Change the type of video signal output from the HDMI OUT jack, and switch your TV's input back to HDMI. If the picture still does not appear, repeat the Steps and try other options. • You have set progressive format but your TV cannot accept the signal in progressive format. In this case, return the setting to interlace format (the default setting) (pages 28, 55). • You have set [PROGRESSIVE (COMPONENT OUT)] in [VIDEO SETUP] to [ON] (page 55) even though your TV cannot accept the progressive signal. In this case, disconnect the HDMI cable from the unit and then set to [OFF]. • Even if your TV is compatible with progressive format (525p/625p) signals, the image may be affected when you set progressive format. In this case, return the setting to interlace format (the default setting) (pages 28, 55). 64US
-
 1
1 -
2
-
3
-
4
-
5
-
6
-
7
-
8
-
9
-
10
-
11
-
12
-
13
-
14
-
15
-
16
-
17
-
18
-
19
-
20
-
21
-
22
-
23
-
24
-
25
-
26
-
27
-
28
-
29
-
30
-
31
-
32
-
33
-
34
-
35
-
36
-
37
-
38
-
39
-
40
-
41
-
42
-
43
-
44
-
45
-
46
-
47
-
48
-
49
-
50
-
51
-
52
-
53
-
54
-
55
-
56
-
57
-
58
-
 59
59 -
 60
60 -
 61
61 -
 62
62 -
 63
63 -
 64
64 -
 65
65 -
 66
66 -
 67
67 -
 68
68 -
 69
69 -
70
-
71
-
72
-
73
-
74
-
75
-
76
 |
 |