Sony DCR DVD301 Operating Instructions - Page 94
Connecting your camcorder to the computer, For Microsoft Windows XP users - dvd handycam
 |
UPC - 027242654792
View all Sony DCR DVD301 manuals
Add to My Manuals
Save this manual to your list of manuals |
Page 94 highlights
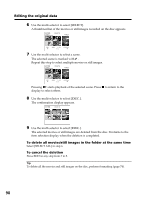
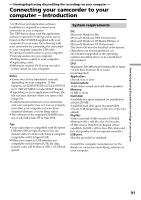
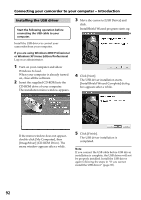
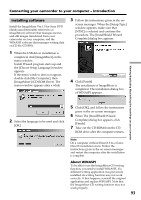
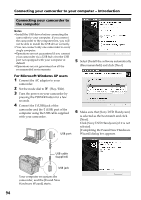
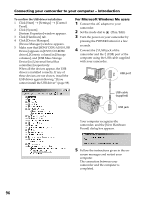
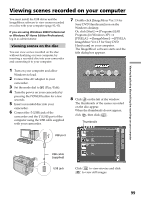
Connecting your camcorder to your computer - Introduction Connecting your camcorder to the computer Notes •Install the USB driver before connecting the camcorder to your computer. If you connect the camcorder to the computer first, you will not be able to install the USB driver correctly. •You can connect only one camcorder to every single computer. •Operations are not guaranteed if you connect your camcorder via a USB hub or to the USB port not equipped with your computer at default. •Operations are not guaranteed on all the recommended environments. 5 Select [Install the software automatically (Recommended)] and click [Next]. For Microsoft Windows XP users 1 Connect the AC adaptor to your camcorder. 2 Set the mode dial to (Play/Edit). 3 Turn the power on your camcorder by pressing the POWER button for a few seconds. 4 Connect the (USB) jack of the camcorder and the (USB) port of the computer using the USB cable supplied with your camcorder. USB port 6 Make sure that [Sony DVD Handycam] is selected as the best match and click [Next]. Click [Sony DVD Handycam] if it is not selected. [Completing the Found New Hardware Wizard] dialog box appears. USB cable (supplied) USB jack Your computer recognizes the camcorder, and the [Found New Hardware Wizard] starts. 94
-
 1
1 -
2
-
3
-
4
-
5
-
6
-
7
-
8
-
9
-
10
-
11
-
12
-
13
-
14
-
15
-
16
-
17
-
18
-
19
-
20
-
21
-
22
-
23
-
24
-
25
-
26
-
27
-
28
-
29
-
30
-
31
-
32
-
33
-
34
-
35
-
36
-
37
-
38
-
39
-
40
-
41
-
42
-
43
-
44
-
45
-
46
-
47
-
48
-
49
-
50
-
51
-
52
-
53
-
54
-
55
-
56
-
57
-
58
-
59
-
60
-
61
-
62
-
63
-
64
-
65
-
66
-
67
-
68
-
69
-
70
-
71
-
72
-
73
-
74
-
75
-
76
-
77
-
78
-
79
-
80
-
81
-
82
-
83
-
84
-
85
-
86
-
87
-
88
-
 89
89 -
 90
90 -
 91
91 -
 92
92 -
 93
93 -
 94
94 -
 95
95 -
 96
96 -
 97
97 -
 98
98 -
 99
99 -
100
-
101
-
102
-
103
-
104
-
105
-
106
-
107
-
108
-
109
-
110
-
111
-
112
-
113
-
114
-
115
-
116
-
117
-
118
-
119
-
120
-
121
-
122
-
123
-
124
-
125
-
126
-
127
-
128
-
129
-
130
-
131
-
132
-
133
-
134
-
135
-
136
-
137
-
138
-
139
-
140
-
141
-
142
-
143
-
144
-
145
-
146
-
147
-
148
 |
 |
