Sony DCR-SR40 Operating Guide - Page 17
Playback, Connecting to other devices, DISP/BATT INFO button - accessories
 |
UPC - 027242701496
View all Sony DCR-SR40 manuals
Add to My Manuals
Save this manual to your list of manuals |
Page 17 highlights
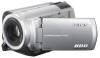
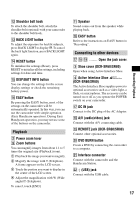
qs Shoulder belt hook To attach the shoulder belt, attach the shoulder belt (optional) with your camcorder to the shoulder belt hook. qd BACK LIGHT button To adjust the exposure for backlit subjects, press BACK LIGHT to display .. To cancel the back light function, press BACK LIGHT again. qf RESET button To initialize the settings (Reset), press RESET to initialize all the settings, including settings for date and time. qg DISP/BATT INFO button You can change the settings for the screen display settings or check the remaining battery power. qh EASY button By pressing the EASY button, most of the settings on the camcorder will be automatically operated. In this way, you can use the camcorder with simple operation (Easy Handycam operation). During Easy Handycam operation, you may not use some of the buttons on the camcorder. Playback 2 Power zoom lever 9 Zoom buttons You can magnify images from about 1.1 to 5 times the original size (Playback zoom). 1 Play back the image you want to magnify. 2 Magnify the image with T (Telephoto). A frame appears on the LCD screen. 3 Touch the portion you want to display in the center of the LCD screen. 4 Adjust the magnification with W (Wide angle)/T (Telephoto). To cancel, touch [END]. qa Speaker Sound comes out from the speaker while playing back. qh EASY button Refer to the instructions on EASY button in "Recording". Connecting to other devices qj qk ql ....... Open the jack cover. 3 Shoe cover (DCR-SR60/SR80) Open when using Active Interface Shoe. 4 Active Interface Shoe (DCR-SR60/SR80) The Active Interface Shoe supplies power to optional accessories such as a video light, a flash, or a microphone. The accessory can be turned on or off as you operate the POWER switch on your camcorder. qj DC IN jack Connect to the DC plug of the AC Adaptor. qk A/V (audio/video) jack Connect with the A/V connecting cable. ql REMOTE jack (DCR-SR60/SR80) Connect other optional accessories. w; DVD BURN button Create a DVD by connecting the camcorder to a computer. wa Interface connector Connect with the camcorder and the Handycam Station. ws (USB) jack Connect with the USB cable. 17 Recording/Playback
-
 1
1 -
2
-
3
-
4
-
5
-
6
-
7
-
8
-
9
-
10
-
11
-
 12
12 -
 13
13 -
 14
14 -
 15
15 -
 16
16 -
 17
17 -
 18
18 -
 19
19 -
 20
20 -
 21
21 -
 22
22 -
23
-
24
-
25
-
26
-
27
-
28
-
29
-
30
-
31
-
32
-
33
-
34
-
35
 |
 |
