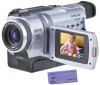
Sony DCR-TRV340 Operating Instructions - Page 6
Table of contents - accessories
 |
UPC - 027242600287
View all Sony DCR-TRV340 manuals
Add to My Manuals
Save this manual to your list of manuals |
Page 6 highlights
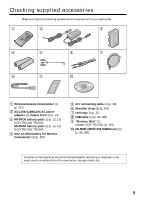
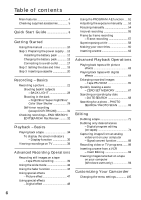
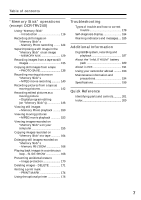
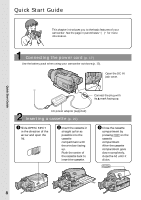
Table of contents Main features 4 Checking supplied accessories 5 Quick Start Guide 8 Getting Started Using this manual 10 Step 1 Preparing the power supply ... 12 Installing the battery pack 12 Charging the battery pack 13 Connecting to a wall outlet 17 Step 2 Setting the date and time ........ 18 Step 3 Inserting a cassette 20 Recording - Basics Recording a picture 21 Shooting backlit subjects - BACK LIGHT 28 Shooting in the dark - NightShot/Super NightShot/ Color Slow Shutter 29 Self-timer recording (except DCR-TRV240 31 Checking recordings - END SEARCH/ EDITSEARCH/Rec Review .......... 32 Playback - Basics Playing back a tape 34 To display the screen indicators - Display function 35 Viewing recordings on TV 38 Advanced Recording Operations Recording still images on a tape - Tape Photo recording 39 Using the wide mode 42 Using the fader function 44 Using special effects - Picture effect 47 Using special effects - Digital effect 48 Using the PROGRAM AE function .... 51 Adjusting the exposure manually ...... 53 Focusing manually 54 Interval recording 55 Frame by frame recording - Frame recording 57 Superimposing a title 58 Making your own titles 60 Inserting a scene 62 Advanced Playback Operations Playing back tapes with picture effects 63 Playing back tapes with digital effects 64 Enlarging recorded images - Tape PB ZOOM 65 Quickly locating a scene - ZERO SET MEMORY 67 Searching a recording by date - DATE SEARCH 68 Searching for a photo - PHOTO SEARCH/PHOTO SCAN 69 Editing Dubbing a tape 71 Dubbing only desired scenes - Digital program editing (on tapes 74 Capturing images from an analog video unit on your computer - Signal convert function 88 Recording video or TV programs ....... 89 Inserting a scene from a VCR - Insert Editing 92 Viewing images recorded on a tape on your computer (Windows users only 94 Customizing Your Camcorder Changing the menu settings 105 6
-
 1
1 -
 2
2 -
 3
3 -
 4
4 -
 5
5 -
 6
6 -
 7
7 -
 8
8 -
 9
9 -
 10
10 -
 11
11 -
 12
12 -
13
-
14
-
15
-
16
-
17
-
18
-
19
-
20
-
21
-
22
-
23
-
24
-
25
-
26
-
27
-
28
-
29
-
30
-
31
-
32
-
33
-
34
-
35
-
36
-
37
-
38
-
39
-
40
-
41
-
42
-
43
-
44
-
45
-
46
-
47
-
48
-
49
-
50
-
51
-
52
-
53
-
54
-
55
-
56
-
57
-
58
-
59
-
60
-
61
-
62
-
63
-
64
-
65
-
66
-
67
-
68
-
69
-
70
-
71
-
72
-
73
-
74
-
75
-
76
-
77
-
78
-
79
-
80
-
81
-
82
-
83
-
84
-
85
-
86
-
87
-
88
-
89
-
90
-
91
-
92
-
93
-
94
-
95
-
96
-
97
-
98
-
99
-
100
-
101
-
102
-
103
-
104
-
105
-
106
-
107
-
108
-
109
-
110
-
111
-
112
-
113
-
114
-
115
-
116
-
117
-
118
-
119
-
120
-
121
-
122
-
123
-
124
-
125
-
126
-
127
-
128
-
129
-
130
-
131
-
132
-
133
-
134
-
135
-
136
-
137
-
138
-
139
-
140
-
141
-
142
-
143
-
144
-
145
-
146
-
147
-
148
-
149
-
150
-
151
-
152
-
153
-
154
-
155
-
156
-
157
-
158
-
159
-
160
-
161
-
162
-
163
-
164
-
165
-
166
-
167
-
168
-
169
-
170
-
171
-
172
-
173
-
174
-
175
-
176
-
177
-
178
-
179
-
180
-
181
-
182
-
183
-
184
-
185
-
186
-
187
-
188
-
189
-
190
-
191
-
192
-
193
-
194
-
195
-
196
-
197
-
198
-
199
-
200
-
201
-
202
-
203
-
204
-
205
-
206
-
207
-
208
-
209
-
210
-
211
-
212
 |
 |