Sony DCR-TRV340 Operating Instructions - Page 88
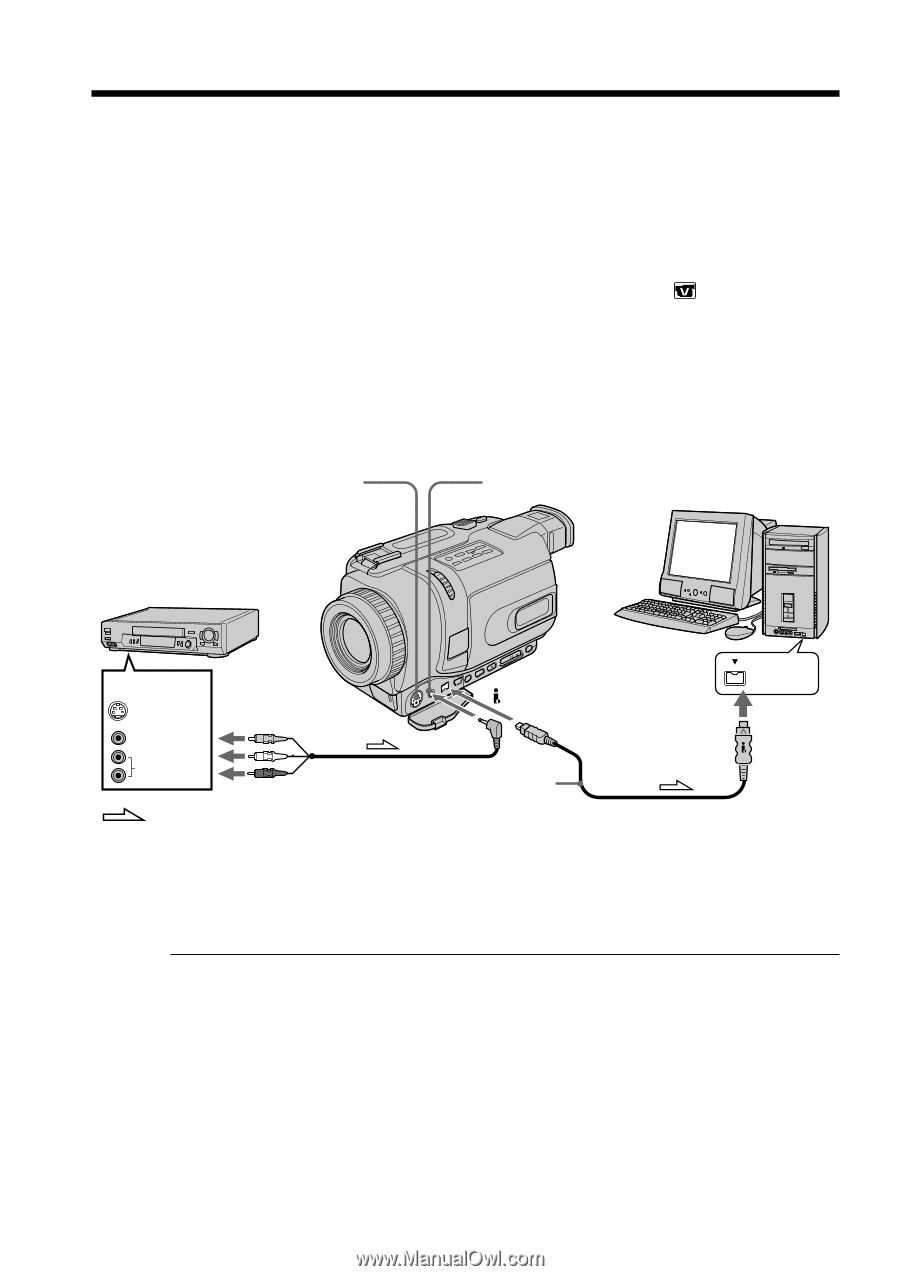
Capturing images from an analog video unit, on your computer, Signal convert function - software
 |
UPC - 027242600287
View all Sony DCR-TRV340 manuals
Add to My Manuals
Save this manual to your list of manuals |
Page 88 highlights
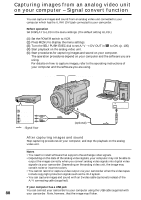
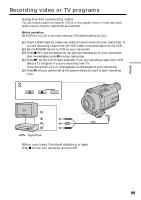
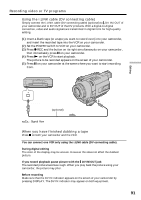
Capturing images from an analog video unit on your computer - Signal convert function You can capture images and sound from an analog video unit connected to your computer which has the i.LINK (DV) jack connected to your camcorder. Before operation Set DISPLAY to LCD in the menu settings. (The default setting is LCD.) (1) Set the POWER switch to VCR. (2) Press MENU to display the menu settings. (3) Turn the SEL/PUSH EXEC dial to set A/V t DV OUT in to ON. (p. 105) (4) Start playback on the analog video unit. (5) Start procedures for capturing images and sound on your computer. The operation procedures depend on your computer and the software you are using. For details on how to capture images, refer to the operating instructions of your computer and the software you are using. S VIDEO AUDIO/VIDEO VCR OUT S VIDEO VIDEO AUDIO : Signal flow DV IN/OUT (optional) i.LINK After capturing images and sound Stop capturing procedures on your computer, and stop the playback on the analog video unit. Notes •You need to install software that supports the exchange video signals. •Depending on the state of the analog video signals, your computer may not be able to output the images correctly when you convert analog video signals into digital video signals via your camcorder. Depending on the analog video unit, the image may contain noise or incorrect colors. •You cannot record or capture video output via your camcorder when the video tapes include copyright protection signals such as the ID-2 system. •You can capture images and sound with an S video cable (optional) instead of the A/V connecting cable (supplied). If your computer has a USB jack You can connect your camcorder to your computer using the USB cable supplied with 88 your camcorder. Note, however, that the image may flicker.
-
 1
1 -
2
-
3
-
4
-
5
-
6
-
7
-
8
-
9
-
10
-
11
-
12
-
13
-
14
-
15
-
16
-
17
-
18
-
19
-
20
-
21
-
22
-
23
-
24
-
25
-
26
-
27
-
28
-
29
-
30
-
31
-
32
-
33
-
34
-
35
-
36
-
37
-
38
-
39
-
40
-
41
-
42
-
43
-
44
-
45
-
46
-
47
-
48
-
49
-
50
-
51
-
52
-
53
-
54
-
55
-
56
-
57
-
58
-
59
-
60
-
61
-
62
-
63
-
64
-
65
-
66
-
67
-
68
-
69
-
70
-
71
-
72
-
73
-
74
-
75
-
76
-
77
-
78
-
79
-
80
-
81
-
82
-
 83
83 -
 84
84 -
 85
85 -
 86
86 -
 87
87 -
 88
88 -
 89
89 -
 90
90 -
 91
91 -
 92
92 -
 93
93 -
94
-
95
-
96
-
97
-
98
-
99
-
100
-
101
-
102
-
103
-
104
-
105
-
106
-
107
-
108
-
109
-
110
-
111
-
112
-
113
-
114
-
115
-
116
-
117
-
118
-
119
-
120
-
121
-
122
-
123
-
124
-
125
-
126
-
127
-
128
-
129
-
130
-
131
-
132
-
133
-
134
-
135
-
136
-
137
-
138
-
139
-
140
-
141
-
142
-
143
-
144
-
145
-
146
-
147
-
148
-
149
-
150
-
151
-
152
-
153
-
154
-
155
-
156
-
157
-
158
-
159
-
160
-
161
-
162
-
163
-
164
-
165
-
166
-
167
-
168
-
169
-
170
-
171
-
172
-
173
-
174
-
175
-
176
-
177
-
178
-
179
-
180
-
181
-
182
-
183
-
184
-
185
-
186
-
187
-
188
-
189
-
190
-
191
-
192
-
193
-
194
-
195
-
196
-
197
-
198
-
199
-
200
-
201
-
202
-
203
-
204
-
205
-
206
-
207
-
208
-
209
-
210
-
211
-
212
 |
 |