Sony DHG-HDD500 Operation Manual - Page 35
Changing TV channels with your HD DVR Remote Control
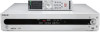 |
View all Sony DHG-HDD500 manuals
Add to My Manuals
Save this manual to your list of manuals |
Page 35 highlights
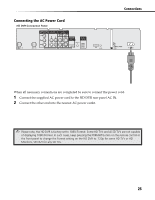
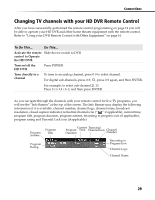
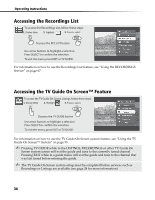
Connections Changing TV channels with your HD DVR Remote Control After you have successfully performed the remote control programming on page 12 you will be able to operate your HD DVR and other home theater equipment with the remote control. Refer to "Using your DVR Remote Control with Other Equipment" on page 16. To Do This... Do This... Activate the remote Slide device switch to DVR control to Operate the HD DVR Turn on/off the HD DVR Press POWER Tune directly to a channel To tune to an analog channel, press 0-9 to select channel. For digital sub-channels, press 0-9, , press 0-9 again, and then ENTER. For example, to select sub-channel 21.13. Press 2+1+ +1+3, and then press ENTER. As you navigate through the channels with your remote control for live TV programs, you will see the "Info Banner" at the top of the screen. The Info Banner may display the following information if it is available: channel number, channel logo, channel name, broadcast resolution, closed caption indicator, terrestrial channel icon (" " if applicable), current time, program title, program duration, program airtime, recording in progress icon (if applicable), program rating and Parental Lock icon (if applicable). Program Airtime Program Title Program Rating Current Terrestrial Program Time Channel Icon Channel Duration Number Recording in Progress Icon Channel Logo Channel Name 29
-
 1
1 -
2
-
3
-
4
-
5
-
6
-
7
-
8
-
9
-
10
-
11
-
12
-
13
-
14
-
15
-
16
-
17
-
18
-
19
-
20
-
21
-
22
-
23
-
24
-
25
-
26
-
27
-
28
-
29
-
 30
30 -
 31
31 -
 32
32 -
 33
33 -
 34
34 -
 35
35 -
 36
36 -
 37
37 -
 38
38 -
 39
39 -
 40
40 -
41
-
42
-
43
-
44
-
45
-
46
-
47
-
48
-
49
-
50
-
51
-
52
-
53
-
54
-
55
-
56
-
57
-
58
-
59
-
60
-
61
-
62
-
63
-
64
-
65
-
66
-
67
-
68
-
69
-
70
-
71
-
72
-
73
-
74
-
75
-
76
-
77
-
78
-
79
-
80
-
81
-
82
-
83
-
84
-
85
-
86
-
87
-
88
-
89
-
90
-
91
-
92
-
93
-
94
-
95
-
96
-
97
-
98
-
99
-
100
-
101
-
102
-
103
-
104
 |
 |
