Sony DIR-TC1 Instruction Manual - Page 9
Settings for the Speakers, TA.CAL MIC
 |
View all Sony DIR-TC1 manuals
Add to My Manuals
Save this manual to your list of manuals |
Page 9 highlights
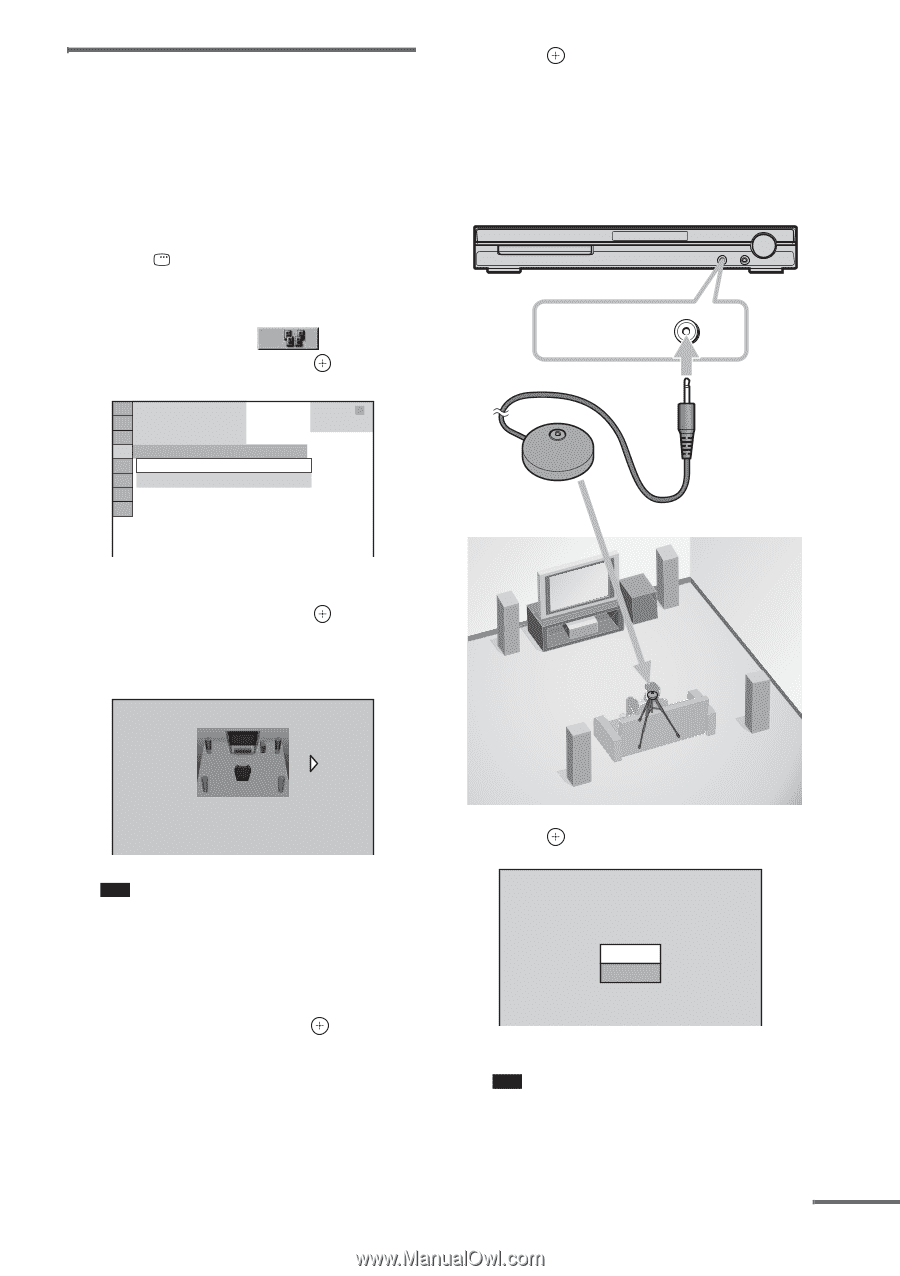
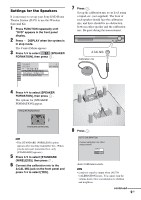
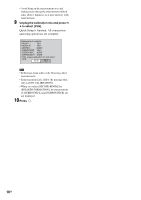
Settings for the Speakers It is necessary to set up your Sony DVD Home Theatre System (DAV) to use this Wireless Surround Kit. 1 Press FUNCTION repeatedly until "DVD" appears in the front panel display. 2 Press DISPLAY when the system is in stop mode. The Control Menu appears. 3 Press X/x to select [SPEAKER FORMATION], then press . 1 ( 4 4 ) 3 ( 2 8 ) T 0:03:04 SPEAKER FORMATION SPEAKER FORMATION AUTO CALIBRATION DVD VIDEO 7 Press . Set up the calibration mic at ear level using a tripod, etc. (not supplied). The front of each speaker should face the calibration mic, and there should be no obstruction between either speaker and the calibration mic. Be quiet during the measurement. A.CAL MIC Calibration mic 4 Press X/x to select [SPEAKER FORMATION], then press . The options for [SPEAKER FORMATION] appear. SPEAKER FORMATION STANDARD(WIRELESS) Note • The [STANDARD (WIRELESS)] option appears after inserting transmitter box. (When you do not insert transmitter box, only [STANDARD] appears.) 5 Press C/c to select [STANDARD (WIRELESS)], then press . 6 Connect the calibration mic to the A.CAL MIC jack on the front panel and press X/x to select [YES]. 8 Press . AUTO CALIBRATION Connect calibration mic. Start measurement? YES NO Auto Calibration starts. Note • Loud test sound is output when [AUTO CALIBRATION] starts. You cannot turn the volume down. Give consideration to children and neighbors. continued 9GB
-
 1
1 -
2
-
3
-
 4
4 -
 5
5 -
 6
6 -
 7
7 -
 8
8 -
 9
9 -
 10
10 -
 11
11 -
 12
12 -
 13
13 -
 14
14 -
15
-
16
-
17
-
18
-
19
-
20
-
21
-
22
-
23
-
24
-
25
-
26
-
27
-
28
-
29
-
30
-
31
-
32
 |
 |