Sony DSC T33 Operating Instructions - Page 32
Checking the last image you shot — Quick Review, Indicators on the LCD screen during shooting, Press - screen not working
 |
UPC - 027242670877
View all Sony DSC T33 manuals
Add to My Manuals
Save this manual to your list of manuals |
Page 32 highlights
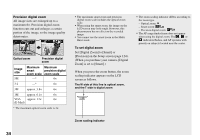
Auto Focus When you try to shoot a subject that is difficult to focus on, the AE/AF lock indicator changes to flashing slowly. In addition, the AE locked beep does not sound. The Auto Focus function may have difficulty working under the following conditions. In such cases, release the shutter button, then recompose the shot and focus again. • The subject is distant from the camera and dark. • The contrast between the subject and its background is poor. • The subject is seen through glass, such as a window. • A fast-moving subject. • The subject reflects or has a lustrous finish, such as a mirror or a luminous body. • A flashing subject. • A backlit subject. There are two Auto Focus functions: "AF range finder frame" which sets the focus position according to the subject position and size, and "AF mode" which sets the focus start/finish timing. See page 57 for details. 32 Checking the last image you shot - Quick Review 60min Review VGA 101 8/8 101-0029 2005 1 1 10:30PM RETURN Press () on the control button. To return to the normal shooting mode, press lightly on the shutter button or press () again. To delete the image displayed on the LCD screen 1 Press (Delete). 2 Select [Delete] with on the control button, then press . The image is deleted. • The image may appear rough right after playback starts due to the image processing. Indicators on the LCD screen during shooting Each time you press , the display changes in the following order. • For a detailed description of the indicators, see page 133. • For a detailed description of the histogram, see page 61. • You can extend the battery remaining time by turning off the LCD backlight. • When shooting/viewing movies, the status of the LCD screen changes as follows: Indicators off LCD backlight off Indicators on • This setting is maintained even when the power is turned off.
-
 1
1 -
2
-
3
-
4
-
5
-
6
-
7
-
8
-
9
-
10
-
11
-
12
-
13
-
14
-
15
-
16
-
17
-
18
-
19
-
20
-
21
-
22
-
23
-
24
-
25
-
26
-
 27
27 -
 28
28 -
 29
29 -
 30
30 -
 31
31 -
 32
32 -
 33
33 -
 34
34 -
 35
35 -
 36
36 -
 37
37 -
38
-
39
-
40
-
41
-
42
-
43
-
44
-
45
-
46
-
47
-
48
-
49
-
50
-
51
-
52
-
53
-
54
-
55
-
56
-
57
-
58
-
59
-
60
-
61
-
62
-
63
-
64
-
65
-
66
-
67
-
68
-
69
-
70
-
71
-
72
-
73
-
74
-
75
-
76
-
77
-
78
-
79
-
80
-
81
-
82
-
83
-
84
-
85
-
86
-
87
-
88
-
89
-
90
-
91
-
92
-
93
-
94
-
95
-
96
-
97
-
98
-
99
-
100
-
101
-
102
-
103
-
104
-
105
-
106
-
107
-
108
-
109
-
110
-
111
-
112
-
113
-
114
-
115
-
116
-
117
-
118
-
119
-
120
-
121
-
122
-
123
-
124
-
125
-
126
-
127
-
128
-
129
-
130
-
131
-
132
-
133
-
134
-
135
-
136
-
137
-
138
-
139
-
140
-
141
-
142
-
143
-
144
 |
 |
