Sony DSC T33 Operating Instructions - Page 90
Installing the USB driver - installation
 |
UPC - 027242670877
View all Sony DSC T33 manuals
Add to My Manuals
Save this manual to your list of manuals |
Page 90 highlights
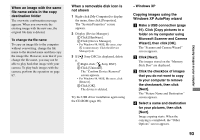
Installing the USB driver When using Windows XP, you need not install the USB driver. Once the USB driver is installed, you need not install the USB driver. Turn on your computer, and insert the CD-ROM (supplied) into the CD-ROM drive. Do not connect your camera to your computer at this time. The install menu screen appears. If it does not appear, doubleclick (My Computer) (PICTUREPACKAGE) in that order. • When also using the supplied image utility software "Picture Package", click [Picture Package]. The USB driver will be installed when "Picture Package" is installed (page 97). • When the computer is in use, shut down all application software before you install the USB driver. Click [USB Driver] on the title screen. Click [Yes, I want to restart my computer now], then click [Finish]. The "InstallShield Wizard" screen appears. Click [Next]. Your computer restarts. Then, you can establish USB connection. Remove the CD-ROM. The USB driver installation starts. When the installation is completed, the screen informs you of completion. 90
-
 1
1 -
2
-
3
-
4
-
5
-
6
-
7
-
8
-
9
-
10
-
11
-
12
-
13
-
14
-
15
-
16
-
17
-
18
-
19
-
20
-
21
-
22
-
23
-
24
-
25
-
26
-
27
-
28
-
29
-
30
-
31
-
32
-
33
-
34
-
35
-
36
-
37
-
38
-
39
-
40
-
41
-
42
-
43
-
44
-
45
-
46
-
47
-
48
-
49
-
50
-
51
-
52
-
53
-
54
-
55
-
56
-
57
-
58
-
59
-
60
-
61
-
62
-
63
-
64
-
65
-
66
-
67
-
68
-
69
-
70
-
71
-
72
-
73
-
74
-
75
-
76
-
77
-
78
-
79
-
80
-
81
-
82
-
83
-
84
-
 85
85 -
 86
86 -
 87
87 -
 88
88 -
 89
89 -
 90
90 -
 91
91 -
 92
92 -
 93
93 -
 94
94 -
 95
95 -
96
-
97
-
98
-
99
-
100
-
101
-
102
-
103
-
104
-
105
-
106
-
107
-
108
-
109
-
110
-
111
-
112
-
113
-
114
-
115
-
116
-
117
-
118
-
119
-
120
-
121
-
122
-
123
-
124
-
125
-
126
-
127
-
128
-
129
-
130
-
131
-
132
-
133
-
134
-
135
-
136
-
137
-
138
-
139
-
140
-
141
-
142
-
143
-
144
 |
 |
