Sony DSC T33 Operating Instructions - Page 78
WhEn [´sB ConnEcT] i² noT ²ET, ²crEEn, sElEcT ThE dE²irEd PrinTing, TyPE wiTh, ThEn PrE²²
 |
UPC - 027242670877
View all Sony DSC T33 manuals
Add to My Manuals
Save this manual to your list of manuals |
Page 78 highlights
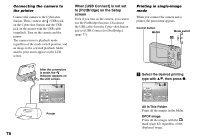
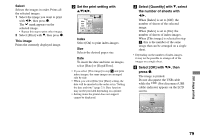
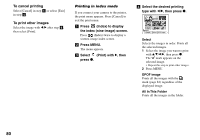
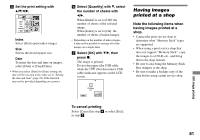
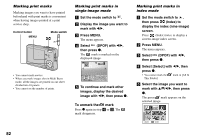
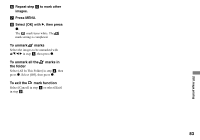
Connecting the camera to the printer Connect the camera to the Cyber-shot Station. Then, connect the (USB) jack on the Cyber-shot Station and the USB jack on the printer with the USB cable (supplied). Turn on the camera and the printer. The camera turns to playback mode regardless of the mode switch position, and an image in the selected playback folder and the print menu appear on the LCD screen. When [USB Connect] is not set to [PictBridge] on the Setup screen Even if you turn on the camera, you cannot use the PictBridge function. Disconnect the USB cable from the Cyber-shot Station and set [USB Connect] to [PictBridge]. (page 77) Printing in single-image mode When you connect the camera and a printer, the print menu appears. Control button MENU Mode switch 78 After the connection is made, the indicator appears on the LCD screen. Print All In This Folder DPOF image Select This image Cancel 1M 101 2/9 Printer Select the desired printing type with /, then press . Print All In This Folder DPOF image Select This image Cancel 1M 101 2/9 All In This Folder Prints all the images in the folder. DPOF image Prints all the images with the mark (page 82) regardless of the displayed image.
-
 1
1 -
2
-
3
-
4
-
5
-
6
-
7
-
8
-
9
-
10
-
11
-
12
-
13
-
14
-
15
-
16
-
17
-
18
-
19
-
20
-
21
-
22
-
23
-
24
-
25
-
26
-
27
-
28
-
29
-
30
-
31
-
32
-
33
-
34
-
35
-
36
-
37
-
38
-
39
-
40
-
41
-
42
-
43
-
44
-
45
-
46
-
47
-
48
-
49
-
50
-
51
-
52
-
53
-
54
-
55
-
56
-
57
-
58
-
59
-
60
-
61
-
62
-
63
-
64
-
65
-
66
-
67
-
68
-
69
-
70
-
71
-
72
-
 73
73 -
 74
74 -
 75
75 -
 76
76 -
 77
77 -
 78
78 -
 79
79 -
 80
80 -
 81
81 -
 82
82 -
 83
83 -
84
-
85
-
86
-
87
-
88
-
89
-
90
-
91
-
92
-
93
-
94
-
95
-
96
-
97
-
98
-
99
-
100
-
101
-
102
-
103
-
104
-
105
-
106
-
107
-
108
-
109
-
110
-
111
-
112
-
113
-
114
-
115
-
116
-
117
-
118
-
119
-
120
-
121
-
122
-
123
-
124
-
125
-
126
-
127
-
128
-
129
-
130
-
131
-
132
-
133
-
134
-
135
-
136
-
137
-
138
-
139
-
140
-
141
-
142
-
143
-
144
 |
 |
