Sony DSCP31 Operating Instructions - Page 87
Personal computers continued, Memory Stick, Others
 |
UPC - 027242603325
View all Sony DSCP31 manuals
Add to My Manuals
Save this manual to your list of manuals |
Page 87 highlights
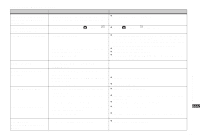
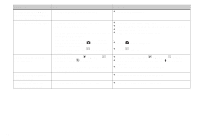
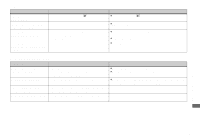
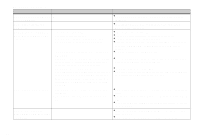
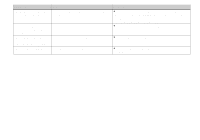
Personal computers (continued) Symptom The image is affected by noise when you play back an image on a personal computer. You cannot print an image. Cause • You are playing back the file directly from the "Memory Stick." - Solution p Copy the file to the hard disk of the personal computer and then play the file back from the hard disk (page 80). p Check the printer settings. p Click on HELP files for the "PIXELA ImageMixer for Sony" software. "Memory Stick" Symptom You cannot insert a "Memory Stick." You cannot record on a "Memory Stick." You cannot format a "Memory Stick." You have formatted a "Memory Stick" by mistake. Cause • You are inserting it backwards. Solution p Insert it from the right side (page 23). • The write-protect tab on the "Memory Stick" is set to the LOCK position. • The "Memory Stick" is full. • The write-protect tab on the "Memory Stick" is set to the LOCK position. • All the images on the "Memory Stick" are deleted by formatting. p Change the LOCK position (page 100). p Delete unnecessary images (page 39). p Change the LOCK position (page 100). p Set the "Memory Stick" write-protect tab to the LOCK position (page 100). Troubleshooting Others Symptom The camera doesn't work, no operations can be performed. Cause • The battery level is low or zero (The indicator appears.). • The AC power adaptor is not connected securely. • The built-in microcomputer is not working properly. Solution p Charge the battery (page 14). p Connect it securely to the DC IN jack of your camera and to a wall outlet (mains) (page 19). p Disconnect, and then, after one minute, reconnect all power sources. Then turn the power on and check that the camera works properly. 87
-
 1
1 -
2
-
3
-
4
-
5
-
6
-
7
-
8
-
9
-
10
-
11
-
12
-
13
-
14
-
15
-
16
-
17
-
18
-
19
-
20
-
21
-
22
-
23
-
24
-
25
-
26
-
27
-
28
-
29
-
30
-
31
-
32
-
33
-
34
-
35
-
36
-
37
-
38
-
39
-
40
-
41
-
42
-
43
-
44
-
45
-
46
-
47
-
48
-
49
-
50
-
51
-
52
-
53
-
54
-
55
-
56
-
57
-
58
-
59
-
60
-
61
-
62
-
63
-
64
-
65
-
66
-
67
-
68
-
69
-
70
-
71
-
72
-
73
-
74
-
75
-
76
-
77
-
78
-
79
-
80
-
81
-
 82
82 -
 83
83 -
 84
84 -
 85
85 -
 86
86 -
 87
87 -
 88
88 -
 89
89 -
 90
90 -
 91
91 -
 92
92 -
93
-
94
-
95
-
96
-
97
-
98
-
99
-
100
-
101
-
102
-
103
-
104
-
105
-
106
-
107
-
108
 |
 |
