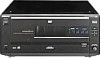
Sony DVP-CX850D Operating Instructions - Page 12
Channel Surround Hookups, To enjoy Dolby Digital surr, ound sound by, connecting the player to a r - dvd
 |
View all Sony DVP-CX850D manuals
Add to My Manuals
Save this manual to your list of manuals |
Page 12 highlights
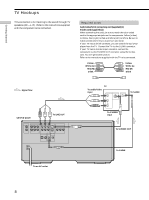
5.1 Channel Surround Hookups Getting Started Some DVDs have a sound track with up to 5.1 channels recorded in Dolby* Digital format. Using a receiver (amplifier) having 5.1 channel inputs and the 5 (+1) speakers, you can enjoy more real audio presence in the comfort of your own home. "5 channel" stands for the 2 front speakers (Left and Right), 2 rear speakers (Left and Right) and 1 center speaker. The "0.1 channel" (+1) stands for the subwoofer which outputs the bass. Even if you have fewer than 5 (+1) speakers, the player distributes the output signal to the speakers appropriately. This player has VIRTUAL 3D SURROUND mode. You can use the 3D sound imaging to shift the sound of the rear speakers away from the actual speaker position (VIRTUAL REAR SHIFT) or to create 3 sets of virtual rear speakers from 1 set of actual rear speakers (VIRTUAL MULTI REAR). For details on the VIRTUAL 3D SURROUND mode, see page 48. Speaker placement For the best possible surround sound, we recommend the following conditions. • Use higher performance speakers. • Use rear and center speakers that match your front speakers in size and performance. • All speakers should be the same distance from the listening position. • Place the subwoofer between the front (L, R) speakers if possible. Note Do not place the center or rear speakers farther away from the listening position than the front speakers. Required cords Audio cords (not supplied) Two for the 5.1CH OUTPUT FRONT and REAR jacks White (L) Red (R) White (L) Red (R) Monaural audio cords (not supplied) Two for the 5.1CH OUTPUT CENTER and WOOFER jacks Black S video cord (supplied) One for the S VIDEO OUT jacks Black Notes • Do not connect the power cord to an AC outlet or press the POWER switch before completing all connections. • The cord connectors should be fully inserted into the jacks. Loose connection may cause hum and noise. • Jacks and plugs of the connecting cords are color-coded as follows: Red jacks and plugs: Right audio channel White jacks and plugs: Left audio channel You can use either red or white cables to connect the center speaker and subwoofer. • When you connect the component via the DIGITAL OUT OPTICAL or COAXIAL connector using an optical or coaxial digital connecting cord (not supplied), see page 11. Setups for the player Some setups are necessary for the player depending on the components to be connected. Use the setup display or the Control Menu display to change the various settings. For details on using the setup display, see page 55. For details on enjoying Digital Cinema Sound, see page 48. • To enjoy Dolby Digital surorund sound by connecting the player to aecreiver (amplifier) with 5.1 channel inputs Set each speaker position or distance, etc. See page 65. * Manufactured under license from Dolby Laboratories. "Dolby," "AC-3," "Pro Logic" and the double-D symbol a are trademarks of Dolby Laboratories. Confidential Unpublished Works. ©1992-1997 Dolby Laboratories, Inc. All rights reserved. 12
-
 1
1 -
2
-
3
-
4
-
5
-
6
-
 7
7 -
 8
8 -
 9
9 -
 10
10 -
 11
11 -
 12
12 -
 13
13 -
 14
14 -
 15
15 -
 16
16 -
 17
17 -
18
-
19
-
20
-
21
-
22
-
23
-
24
-
25
-
26
-
27
-
28
-
29
-
30
-
31
-
32
-
33
-
34
-
35
-
36
-
37
-
38
-
39
-
40
-
41
-
42
-
43
-
44
-
45
-
46
-
47
-
48
-
49
-
50
-
51
-
52
-
53
-
54
-
55
-
56
-
57
-
58
-
59
-
60
-
61
-
62
-
63
-
64
-
65
-
66
-
67
-
68
-
69
-
70
-
71
-
72
-
73
-
74
-
75
-
76
-
77
-
78
-
79
-
80
-
81
-
82
-
83
-
84
 |
 |
