Sony KDL-32N4000 Operating Instructions - Page 9
Installing the Wall-Mount Bracket, Mounting Hooks, Installation dimensions table - parts
 |
View all Sony KDL-32N4000 manuals
Add to My Manuals
Save this manual to your list of manuals |
Page 9 highlights
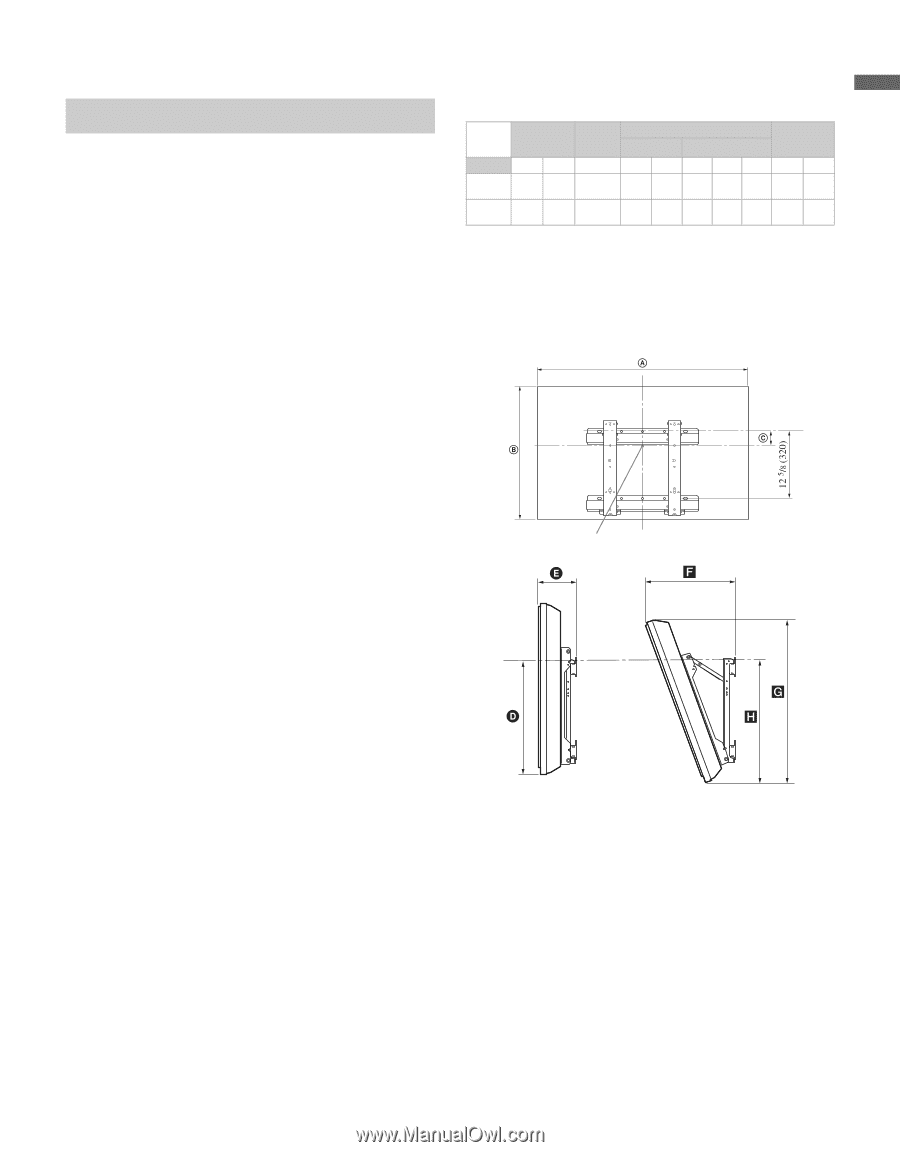
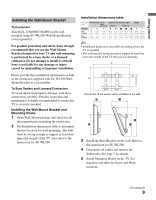
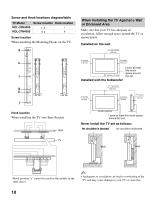
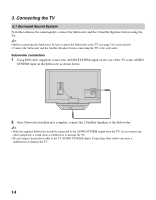
Getting Started Installing the Wall-Mount Bracket To Customers Your KDL-32N4000/37N4000 can be wallmounted using SU-WL500 Wall-Mount Bracket (sold separately). For product protection and safety, Sony strongly recommends that you use the Wall-Mount Bracket designed for your TV and wall-mounting is performed by a Sony dealer or a licensed contractor. Do not attempt to install it yourself. Sony is not liable for any damage or injury caused by mishandling or improper installation. Please provide this installation information as well as the instruction supplied with SU-WL500 WallMount Bracket to your installer. To Sony Dealers and Licensed Contractors To avoid injury and property damage, read these instructions carefully. Periodic inspection and maintenance is highly recommended to ensure that TV is securely mounted. Installing the Wall-Mount Bracket and Mounting Hooks 1 Open Wall-Mount package and check for all the required parts including the instruction. 2 See Installation dimensions table to determine the best location for wall-mounting. The wall must be strong enough to support at least four times the weight of the TV. Also refer to the instruction for SU-WL500. Installation dimensions table Unit: inches TV Dimensions Screen Length for each mounting angle (mm) center dimensions Angle (0°) Angle (20°) Weight TV Model A B C D E FGH TV ×4 KDL32N4000 36 21 1/2 (912) (543) 6 5/8 (168) 18 1/2 6 3/8 12 1/4 20 1/8 20 29 lb. 115 lb. (467) (160) (309) (509) (505) (13.0 kg) (52.0 kg) KDL- 40 1/2 24 37N4000 (1,028) (608) 5 1/2 (139) 18 1/2 6 7/8 13 1/2 22 1/2 20 1/8 38 lb. 150 lb. (467) (172) (342) (570) (509) (17.0 kg) (68.0 kg) ~ • Installation dimensions may differ according to how the TV is installed. • The wall must be strong enough to support at least four times the weight of the TV that you are installing. Center line of the screen when installed on the wall 3 Install the Base Bracket on the wall. Refer to the instruction for SU-WL500. 4 Disconnect all cables and remove the Subwoofer. See page 7 for details. 5 Install Mounting Hooks on the TV. See diagrams and table for Screw and Hook locations. (Continued) 9
-
 1
1 -
2
-
3
-
 4
4 -
 5
5 -
 6
6 -
 7
7 -
 8
8 -
 9
9 -
 10
10 -
 11
11 -
 12
12 -
 13
13 -
 14
14 -
15
-
16
-
17
-
18
-
19
-
20
-
21
-
22
-
23
-
24
-
25
-
26
-
27
-
28
-
29
-
30
-
31
-
32
-
33
-
34
-
35
-
36
-
37
-
38
-
39
-
40
-
41
-
42
-
43
-
44
-
45
-
46
-
47
-
48
 |
 |