Sony KDL-40XBR2 Operating Instructions - Page 21
Basic Operations, Remote Control - features
 |
UPC - 027242696136
View all Sony KDL-40XBR2 manuals
Add to My Manuals
Save this manual to your list of manuals |
Page 21 highlights
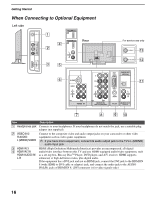
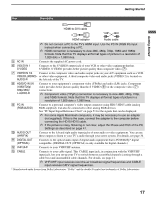
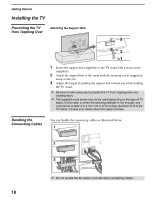
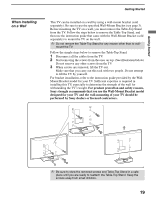
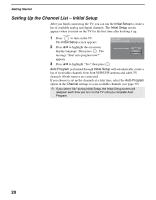
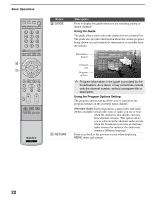
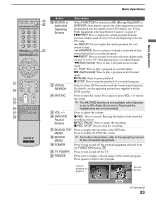
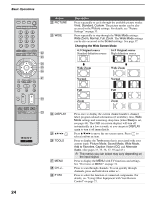
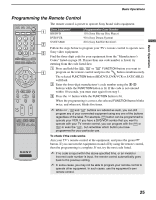
Basic Operations Basic Operations Remote Control Button 1 TV/VIDEO 2 SLEEP 3 FUNCTION Buttons 4 0 - 9, ENT 5 6 JUMP 7 ANT 8 SURROUND 9 SOUND Description Press repeatedly to cycle through the video inputs. ✍ See page 43 for information on setting up the video input labels, including the Skip function. Press repeatedly until the TV displays the time in minutes (Off, 15, 30, 45, 60, 90 or 120) that you want the TV to remain on before shutting off. To cancel Sleep, press SLEEP repeatedly until Off appears. The FUNCTION button indicator lights up momentarily when pressed to show which external equipment the remote control is operating. When the remote control is set to operate the external equipment, these buttons will operate the equipment you choose. You must first press one of these FUNCTION buttons to operate the corresponding equipment. See page 25 for programming the remote control. Press 0 - 9 to select a channel; the channel changes after two seconds. Press ENT to change channels immediately. Use with the 0-9 and ENT buttons to select digital channels. For example, to enter 2.1, press 2 , , 1 and ENT. Press to jump back and forth between two channels. The TV alternates between the current channel and the last channel that was selected. Press to change between the VHF/UHF input and the CABLE input. Press to select TruSurround XT audio effect or Off to turn this feature off. Press to cycle through different sound settings: Dynamic for enhanced treble and bass, Standard for spoken dialog and Custom for flat setting. ✍ The 5 button, CH + button and PLAY button have a tactile dot. Use the tactile dot as a reference when operating the TV. ✍ Insert two size AA (R6) batteries (supplied) by matching the e and E on the batteries to the diagram inside the remote control's battery compartment. , (Continued) 21
-
 1
1 -
2
-
3
-
4
-
5
-
6
-
7
-
8
-
9
-
10
-
11
-
12
-
13
-
14
-
15
-
 16
16 -
 17
17 -
 18
18 -
 19
19 -
 20
20 -
 21
21 -
 22
22 -
 23
23 -
 24
24 -
 25
25 -
 26
26 -
27
-
28
-
29
-
30
-
31
-
32
-
33
-
34
-
35
-
36
-
37
-
38
-
39
-
40
-
41
-
42
-
43
-
44
-
45
-
46
-
47
-
48
-
49
-
50
-
51
-
52
-
53
-
54
-
55
-
56
 |
 |
