Sony KE-42TS2U Operating Instructions - Page 6
Installing and Connecting the TV, Unpacking, Inserting Batteries into the Remote Control - no video
 |
View all Sony KE-42TS2U manuals
Add to My Manuals
Save this manual to your list of manuals |
Page 6 highlights
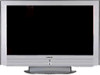
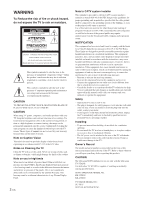
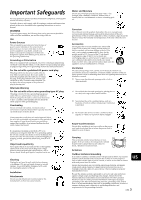
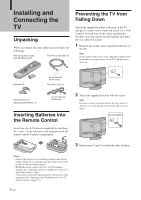
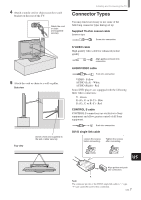
Installing and Connecting the TV Installing and Connecting the TV Unpacking When you unpack this unit, make sure it includes the following: Remote control (1) and size AA batteries (2) 75-ohm coaxial cable (1) Preventing the TV from Falling Down Attach the supplied brackets to the rear of the TV, and pass a sturdy cord or chain and attach it to a wall or pillar. Consult your dealer when attaching the brackets, since the screws for the brackets also hold the rear cabinet in a place. 1 Remove one of the screws attached at the rear of the TV. Note Do not remove both screws at the same time as these screws secure the rear cabinet. Never use the TV with the screws removed. Brackets (2) Do not remove ferrite cores. AC power cord (1) Cleaning cloth (1) Operating Instructions (1) Do not remove ferrite core. Inserting Batteries into the Remote Control Insert two size AA batteries (supplied) by matching the + and - on the batteries to the diagram inside the remote control's battery compartment. 2 Attach the supplied brackets with the screw. Note Be sure to use the screw that attaches the rear cabinet. A different screw may damage the TV and result in electric shock. Bracket (supplied) 3 Repeat steps 1 and 2 to attach the other brackets. Notes • Remove the batteries to avoid damage from possible battery leakage whenever you anticipate that the remote control will not be used for an extended period. • Handle the remote control with care. Avoid dropping it, getting it wet, or placing it in direct sunlight, near a heater or where the humidity is high. • Your remote control can be programmed to operate most video equipment. (See "Operating Video Equipment with Your TV Remote Control" on page 33.) 6 (US)
-
 1
1 -
 2
2 -
 3
3 -
 4
4 -
 5
5 -
 6
6 -
 7
7 -
 8
8 -
 9
9 -
 10
10 -
 11
11 -
 12
12 -
13
-
14
-
15
-
16
-
17
-
18
-
19
-
20
-
21
-
22
-
23
-
24
-
25
-
26
-
27
-
28
-
29
-
30
-
31
-
32
-
33
-
34
-
35
-
36
-
37
-
38
-
39
-
40
-
41
-
42
-
43
-
44
-
45
-
46
-
47
-
48
-
49
-
50
-
51
-
52
-
53
-
54
-
55
-
56
-
57
-
58
-
59
-
60
-
61
-
62
-
63
-
64
-
65
-
66
-
67
-
68
-
69
-
70
-
71
-
72
-
73
-
74
-
75
-
76
-
77
-
78
-
79
-
80
-
81
-
82
-
83
-
84
-
85
-
86
-
87
-
88
-
89
-
90
-
91
-
92
-
93
-
94
-
95
-
96
-
97
-
98
-
99
-
100
-
101
-
102
-
103
-
104
-
105
-
106
-
107
-
108
-
109
-
110
-
111
-
112
-
113
-
114
-
115
-
116
-
117
-
118
-
119
-
120
-
121
-
122
-
123
-
124
-
125
-
126
-
127
-
128
-
129
-
130
-
131
-
132
-
133
-
134
-
135
-
136
-
137
-
138
-
139
-
140
-
141
-
142
-
143
-
144
-
145
-
146
-
147
-
148
-
149
-
150
-
151
-
152
-
153
-
154
-
155
-
156
-
157
-
158
-
159
-
160
-
161
-
162
-
163
-
164
-
165
-
166
-
167
-
168
-
169
-
170
-
171
-
172
-
173
-
174
-
175
-
176
-
177
-
178
-
179
-
180
-
181
-
182
-
183
-
184
-
185
-
186
-
187
-
188
 |
 |