Sony KP-51WS510 Operating Instructions - Page 30
Connecting an AV Receiver, Video Label
 |
View all Sony KP-51WS510 manuals
Add to My Manuals
Save this manual to your list of manuals |
Page 30 highlights
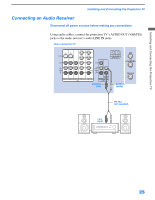
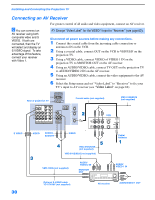
Installing and Connecting the Projection TV Connecting an AV Receiver For greater control of all audio and video equipment, connect an AV receiver. z You can connect an AV receiver using both composite video and S VIDEO. If both are connected, then the TV will detect and display an S VIDEO signal. To take advantage of this feature, connect your receiver with Video 1. ✍ Change "Video Label" for the VIDEO 1 input to "Receiver" (see page 62). Disconnect all power sources before making any connections. 1 Connect the coaxial cable from the incoming cable connection or antenna to IN on the VCR. 2 Using a coaxial cable, connect OUT on the VCR to VHF/UHF on the projection TV. 3 Using a VIDEO cable, connect VIDEO of VIDEO 1 IN on the projection TV to MONITOR OUT on the AV receiver. 4 Using an AUDIO/VIDEO cable, connect TV OUT on the projection TV to AUDIO/VIDEO 2 IN on the AV receiver. 5 Using an AUDIO/VIDEO cable, connect the video equipment to the AV receiver. 6 Select the Setup menu and set "Video Label" to "Receiver" to fix your TV's input to AV receiver (see "Video Label" on page 62). Rear of projection TV Coaxial cable (not supplied) VMC-810S/820S (not supplied) VCR S VIDEO 30 VIDEO AUDIO-L AUDIO-R VIDEO VMC-810S/820S (not supplied) VMC-810S/820S (not supplied) VMC-10HG (not supplied) AUDIO/ VIDEO 2 IN MONITOR OUT Cable/ Antenna AUDIO/ VIDEO 1 IN Optional S VIDEO cable YC-15V/30V (not supplied) AV receiver AUDIO/VIDEO 1 OUT
-
 1
1 -
2
-
3
-
4
-
5
-
6
-
7
-
8
-
9
-
10
-
11
-
12
-
13
-
14
-
15
-
16
-
17
-
18
-
19
-
20
-
21
-
22
-
23
-
24
-
 25
25 -
 26
26 -
 27
27 -
 28
28 -
 29
29 -
 30
30 -
 31
31 -
 32
32 -
 33
33 -
 34
34 -
 35
35 -
36
-
37
-
38
-
39
-
40
-
41
-
42
-
43
-
44
-
45
-
46
-
47
-
48
-
49
-
50
-
51
-
52
-
53
-
54
-
55
-
56
-
57
-
58
-
59
-
60
-
61
-
62
-
63
-
64
-
65
-
66
-
67
-
68
-
69
-
70
-
71
-
72
-
73
-
74
-
75
-
76
-
77
-
78
-
79
-
80
-
81
-
82
-
83
 |
 |
