Sony KV-36HS500 Operating Instructions - Page 42
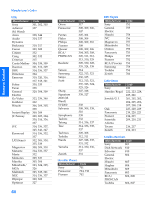
SETUP, Remote Control, DISPLAY, SLEEP, Sleep Off, ENTER, FAVORITES, MTS/SAP, Stereo, Auto SAP, FREEZE
 |
View all Sony KV-36HS500 manuals
Add to My Manuals
Save this manual to your list of manuals |
Page 42 highlights
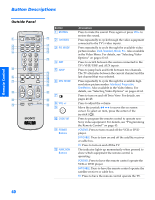
SETUP Setup Remote Control Button qd DISPLAY qf SLEEP qg 0 - 9 ENTER Description Press once to display the current channel number and current time and channel label (if set). Press again to turn Display off. Press repeatedly until the TV displays the time in minutes (15, 30, 45, 60, or 90) that you want the TV to remain on before shutting off automatically. To cancel press until Sleep Off appears. While the Sleep feature is set, press once to display the remaining time. Press 0 - 9 to select a channel; the channel changes after 3 seconds. Press ENTER to change channels immediately. qh FAVORITES Press to display the Favorite Channels list. For details, see page 49. qj MTS/SAP Press repeatedly to cycle through the Multi-channel TV Sound (MTS) options: Stereo, Auto SAP (Second Audio Program), and Mono. Also available in the Audio Menu. For details, see "Using the Audio Menu" on page 64. qk FREEZE Press to freeze the picture. Press again to restore the picture. For details, see page 50. ql Press repeatedly to step through the Audio Effect options. Also available in the Audio Menu. For details, see page 64. w; MENU Press to display the Menu. Press again to exit from the Menu. For details, see "Using the Menus" on page 61. wa CH +/- Press to scan through channels. To scan quickly through channels, press and hold down either CH button. ws MEMORY STICK Press to display the Memory Stick Menu. For details, see "Using the Memory Stick Picture Viewer" on page 51. wd AV 1 2 3 DVD Use the A/V slide switch to control connected video equipment. You can program one video source for each switch position. For details, see "Programming the Remote Control" on page 43. SETUP SETUP SETUP 41
-
 1
1 -
2
-
3
-
4
-
5
-
6
-
7
-
8
-
9
-
10
-
11
-
12
-
13
-
14
-
15
-
16
-
17
-
18
-
19
-
20
-
21
-
22
-
23
-
24
-
25
-
26
-
27
-
28
-
29
-
30
-
31
-
32
-
33
-
34
-
35
-
36
-
 37
37 -
 38
38 -
 39
39 -
 40
40 -
 41
41 -
 42
42 -
 43
43 -
 44
44 -
 45
45 -
 46
46 -
 47
47 -
48
-
49
-
50
-
51
-
52
-
53
-
54
-
55
-
56
-
57
-
58
-
59
-
60
-
61
-
62
-
63
-
64
-
65
-
66
-
67
-
68
-
69
-
70
-
71
-
72
-
73
-
74
-
75
-
76
-
77
-
78
-
79
-
80
-
81
-
82
-
83
-
84
-
85
-
86
-
87
 |
 |
