Sony MHC-ECL99BT Mode d’emploi - Page 11
Inserting batteries, Setting the clock, About the power management, Getting Started - size
 |
View all Sony MHC-ECL99BT manuals
Add to My Manuals
Save this manual to your list of manuals |
Page 11 highlights
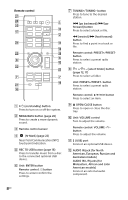
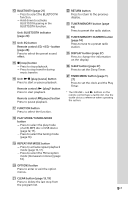
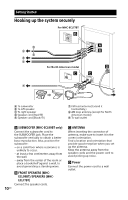
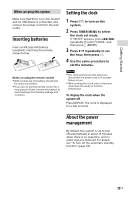
Getting Started When carrying this system Make sure that there is no disc loaded and no USB device is connected, and remove the power cord from the wall outlet. Inserting batteries Insert an R6 (size AA) battery (supplied), matching the polarity shown below. Notes on using the remote control ˎˎWith normal use, the battery should last for about six months. ˎˎIf you do not use the remote control for a long period of time, remove the battery to avoid damage from battery leakage and corrosion. Setting the clock 1 Press to turn on the system. 2 Press TIMER MENU to select the clock set mode. If "SELECT" appears, press / repeatedly to select "CLOCK," and then press (ENTER). 3 Press / repeatedly to set the hour, then press . 4 Use the same procedure to set the minutes. Notes ˎˎThe clock settings are lost when you disconnect the power cord or if a power failure occurs. ˎˎWhen setting the clock, select a function other than the audio in function beforehand. To display the clock when the system off Press DISPLAY. The clock is displayed for a few seconds. About the power management By default, this system is set to turn off automatically in about 15 minutes when there is no operation, and no audio signal is detected. For details, see "To turn off the automatic standby function" (page 33). 11GB
-
 1
1 -
2
-
3
-
4
-
5
-
 6
6 -
 7
7 -
 8
8 -
 9
9 -
 10
10 -
 11
11 -
 12
12 -
 13
13 -
 14
14 -
 15
15 -
 16
16 -
17
-
18
-
19
-
20
-
21
-
22
-
23
-
24
-
25
-
26
-
27
-
28
-
29
-
30
-
31
-
32
-
33
-
34
-
35
-
36
-
37
-
38
-
39
-
40
-
41
-
42
-
43
-
44
-
45
-
46
-
47
-
48
-
49
-
50
-
51
-
52
-
53
-
54
-
55
-
56
-
57
-
58
-
59
-
60
-
61
-
62
-
63
-
64
-
65
-
66
-
67
-
68
-
69
-
70
-
71
-
72
-
73
-
74
-
75
-
76
-
77
-
78
-
79
-
80
 |
 |
