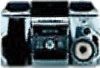
Sony MHC-RXD10AV Operating Instructions
Sony MHC-RXD10AV - 3 Cd Mini Shelf System Manual
 |
View all Sony MHC-RXD10AV manuals
Add to My Manuals
Save this manual to your list of manuals |
Sony MHC-RXD10AV manual content summary:
- Sony MHC-RXD10AV | Operating Instructions - Page 1
System Operating Instructions Owner's Record The model and serial numbers are located on the rear panel. Record the serial number in the space provided below. Refer to them whenever you call upon your Sony dealer regarding this product. Model No. Serial No MHC-GRX90AV / RXD10AV ©1999 by - Sony MHC-RXD10AV | Operating Instructions - Page 2
user to the presence of important operating and maintenance (servicing) instructions in the literature accompanying the appliance. CAUTION The use are cautioned that any changes or modifications not expressly approved in this manual could void your authority to operate this equipment. NOTICE FOR THE - Sony MHC-RXD10AV | Operating Instructions - Page 3
Deck Recording on a tape manually 27 Recording a CD by specifying track order 28 DJ Effects Looping part of a CD 30 Flashing part of a CD 30 Sound Connecting external antennas 48 Additional Information Precautions 50 Troubleshooting 51 Specifications 54 Index Back cover * European model - Sony MHC-RXD10AV | Operating Instructions - Page 4
Getting Started Step 1: Hooking up the system Do the following procedure 1 to 6 to hook up your system using the supplied cords and accessories. Rear surround speaker (Right) AM loop antenna Rear surround speaker (Left) FM antenna 2 Center 2 surround speaker 3 4 1 1 5 1 23 Front - Sony MHC-RXD10AV | Operating Instructions - Page 5
2 Connect the rear surround speakers. Connect the speaker cords to the REAR SURROUND SPEAKER jacks. Insert only the stripped portion. R L + + Red/ Solid (') - Black/ Stripe (') Notes • Keep the speaker cords away from the antennas to prevent noise. • Do not place the rear surround speakers on - Sony MHC-RXD10AV | Operating Instructions - Page 6
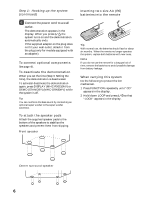
. To activate/deactivate the demonstration again, press DISPLAY (MHC-RXD10AV) or DEMO (STANDBY) (MHC-GRX90AV) while the system is off. Tip You can R6) batteries into the remote ] } } ] Tip With normal use, the batteries should last for about six months. When the remote no longer operates the - Sony MHC-RXD10AV | Operating Instructions - Page 7
Step 2: Setting up your speakers Connecting the supplied rear and center surround speakers enables you to fully enjoy Dolby Pro Logic Surround sound. Dolby Pro Logic Surround is a decoding system standardized in TV programs and movies. Dolby Pro Logic Surround improves the sound image by using four - Sony MHC-RXD10AV | Operating Instructions - Page 8
volume of the test tone. n LEFT (front) n CENTER n RIGHT (front) REAR N 3 From your listening position, press CENTER LEVEL (+/-) and REAR LEVEL (+/-) on the remote to adjust the volume. The volume levels from each speaker must become the same. 4 Press T.TONE ON/OFF when you are done adjusting. The - Sony MHC-RXD10AV | Operating Instructions - Page 9
Step 3: Setting the time You must set the time before using the timer functions. The clock is on a 24-hour system for the European model, and a 12-hour system for other models. The 24-hour system model is used for illustration purposes. DISPLAY 2,4 3,5 3 Press ENTER/NEXT. The minute indication - Sony MHC-RXD10AV | Operating Instructions - Page 10
Step 4: Presetting radio stations You can preset the following number of stations: - 2 band model: 20 for FM, 10 for AM. - 3 band model: 20 for FM, 10 for MW, and 10 for SW, or 20 for FM, 10 for AM and 5 for UKV, depending on the model you purchased. (Power) 4 Jog dial 1 n n 1 Press TUNER/ - Sony MHC-RXD10AV | Operating Instructions - Page 11
stored. 5 Repeat steps 1 to 4 to store other stations. To tune in a station with a weak signal Press + or - repeatedly in step 2 to tune in the station manually. To set another station to the exist preset number Start over from step 1. After step 3, turn the jog dial to select the preset number you - Sony MHC-RXD10AV | Operating Instructions - Page 12
Saving the power in standby mode (MHC-RXD10AV only) You can lower the power consumption to a minimum (Power Saving Mode) and save energy in the standby mode. POWER SAVE (Power) /DEMO Tips • Each - Sony MHC-RXD10AV | Operating Instructions - Page 13
rotate the disc tray. 2 Press one of the DISC 1~3 buttons. The disc tray closes and play starts. If you press CD (P (or CD · on the remote) when the disc tray is closed, play starts from the CD loaded on the tray whose button is lit green. Track number Playing time Basic - Sony MHC-RXD10AV | Operating Instructions - Page 14
track. (Or press + (to go forward) or = (to go back) on the remote.) Find a point in a track Press and hold down ) or 0 during play and release CHANGE. playing Adjust the volume Turn VOLUME (or press VOLUME +/- on the remote). Tips • Pressing CD (P when the power is off automatically turns the - Sony MHC-RXD10AV | Operating Instructions - Page 15
Basic Operations Recording a CD - CD Synchro Recording The CD SYNC button lets you record from a CD to a tape easily. You can use TYPE I (normal) or TYPE II (CrO2) tapes. The recording level is adjusted automatically. DISC SKIP/ EX-CHANGE (Power) DOLBY NR CD (P 2 2 Press § and place a CD. - Sony MHC-RXD10AV | Operating Instructions - Page 16
) to tune in the desired preset station. Turn counterclockwise Turn clockwise = + (or press + (or press = on the remote) on the remote) for higher for lower preset preset numbers. numbers. Preset number* Frequency * When only one station is preset, "ONE PRESET" appears in the display - Sony MHC-RXD10AV | Operating Instructions - Page 17
To listen to non-preset radio stations Use manual or automatic tuning in step 2. For manual tuning, press + or - repeatedly. For automatic tuning, press and hold + or -. Tips • Pressing TUNER/BAND when the power is off automatically turns the power on - Sony MHC-RXD10AV | Operating Instructions - Page 18
To select either deck A or B, press DECK A ª· or DECK B ª· on the remote. * AMS (Automatic Music Sensor) (Power) 3p To stop recording Press p. Tips • If , use + and - in step 2 to tune in the desired station manually. • When you want to reduce the hiss noise in lowlevel high-frequency signals - Sony MHC-RXD10AV | Operating Instructions - Page 19
play Press p. Fast-forward Press 0 or ). Rewind Press 0 or ). Remove the cassette Press §. Adjust the volume Turn VOLUME (or press VOLUME +/- on the remote). Tips • Pressing TAPE A (or TAPE B) ( or 9 when the power is off automatically turns the power on and starts tape playback if there is - Sony MHC-RXD10AV | Operating Instructions - Page 20
jog dial the same direction as the 9 or ( indicator to go forward. Turn the opposite direction to go back. (Or press = or + on the remote.) The search direction, + (forward) or - (back), and number of songs being skipped (1~9) appear in the display. Example: searching forward 2 songs Recording from - Sony MHC-RXD10AV | Operating Instructions - Page 21
Basic Operations 3 Press DIRECTION repeatedly to select A to record on one side. Select ß (or RELAY) to record on both sides. 4 Press REC PAUSE/START. Dubbing starts. To stop dubbing Press p. Tips • When you dub on both sides, start recording from the front side. If you record from the reverse side - Sony MHC-RXD10AV | Operating Instructions - Page 22
The CD Player Using the CD display You can check the remaining time of the current track or that of the CD. When a CD TEXT disc is loaded, you can check the information stored on the disc, such as the disc titles or artist names. When the unit detects CD TEXT discs, the "CD TEXT" indication appears - Sony MHC-RXD10AV | Operating Instructions - Page 23
Playing the CD tracks repeatedly -- Repeat Play This function lets you repeat a single CD or all CDs in normal play, Shuffle Play and Program Play. (Power) PLAY MODE To cancel Repeat Play Press REPEAT so that "REPEAT" or "REPEAT 1" disappears from the display. REPEAT / Press REPEAT during - Sony MHC-RXD10AV | Operating Instructions - Page 24
during normal play by pressing PLAY MODE repeatedly to select "SHUFFLE". • To skip a track, turn the jog dial clockwise (or press + on the remote). 1 2 Jog dial 1 Press FUNCTION repeatedly until "CD" appears in the display, then place a CD. 2 Press PLAY MODE repeatedly until "1 DISC SHUFFLE " or - Sony MHC-RXD10AV | Operating Instructions - Page 25
Programming the CD tracks -- Program Play You can make a program of up to 32 tracks from all the CDs in the order you want them to be played. (Power) 37 1 Press FUNCTION repeatedly until "CD" appears in the display, then place a CD. 2 Press PLAY MODE repeatedly until "PROGRAM" appears in the - Sony MHC-RXD10AV | Operating Instructions - Page 26
a specific track Add a track to the program Clear the entire program Press CHECK on the remote repeatedly. After the last track, "CHECK END" appears. CLEAR on the remote in stop mode. CHECK on the remote repeatedly until the number of the track to be erased lights up, then press CLEAR. 1 Select - Sony MHC-RXD10AV | Operating Instructions - Page 27
The Tape Deck Recording on a tape manually You can record from CD, tape, or radio as you like. For example, you can record just the songs you want or record from the - Sony MHC-RXD10AV | Operating Instructions - Page 28
time. 7 To program additional tracks to be recorded on side A, repeat steps 4 to 6. Skip step 4 to select tracks from the same disc. 8 Press P on the remote to insert a pause at the end of side A. "P" appears in the display and the total playing time resets to "0.00" in the display. 28 - Sony MHC-RXD10AV | Operating Instructions - Page 29
) to record on both sides. 12 Press REC PAUSE/START. Recording starts. To stop recording Press p. To check the order Press CHECK on the remote repeatedly. After the last track, "CHECK END" appears. To cancel Program Edit Press PLAY MODE repeatedly until "PROGRAM" or "SHUFFLE" disappears from the - Sony MHC-RXD10AV | Operating Instructions - Page 30
playback. This lets you create original recordings. (Power) Flashing part of a CD - Flash With the flash function, you can jog dial while holding LOOP (or press SELECT > or . while holding LOOP on the remote) to select different loop lengths (LOOP 1~20). 30 / Press and hold FLASH during playback - Sony MHC-RXD10AV | Operating Instructions - Page 31
Sound Adjustment Adjusting the sound You can reinforce the bass, create a more powerful sound, and listen with headphones. (Power) GROOVE SYNC BASS For the most suitable bass sound (SYNC BASS) Press SYNC BASS. The bass frequencies of the music you are listening to are measured and those areas - Sony MHC-RXD10AV | Operating Instructions - Page 32
Selecting the audio emphasis To cancel the effect Press EFFECT (or ON/OFF on the remote) repeatedly so that "EFFECT OFF" appears in the display. The audio emphasis menu lets you select the sound characteristic according to the sound you are - Sony MHC-RXD10AV | Operating Instructions - Page 33
Using the synchronized equalizer You can set the audio emphasis to change automatically according to the beat and tempo at the music. / Press SYNC EQ. The indicator blinks while measuring the beat and tempo of the source. Once measured, the indicator lights up in the display. Changing the spectrum - Sony MHC-RXD10AV | Operating Instructions - Page 34
ON: Reproduces stereo sources in surround sound. HALL: Reproduces the acoustics of a concert hall.* THEATER: Reproduces the acoustics of a movie theater.* ENHANCED THEATER: Reproduces the acoustics of a large movie theater.* DSP OFF: Turns off the DSP mode. * The indicator on the front panel's DSP - Sony MHC-RXD10AV | Operating Instructions - Page 35
adjustments first (see page 7). (Power) PRO LOGIC To cancel the Dolby Pro Logic Surround sound Press PRO LOGIC (or PRO LOGIC ON/OFF on the remote) again to turn off the indicator on the front panel's PRO LOGIC button. Notes • You can't use both Dolby Pro Logic Surround sound and the - Sony MHC-RXD10AV | Operating Instructions - Page 36
Adjusting the graphic equalizer 4 Turn the jog dial to adjust level. You can adjust the sound by raising or lowering the levels of specific frequency ranges. Before operation, first select the audio emphasis you want for your basic sound. (Power) 46 5 Repeat steps 3 and 4. 6 Press ENTER/NEXT - Sony MHC-RXD10AV | Operating Instructions - Page 37
Making a personal audio emphasis file - Personal file You can create a personal file of audio patterns (surround effect and graphic equalizer) and store them in the memory of the unit. Later, call up an audio pattern to play a favorite tape, CD, or radio program. Create up to five audio files. - Sony MHC-RXD10AV | Operating Instructions - Page 38
Using the Radio Data System (RDS) (For European model only) What is the Radio Data System? Radio Data System (RDS) is a broadcasting service that allows radio stations to send additional information along with the regular program signal. This tuner offers convenient RDS features like station name - Sony MHC-RXD10AV | Operating Instructions - Page 39
1 Press PTY while listening to the radio. 2 Turn jog dial to select the program type you want. See the "List of program types" section below. 3 Press ENTER/NEXT. The unit starts searching the preset RDS stations ("SEARCH" and the selected program type are shown alternately in the display). When the - Sony MHC-RXD10AV | Operating Instructions - Page 40
Using the Radio Data System (RDS) (continued) JAZZ Jazz programs. COUNTRY Country music programs. NATION Programs featuring the popular music of the country or region. OLDIES Programs featuring oldies music. FOLK Folk Music Programs. DOCUMENTARY Investigative features. ALARM TEST Test signal for - Sony MHC-RXD10AV | Operating Instructions - Page 41
4 Start playing the music and adjust the volume. 5 Adjust the microphone volume by turning MIC LEVEL. Mixing and recording sounds (Power) 4 When you are done Turn MIC LEVEL to 0 and disconnect the microphone from MIX MIC, then press KARAOKE PON/MPX repeatedly so that "h" disappears. Note With - Sony MHC-RXD10AV | Operating Instructions - Page 42
the recording level to prevent distortion of the recorded sound signal (Auto Level Control function). Notes • If you press EFFECT (or ON/OFF on the remote) or recall a sound effect, the karaoke mode is cancelled. • The instrumental sound may be reduced as well as the singer's voice when the sound is - Sony MHC-RXD10AV | Operating Instructions - Page 43
Waking up to music - Daily Timer You can wake up to music at a preset time every day. Make sure you have set the clock (see "Step 3: Setting the time"). 9 TIMER SELECT 4 Turn jog dial to select "DAILY 1 (or 2)", then press ENTER/NEXT. "ON" appears and the hour digits flash in the display. 5 Set - Sony MHC-RXD10AV | Operating Instructions - Page 44
Waking up to music (continued) To check the setting Press TIMER SELECT and turn the jog dial to select the respective mode (DAILY 1 or DAILY 2), then press ENTER/NEXT. To change the setting, start over from step 1. To cancel the timer operation Press TIMER SELECT and turn the jog dial to select " - Sony MHC-RXD10AV | Operating Instructions - Page 45
Connecting audio components Select one of the following connections, depending on the equipment to be connected and method of connecting. Refer to the instructions of each component. Connecting an MD deck for digital recording You can record from CD into the MD deck digitally by connecting an - Sony MHC-RXD10AV | Operating Instructions - Page 46
MD deck of the MD deck Connecting a super woofer speaker You can connect an optional super woofer speaker. To super woofer Tip When you connect a Sony MD deck, you can use the MD ·, P, and p buttons on this unit's remote to perform play, pause, and stop operations. 46 - Sony MHC-RXD10AV | Operating Instructions - Page 47
color of the plugs and the connectors. To listen to the sound of the connected VCR, press FUNCTION repeatedly until "VIDEO" appears. Refer to the instructions of each component. To the audio output of the VCR Connecting a DVD player When your DVD player has 5.1 channel analog outputs Be sure to - Sony MHC-RXD10AV | Operating Instructions - Page 48
Connecting a DVD player (continued) (Power) Connecting external antennas Connect the external antenna to improve the reception. Refer to the instructions of each component. FM antenna Connect the optional FM external antenna. You can also use the TV antenna instead. Jack type A 75-ohm coaxial - Sony MHC-RXD10AV | Operating Instructions - Page 49
AM antenna Connect a 6- to 15- meter (20- to 50- feet) insulated wire to the AM antenna terminal. Leave the supplied AM loop antenna connected. Jack type A Insulated wire (not supplied) FM75 AM Jack type B Insulated wire (not supplied) CFMO7A5XIAL 49 - Sony MHC-RXD10AV | Operating Instructions - Page 50
. • The AC power cord must be changed only at the qualified service shop. On placement • Place the stereo system in a location with out any discs. If you have any questions or problems concerning your stereo system, please consult your nearest Sony dealer. Notes on CDs • Before playing, clean the - Sony MHC-RXD10AV | Operating Instructions - Page 51
correctly and firmly. Should any problem persist, consult your nearest Sony dealer. General The display starts flashing as soon as you plug in the power cord even though you haven't turned on the power (demonstration mode). •Press DISPLAY (MHC-RXD10AV) or DEMO (STANDBY) (MHC-GRX90AV) when the power - Sony MHC-RXD10AV | Operating Instructions - Page 52
Troubleshooting (continued) There is severe hum or noise. •A TV or VCR is placed SELECT button. •Set the timer correctly. •Set the clock. The remote does not function. •There is an obstacle between the remote and the system. •The remote is not pointing in the direction of the system's sensor. •The - Sony MHC-RXD10AV | Operating Instructions - Page 53
is too weak. Connect the external antenna. A stereo FM program cannot be received in stereo. •Press STEREO/MONO so that "STEREO" appears. If other troubles not described above occur, reset the system as follows: 1 Unplug the power cord. 2 Plug the power cord back in. 3 Press p, ENTER/NEXT, and - Sony MHC-RXD10AV | Operating Instructions - Page 54
Specifications AUDIO POWER SPECIFICATIONS: (MHC-RXD10AV U.S.A. model only) POWER OUTPUT AND TOTAL HARMONIC DISTORTION: with 8 ohm loads both channels driven, from 70-20,000 Hz; rates 80 watts per channel minimum - Sony MHC-RXD10AV | Operating Instructions - Page 55
system Frequency response (DOLBY NR OFF) Wow and flutter 4-track 2-channel stereo 40 - 13,000 Hz (±3 dB), using Sony TYPE I cassette 40 - 14,000 Hz (±3 dB), using Sony TYPE II cassette ±0.15% W.Peak (IEC) 0.1% W.RMS (NAB) ±0.2% W.Peak (DIN) Tuner section FM stereo, FM/AM superheterodyne tuner - Sony MHC-RXD10AV | Operating Instructions - Page 56
the supplied SS-CN125 center surround speaker for connection to the CENTER SURROUND SPEAKER connector on the MHC-RXD10AV. General Power kg Approx. 11.3 kg Approx. 12.2 kg Supplied accessories: AM loop antenna (1) Remote Commander (1) Batteries (2) FM lead antenna (1) Speaker cords (3 or 5 (for - Sony MHC-RXD10AV | Operating Instructions - Page 57
57 - Sony MHC-RXD10AV | Operating Instructions - Page 58
58 - Sony MHC-RXD10AV | Operating Instructions - Page 59
59 - Sony MHC-RXD10AV | Operating Instructions - Page 60
42 Sound adjustment 31 Speakers 7, 46 Station name 38 T, U, V, W, X, Y, Z Test tone 8 Timer falling asleep to music 42 timer recording 44 waking up to music 43 Troubleshooting 51 Tuner 10, 16 Tuning interval 11 60 Sony Corporation Printed in Indonesia
-
 1
1 -
 2
2 -
 3
3 -
 4
4 -
 5
5 -
 6
6 -
 7
7 -
8
-
9
-
10
-
11
-
12
-
13
-
14
-
15
-
16
-
17
-
18
-
19
-
20
-
21
-
22
-
23
-
24
-
25
-
26
-
27
-
28
-
29
-
30
-
31
-
32
-
33
-
34
-
35
-
36
-
37
-
38
-
39
-
40
-
41
-
42
-
43
-
44
-
45
-
46
-
47
-
48
-
49
-
50
-
51
-
52
-
53
-
54
-
55
-
56
-
57
-
58
-
59
-
60
 |
 |
Mini Hi-Fi
Component
System
©1999 by Sony Corporation
Operating Instructions
3-865-612-
14
(1)
MHC-GRX90AV / RXD10AV
Owner’s Record
The model and serial numbers are located on the rear panel. Record the serial
number in the space provided below. Refer to them whenever you call upon your
Sony dealer regarding this product.
Model No.
_______________
Serial No. _______________