Sony MHC-RXD10AV Operating Instructions - Page 21
Basic Operations, To stop dubbing, Press DIRECTION repeatedly to, select, to record on one side.
 |
View all Sony MHC-RXD10AV manuals
Add to My Manuals
Save this manual to your list of manuals |
Page 21 highlights
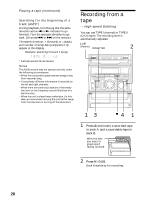
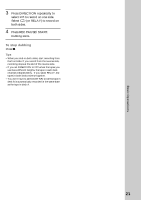
Basic Operations 3 Press DIRECTION repeatedly to select A to record on one side. Select ß (or RELAY) to record on both sides. 4 Press REC PAUSE/START. Dubbing starts. To stop dubbing Press p. Tips • When you dub on both sides, start recording from the front side. If you record from the reverse side, recording stops at the end of the reverse side. • If you set DIRECTION to ß when the tapes you use have different lengths, the tape in each deck reverses independently. If you select RELAY, the tapes in both decks reverse together. • You don't have to set DOLBY NR, since the tape in deck B is automatically recorded in the same state as the tape in deck A. 21
-
 1
1 -
2
-
3
-
4
-
5
-
6
-
7
-
8
-
9
-
10
-
11
-
12
-
13
-
14
-
15
-
 16
16 -
 17
17 -
 18
18 -
 19
19 -
 20
20 -
 21
21 -
 22
22 -
 23
23 -
 24
24 -
 25
25 -
 26
26 -
27
-
28
-
29
-
30
-
31
-
32
-
33
-
34
-
35
-
36
-
37
-
38
-
39
-
40
-
41
-
42
-
43
-
44
-
45
-
46
-
47
-
48
-
49
-
50
-
51
-
52
-
53
-
54
-
55
-
56
-
57
-
58
-
59
-
60
 |
 |
Basic Operations
21
3
Press DIRECTION repeatedly to
select
A
to record on one side.
Select
ß
(or RELAY) to record on
both sides.
4
Press REC PAUSE/START.
Dubbing starts.
To stop dubbing
Press
p
.
Tips
• When you dub on both sides, start recording from
the front side. If you record from the reverse side,
recording stops at the end of the reverse side.
• If you set DIRECTION to
ß
when the tapes you
use have different lengths, the tape in each deck
reverses independently.
If you select RELAY, the
tapes in both decks reverse together.
• You don’t have to set DOLBY NR, since the tape in
deck B is automatically recorded in the same state
as the tape in deck A.