Sony MVC-CD350 Operating Instructions - Page 18
Shooting still images, Inserting and removing a disc - lens
 |
View all Sony MVC-CD350 manuals
Add to My Manuals
Save this manual to your list of manuals |
Page 18 highlights
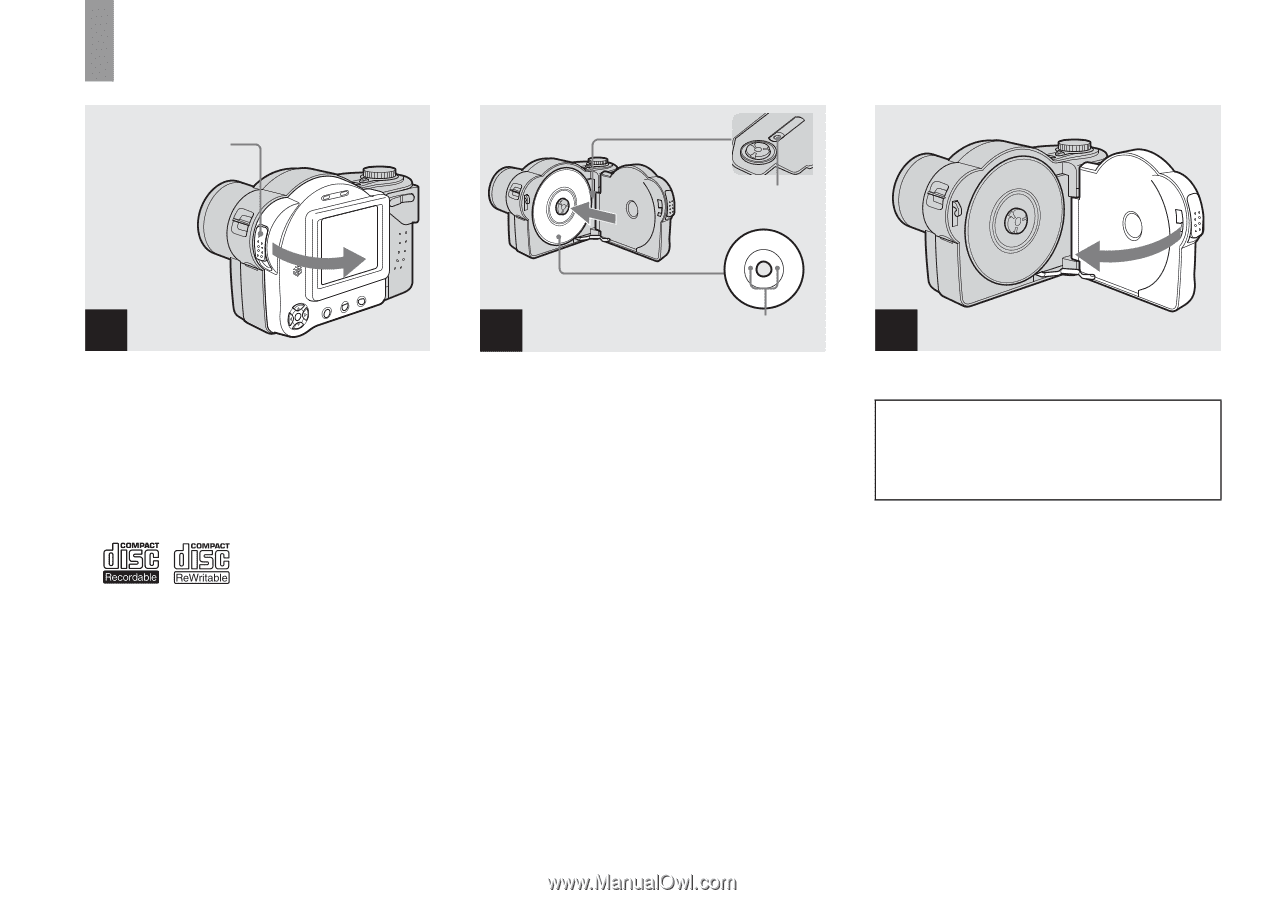
Shooting still images Inserting and removing a disc Disc cover OPEN lever Pickup lens 1 , Open the disc cover. Slide down the disc cover OPEN lever, and open the disc cover. • You can use only 8 cm CD-R/CD-RW discs that have these marks. • For details on disc, see page 108. Disc 2 Push here , Place a disc in the disc tray. Place the disc with the printed side up, and push down on the center of the disc until it clicks. • Do not forcibly push on the disc. • Do not touch the pickup lens. 3 , Close the disc cover. Removing the disc Open the disc cover. Check to make sure that the disc has completely stopped rotating, then remove the disc. • When the ACCESS lamp is flashing, it means that image data is being read or written. Never open the disc cover or turn off the power at this time, as the image data may be damaged or the disc may become unusable. • While the camera is writing data on a disc, the disc cover OPEN lever is locked. • After you change the disc, "Repairing Data" may appear on the LCD screen and it may take about 10 minutes to prepare the disc for recording depending on the disc condition. 18
-
 1
1 -
2
-
3
-
4
-
5
-
6
-
7
-
8
-
9
-
10
-
11
-
12
-
 13
13 -
 14
14 -
 15
15 -
 16
16 -
 17
17 -
 18
18 -
 19
19 -
 20
20 -
 21
21 -
 22
22 -
 23
23 -
24
-
25
-
26
-
27
-
28
-
29
-
30
-
31
-
32
-
33
-
34
-
35
-
36
-
37
-
38
-
39
-
40
-
41
-
42
-
43
-
44
-
45
-
46
-
47
-
48
-
49
-
50
-
51
-
52
-
53
-
54
-
55
-
56
-
57
-
58
-
59
-
60
-
61
-
62
-
63
-
64
-
65
-
66
-
67
-
68
-
69
-
70
-
71
-
72
-
73
-
74
-
75
-
76
-
77
-
78
-
79
-
80
-
81
-
82
-
83
-
84
-
85
-
86
-
87
-
88
-
89
-
90
-
91
-
92
-
93
-
94
-
95
-
96
-
97
-
98
-
99
-
100
-
101
-
102
-
103
-
104
-
105
-
106
-
107
-
108
-
109
-
110
-
111
-
112
-
113
-
114
-
115
-
116
-
117
-
118
-
119
-
120
 |
 |