Sony MVC-CD350 Operating Instructions - Page 23
Mode dial for still image, shooting, Auto Focus, Press the shutter button fully, down.
 |
View all Sony MVC-CD350 manuals
Add to My Manuals
Save this manual to your list of manuals |
Page 23 highlights
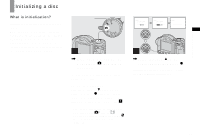
60min 3.1M 101 95 M AF 4 , Press the shutter button fully down. The shutter sounds. The image will be recorded in the disc. When ACCESS lamp (page 10) goes out, you can shoot the next image. • When operating the camera using a battery pack, if you do not operate the camera for about three minutes during recording, the camera turns off automatically to prevent wearing down the battery (page 15). • While the image is being recorded on the disc, the ACCESS lamp flashes. Do not shake or strike the camera while this lamp is flashing. Also do not turn off the power, remove the battery pack, or open the disc cover at this time, as the data may be damaged or the disc may become unusable. Mode dial for still image shooting When shooting still images with your camera, you can choose from the following shooting methods. (Auto adjustment mode) The focus, exposure and white balance are automatically adjusted to allow easy shooting. The image quality is set to [Fine] (page 41). (Program auto shooting) You can set the desired shooting functions using menus (pages 40 and 101). SCN (Scene Selection) You can select from the following modes to shoot according to the scene conditions (page 55). - (Twilight mode) - (Twilight portrait mode) - (Landscape mode) - (Soft snap mode) - (Snow mode) - (Beach mode) - (High-speed shutter mode) Auto Focus When you try to shoot a subject that is difficult to focus on, the AE/AF lock indicator changes to flashing slowly. The Auto Focus function may have difficulty working under the following conditions. In such cases, release the shutter button, then recompose the shot and focus again. • The subject is distant from the camera and dark. • The contrast between the subject and its background is poor. • The subject is seen through glass, such as a window. • A fast-moving subject. • The subject reflects or has a lustrous finish, such as a mirror or a luminous body. • A flashing subject. • A backlit subject. There are two Auto Focus functions: "AF range finder frame" which sets the focus position according to the subject position and size, and "AF mode" which sets the focus operation according to the AF response and the battery consumption. See page 43 for details. 23 Shooting still images
-
 1
1 -
2
-
3
-
4
-
5
-
6
-
7
-
8
-
9
-
10
-
11
-
12
-
13
-
14
-
15
-
16
-
17
-
 18
18 -
 19
19 -
 20
20 -
 21
21 -
 22
22 -
 23
23 -
 24
24 -
 25
25 -
 26
26 -
 27
27 -
 28
28 -
29
-
30
-
31
-
32
-
33
-
34
-
35
-
36
-
37
-
38
-
39
-
40
-
41
-
42
-
43
-
44
-
45
-
46
-
47
-
48
-
49
-
50
-
51
-
52
-
53
-
54
-
55
-
56
-
57
-
58
-
59
-
60
-
61
-
62
-
63
-
64
-
65
-
66
-
67
-
68
-
69
-
70
-
71
-
72
-
73
-
74
-
75
-
76
-
77
-
78
-
79
-
80
-
81
-
82
-
83
-
84
-
85
-
86
-
87
-
88
-
89
-
90
-
91
-
92
-
93
-
94
-
95
-
96
-
97
-
98
-
99
-
100
-
101
-
102
-
103
-
104
-
105
-
106
-
107
-
108
-
109
-
110
-
111
-
112
-
113
-
114
-
115
-
116
-
117
-
118
-
119
-
120
 |
 |
