Sony MZ-NF610 SonicStage v1.5 Operating Instructions - Page 14
Storing audio files to the computer, Starting SonicStage
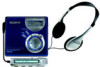 |
View all Sony MZ-NF610 manuals
Add to My Manuals
Save this manual to your list of manuals |
Page 14 highlights
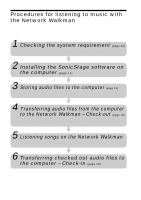
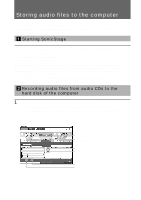
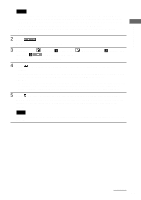
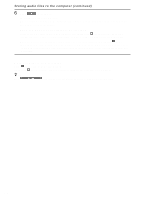
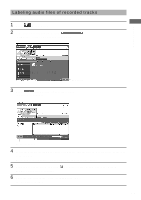
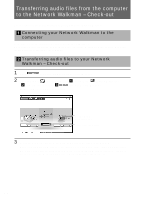
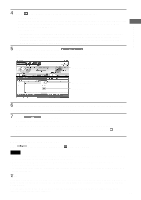
Storing audio files to the computer This section explains how to record audio files from audio CDs to the hard disk of your computer. You can also transfer audio files from media other than audio CDs. For details, refer to the online Help for the SonicStage software. Starting SonicStage Double-click the [SonicStage] icon on the desktop, or click the [Start] button and then select [Programs*], [SonicStage], and [SonicStage]. The "SonicStage" window is displayed. * Select [All Programs] on Windows XP. When SonicStage is started, the message "Auto-configure all SonicStage compatible media?" displays. If you click "Yes," audio files supported by SonicStage (WAV, MP3, Windows Media, OpenMG) will be automatically played from the next time. If you click "No," you can configure the audio file formats automatically played by SonicStage. The "Welcome to SonicStage" window is displayed. It explains how to use SonicStage. Recording audio files from audio CDs to the hard disk of the computer 1 Insert an audio CD into the CD-ROM drive of your computer. If the following Record/Transfer window is displayed automatically, skip to step 4. The list area will be displayed at the bottom of the window. The audio files in the audio CD will be displayed on the left side of the list area. If the Record/Transfer window is not displayed automatically, follow step 2. Record All button Record Setting button Rec Selection button Stop button Select All (Cancel check) button CD Info button 14
-
 1
1 -
2
-
3
-
4
-
5
-
6
-
7
-
8
-
 9
9 -
 10
10 -
 11
11 -
 12
12 -
 13
13 -
 14
14 -
 15
15 -
 16
16 -
 17
17 -
 18
18 -
 19
19 -
20
-
21
-
22
-
23
-
24
-
25
-
26
-
27
-
28
-
29
-
30
-
31
-
32
-
33
-
34
-
35
-
36
 |
 |
