Sony NW-MS7 Operating Instructions - Page 13
Transferring music data from the, computer to Memory Stick Walkman - driver
 |
View all Sony NW-MS7 manuals
Add to My Manuals
Save this manual to your list of manuals |
Page 13 highlights
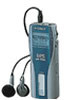
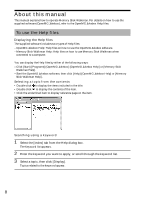
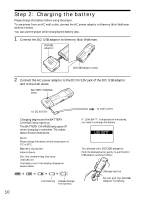
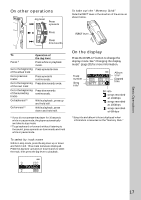
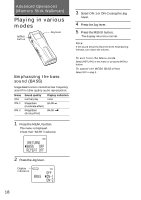
Basic Operations Basic Operations Transferring music data from the computer to Memory Stick Walkman This section describes how to record the contents of a compact disc onto the hard drive of your computer, and then how to transfer it to Memory Stick Walkman (Check-Out). You can also download by using EMD Services, or convert MP3 files and WAV format audio files. Please refer to the online help for more information. 1 Connect Memory Stick Walkman to your computer. 1 Insert "MagicGate Memory Stick." "MagicGate Memory Stick" Memory Stick slot Notes • When connecting Memory Stick Walkman to your computer, make sure the erasure prevention switch of the "Memory Stick" (page 30) is OFF . • Do not start your computer while Memory Stick Walkman is connected. 2 Connect the AC power adaptor. Connect the supplied AC power adaptor to an AC wall outlet, then into the DC IN 5.5V jack on the right side of the DC/USB adaptor. 3 Connect Memory Stick Walkman to your computer. Connect the small connector of the supplied USB cable into the USB jack on the left side of the DC/USB adaptor, then the large connector to the USB jack of your computer. "PC CONNECT" appears in the display. to to DC IN 5.5V USB cable (supplied) to to AC wall outlet Note DC/USB adaptor AC power adaptor (supplied) • Do not connect more than two USB devices to your computer. Normal operation will not be guaranteed. • Use of this player with a USB hub or a USB extension cable is not guaranteed. • A malfunction may occur depending on the USB devices connected at any one time. • Be sure to connect the player to an AC wall outlet when connecting it to your computer. • When connecting Memory Stick Walkman to your computer for the first time, the USB driver Installer window appears. Please follow the instructions in the Installer window. continued 13
-
 1
1 -
2
-
3
-
4
-
5
-
6
-
7
-
 8
8 -
 9
9 -
 10
10 -
 11
11 -
 12
12 -
 13
13 -
 14
14 -
 15
15 -
 16
16 -
 17
17 -
 18
18 -
19
-
20
-
21
-
22
-
23
-
24
-
25
-
26
-
27
-
28
-
29
-
30
-
31
-
32
-
33
-
34
-
35
-
36
-
37
-
38
-
39
-
40
-
41
-
42
-
43
-
44
 |
 |