Sony PCV-RZ26G Online Help Center (VAIO User Guide) - Page 45
Sony PCV-RZ26G - Vaio Desktop Computer Manual
 |
View all Sony PCV-RZ26G manuals
Add to My Manuals
Save this manual to your list of manuals |
Page 45 highlights
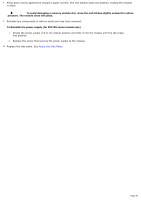
to touch. Wait until the internal parts of the system unit cool down before you attempt to remove the side panel. Replacing the side panel (PCV-RZ series model) 1. Lay the system unit on its side. 2. Align the tabs on the side panel to the tracks on the chassis frame. 3. Gently slide the side panel onto the chassis, until the tabs lock the panel into place. Replacing the side panel (PCV- RZ series m odel) Replacing the side panel (PCV-RX series model) 1. Align the tabs on the side panel to the chassis rim. 2. Press the side panel firmly against the unit until it snaps into place. Replacing the side panel (PCV- RX series m odel) Page 45
-
 1
1 -
2
-
3
-
4
-
5
-
6
-
7
-
8
-
9
-
10
-
11
-
12
-
13
-
14
-
15
-
16
-
17
-
18
-
19
-
20
-
21
-
22
-
23
-
24
-
25
-
26
-
27
-
28
-
29
-
30
-
31
-
32
-
33
-
34
-
35
-
36
-
37
-
38
-
39
-
 40
40 -
 41
41 -
 42
42 -
 43
43 -
 44
44 -
 45
45 -
 46
46 -
 47
47 -
 48
48 -
 49
49 -
 50
50 -
51
-
52
-
53
-
54
-
55
-
56
-
57
-
58
-
59
-
60
-
61
-
62
-
63
-
64
-
65
-
66
-
67
-
68
-
69
-
70
-
71
-
72
-
73
-
74
-
75
-
76
-
77
-
78
-
79
-
80
-
81
-
82
-
83
-
84
-
85
-
86
-
87
 |
 |

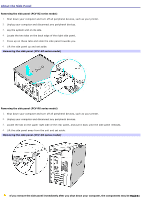
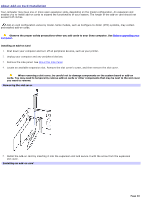
to touch. Wait until the internal parts of the system unit cool down before you attempt to remove the side panel.
Replacing the side panel (PCV-RZ series model)
1.
Lay the system unit on its side.
2.
Align the tabs on the side panel to the tracks on the chassis frame.
3.
Gently slide the side panel onto the chassis, until the tabs lock the panel into place.
Replacing the side panel (PCV-RZ series model)
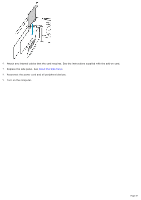
Replacing the side panel (PCV-RX series model)
1.
Align the tabs on the side panel to the chassis rim.
2.
Press the side panel firmly against the unit until it snaps into place.
Replacing the side panel (PCV-RX series model)
Page 45