Sony RM-AX4000 AX Remote Editor Ver.1.0 Help - Page 56
Changing the preset code of a component
 |
UPC - 027242677036
View all Sony RM-AX4000 manuals
Add to My Manuals
Save this manual to your list of manuals |
Page 56 highlights
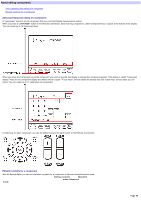
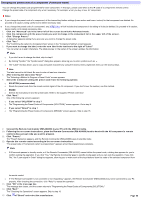
Changing the preset code of a component (Advanced mode) You can change the preset code programmed for each component. In this topic, preset code refers to the IR code of a component's remote control. Change the preset code of a component only w hen necessary, for example, w hen you buy a new AV component. Note s If you change the preset code of a component, all the learned key/button settings (Learn action and Learn+ action) for that component are deleted. So proceed w ith caution, being careful not to delete necessary data. If you change the preset code of a component, any XPRESS key w hich includes that component in its setting w ill also be deleted. So proceed w ith caution, being careful not to delete necessary data. 1. Click the "Advanced" tab in the low er left of the screen to sw itch to Advanced m ode. 2. Click the com ponent w ith the preset code you w ant to change in the com ponent list in the upper left of the screen. 3. Click "Change Preset." A dialog box appears asking if you are sure you w ant to change the preset code. 4. Click "Ye s ." The "Confirming the Label of a Component Key" screen in the "Component Setting" w izard appears. 5. If you w ant to change the label, enter the new label in the text box to the right of "Label." You can enter up to eight characters. The label preview in the center of the screen updates the information. Hints o If you don't w ant to change the label, skip to step 6. o By clicking "Symbol," the "Symbol select" dialog box appears, allow ing you to enter symbols such as . o The "Label" text box allow s you to copy and paste characters by using the shortcut menu (right-click menu) or the shortcut keys. Note The label cannot be left blank. Be sure to enter at least one character. 6. Afte r e nte ring the labe l, click "Ne xt." The "Selecting a Method to Program a Preset Code" screen appears. 7. Se le ct the m e thod of s e tting the pre s e t code from the follow ing options : o SOLUTION (recom m ended) o Reads the preset code from the remote control signal of the AV component. If you don't know the number, use this method. o BRAND o Selects the manufacturer and the preset code. Refer to the supplied "Preset code lists." 8. Click "Ne xt." One of the follow ing screens appears: o If you select "SOLUTION" in step 7 o The "Programming the Preset Codes of Components (SOLUTION)" screen appears. Go to step 9. o If you select "Brand" in step 7 o The "Programming the Preset Codes of Components (BRAND)" screen appears. Skip to step 15. 9. Conne ct the Re m ote Com m ande r (RM -AX4000) to your PC w ith the USB m ini cable . 10. Follow ing the on-s cre e n ins tructions, place the Re m ote Com m ande r (RM -AX4000) he ad to head w ith the AV com pone nt's re m ote control w hose preset code you w ant to program . 11. Click "Preset." The "Preset" dialog box appears, and the Remote Commander (RM-AX4000) goes to standby mode. 12. Operate the rem ote control according to the on-screen instructions. "The preset code of "component name" is programmed." appears w hen the programming is complete. Hints o If 60 seconds passes in standby mode, or if the Remote Commander (RM-AX4000) cannot define the preset code, a dialog box appears for you to confirm redoing the operation. If you click "Yes," the Remote Commander goes to standby mode again and you can redo the operation. If you click "No," the "Learn signal in Order" dialog box appears, allow ing you to make each of the keys/buttons learn the code of the selected component from its remote control. o If "The Remote Commander is not connected or not responding." appears, the Remote Commander (RM-AX4000) may not be connected to your PC properly. After checking the connection, click "Retry" to repeat the operation. 13. Click "OK" in the m essage box. The message box closes, and the screen returns to "Programming the Preset Codes of Components (SOLUTION)." 14. Click "Ne xt." The "Checking the Operations" screen appears. Skip to step 18. 15. Click of "Brand" and select the m anufacturer. Page 56
-
 1
1 -
2
-
3
-
4
-
5
-
6
-
7
-
8
-
9
-
10
-
11
-
12
-
13
-
14
-
15
-
16
-
17
-
18
-
19
-
20
-
21
-
22
-
23
-
24
-
25
-
26
-
27
-
28
-
29
-
30
-
31
-
32
-
33
-
34
-
35
-
36
-
37
-
38
-
39
-
40
-
41
-
42
-
43
-
44
-
45
-
46
-
47
-
48
-
49
-
50
-
 51
51 -
 52
52 -
 53
53 -
 54
54 -
 55
55 -
 56
56 -
 57
57 -
 58
58 -
 59
59 -
 60
60 -
 61
61 -
62
-
63
-
64
-
65
-
66
-
67
-
68
-
69
-
70
-
71
-
72
-
73
-
74
-
75
-
76
-
77
-
78
-
79
-
80
-
81
-
82
-
83
-
84
-
85
-
86
-
87
-
88
-
89
-
90
-
91
-
92
-
93
-
94
-
95
-
96
-
97
-
98
-
99
-
100
-
101
-
102
-
103
-
104
-
105
-
106
-
107
-
108
-
109
-
110
-
111
-
112
-
113
-
114
-
115
-
116
-
117
-
118
 |
 |