Sony RM-AX4000 AX Remote Editor Ver.1.0 Help - Page 91
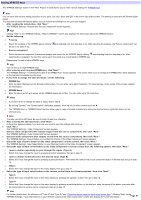
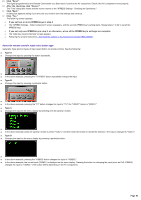
The XPRESS Settings - Input Select Button on your Remote Control of the Video Component screen appears.
 |
UPC - 027242677036
View all Sony RM-AX4000 manuals
Add to My Manuals
Save this manual to your list of manuals |
Page 91 highlights
Setting XPRESS keys The "XPRESS Settings" screen in the "New Project" w izard allow s you to make various settings for XPRESS keys. Hint You can save and exit the setting procedure at any point; just click "Save and Exit" in the low er right of the screen. The setting is saved and AX Remote Editor closes. The next time you start AX Remote Editor, you can resume the setting from the point you stopped. 1. Afte r re ading the introduction, click "Ne xt." The "XPRESS Settings - Purpose and Source Component" screen appears. Hint Clicking "Help" on the "XPRESS Settings - What is XPRESS?" screen also displays the information about the XPRESS function. 2. Se t the follow ing: o Purpose o Select the purpose of the XPRESS key by clicking be set in the same w ay. o Source com ponent and selecting from the drop-dow n list. After selecting the purpose, the "Source component" can o Select the source component (that outputs images and sound) for the XPRESS key by clicking selecting the component, the next line can be set in the same w ay to add another XPRESS key. Repeat step 2 to set up other XPRESS keys. and selecting from the drop-dow n list. After Hint You can set up to eight XPRESS keys. 3. Afte r e nte ring e ach require d XPRESS k e y, click "Ne xt." The "XPRESS Settings - Confirming the Label of an XPRESS Key" screen appears. This screen allow s you to change the XPRESS key's label displayed on the Remote Commander and its name. 4. If you w ant to change the label and nam e, set the follow ing: o XPRESS Key o Enter the label (displayed on the Remote Commander). You can enter up to eight characters. The label preview in the center of the screen updates the information. o XPRESS Nam e o Enter the name (w hich w ill appear on the XPRESS display as its title). You can enter up to 12 characters. Hints o If you don't w ant to change the label or name, skip to step 5. o By clicking "Symbol," the "Symbol select" dialog box appears, allow ing you to enter symbols such as . o The "XPRESS Key" or "XPRESS Name" text box allow s you to copy and paste characters by using the shortcut menu (right-click menu) or the shortcut keys. Note The label cannot be left blank. Be sure to enter at least one character. 5. Afte r e nte ring the labe l and nam e , click "Ne xt." A dialog box appears asking if you are sure you w ant to save the settings and continue. 6. Click "Ye s ." The "XPRESS Settings - Video Component" screen appears. 7. Se le ct a video com pone nt (that outputs im age s from the s ource com pone nt), the n click "Ne xt." The "XPRESS Settings - Audio Component" screen appears. 8. Se le ct an audio com pone nt (that outputs s ound from the s ource com pone nt), the n click "Ne xt." The "XPRESS Settings - Pow er Button on your Remote Control of the Video Component" screen appears. 9. Se le ct the type of pow e r button on the vide o com pone nt's re m ote control, then click "Ne xt." The "XPRESS Settings - Input Select Button on your Remote Control of the Video Component" screen appears. 10. Se le ct the type of input s e le ct button on the vide o com pone nt's re m ote control from the follow ing options , the n click "Ne xt." o I press a button repeatedly to cycle through the inputs. (Type A) o Select this if you change the input by pressing a button repeatedly, then go to step 14. o I press a button to directly select the desired input. (Type B) o Select this if you change the input by pressing a particular button. Then enter the name of the source component button in the text box and go to step 15. o Others o Select this if you change the input on the menu display, then go to step 11. 11. Se le ct the type of input s e le ct button on the re m ote control from the follow ing options , the n click "Ne xt." o Type C o Select this if you change the input on the menu display by pressing the up/dow n button, then go to step 12. o Type D o Select this if you change the input on the menu display by pressing a particular button. In the text box, enter the name of the button you press after the menu button to use the source component, then go to step 15. Hint For further details about the difference of "Type C" and "Type D," see "About the remote control's input select button type." (Clicking "Help" on the "XPRESS Settings - Input Select Button on your Remote Control of the Video Component" screen also displays the same information.) Page 91
-
 1
1 -
2
-
3
-
4
-
5
-
6
-
7
-
8
-
9
-
10
-
11
-
12
-
13
-
14
-
15
-
16
-
17
-
18
-
19
-
20
-
21
-
22
-
23
-
24
-
25
-
26
-
27
-
28
-
29
-
30
-
31
-
32
-
33
-
34
-
35
-
36
-
37
-
38
-
39
-
40
-
41
-
42
-
43
-
44
-
45
-
46
-
47
-
48
-
49
-
50
-
51
-
52
-
53
-
54
-
55
-
56
-
57
-
58
-
59
-
60
-
61
-
62
-
63
-
64
-
65
-
66
-
67
-
68
-
69
-
70
-
71
-
72
-
73
-
74
-
75
-
76
-
77
-
78
-
79
-
80
-
81
-
82
-
83
-
84
-
85
-
 86
86 -
 87
87 -
 88
88 -
 89
89 -
 90
90 -
 91
91 -
 92
92 -
 93
93 -
 94
94 -
 95
95 -
 96
96 -
97
-
98
-
99
-
100
-
101
-
102
-
103
-
104
-
105
-
106
-
107
-
108
-
109
-
110
-
111
-
112
-
113
-
114
-
115
-
116
-
117
-
118
 |
 |