Sony RM-VL1000 Operating Instructions - Page 8
Setting the Clock, Setting the clock for the first time after installing batteries, CLOCK, 00 AM - learn
 |
View all Sony RM-VL1000 manuals
Add to My Manuals
Save this manual to your list of manuals |
Page 8 highlights
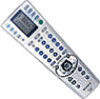
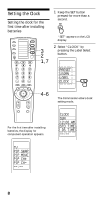
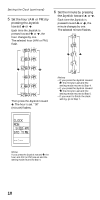
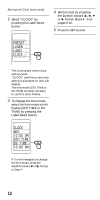
Setting the Clock Setting the clock for the first time after installing batteries COMPO SYSTEM TIMER SCROLL SET POWER REC VIDEO1 VIDEO2 AUX TUNER CD TAPE MD TV PHONO DVD 3 2 1,7 1 Keep the SET button pressed for more than a second. "SET" appears on the LCD display. 2 Select "CLOCK" by pressing the Label Select button. SET PRESET LEARN LABEL CLOCK MENU GUIDE VOL CH 4-6 The Commander enters clock setting mode. MUTING RECALL For the first time after installing batteries, the display for component operation appears. SET CLOCK SUN 12:00 AM STD TIME DS TIME --:-- TV PIP SWAP PIP MOVE PIP CH+ PIP CH--:-- 8
-
 1
1 -
2
-
 3
3 -
 4
4 -
 5
5 -
 6
6 -
 7
7 -
 8
8 -
 9
9 -
 10
10 -
 11
11 -
 12
12 -
 13
13 -
14
-
15
-
16
-
17
-
18
-
19
-
20
-
21
-
22
-
23
-
24
-
25
-
26
-
27
-
28
-
29
-
30
-
31
-
32
-
33
-
34
-
35
-
36
-
37
-
38
-
39
-
40
-
41
-
42
-
43
-
44
-
45
-
46
-
47
-
48
-
49
-
50
-
51
-
52
-
53
-
54
-
55
-
56
-
57
-
58
-
59
-
60
-
61
-
62
-
63
-
64
-
65
-
66
-
67
-
68
-
69
-
70
-
71
-
72
-
73
-
74
-
75
-
76
-
77
-
78
-
79
-
80
-
81
-
82
-
83
-
84
 |
 |
8
Setting the Clock
Setting the clock for the
first time after installing
batteries
SET
CLOCK
SUN
12:00 AM
STD TIME
DS TIME
--:--
COMPO
SYSTEM
TIMER
SCROLL
SET
REC
VIDEO1
VIDEO2
AUX
TUNER
CD
TAPE
MD
TV
DVD
MENU
MUTING
RECALL
VOL
CH
GUIDE
PHONO
POWER
1,7
3
4-6
2
For the first time after installing
batteries, the display for
component operation appears.
TV
PIP SWAP
PIP MOVE
PIP CH+
PIP CH-
--:--
1
Keep the SET button
pressed for more than a
second.
“SET” appears on the LCD
display.
2
Select “CLOCK” by
pressing the Label Select
button.
The Commander enters clock
setting mode.
SET
PRESET
LEARN
LABEL
CLOCK