Sony STR-AV920 Operating Instructions - Page 22
Audio, Recording
 |
View all Sony STR-AV920 manuals
Add to My Manuals
Save this manual to your list of manuals |
Page 22 highlights
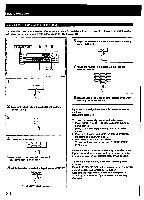
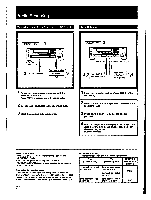
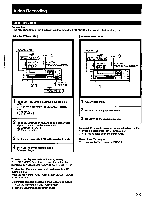
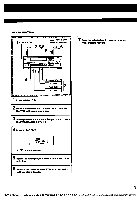
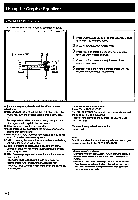
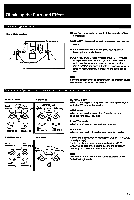
Audio Recording Recording on an Audio Tape Deck or DAT Deck Tape Dubbing POWER -.ON Lz : • _ to DAT or TAPE 1, 2 OUT 21DAT or Tape deck IsMmItsiils' 0 ---- as 0 DI=1!_l ® ® ill 'Turntable systeml ] CD player 3 VCR POWER -4. ON 5 WC 0 CIMIIIMIP-:. - 0 IMMIBI M EOW Neu 1. ---."-. as 0 6 to TAPE 2 OUT to TAPE 1(or OAT) IN 4,2 Tape deck 2 (for recording) .60 Tape deck 1 4 A or DAT deck I y% (or playback) 1 Select the desired program source with the FUNCTION selector. For an FM/AM broadcast, tune in the desired station 2 Set the tape (DAT) deck in the recording mode. 3 Start the selected program source. 1 Insert the recorded tape into tape deck 1 (or the DAT deck). 2 Insert a blank tape into tape deck 2 and adjust the recording level. 3 Press TAPE 1or DAT to select the deck for playback. 4 Start the playback of the tape (or the DAT) in tape deck 1(or the DAT deck), and set tape deck 2 in the recording mode. Dubbing will start. Notes onrecording . Use TAPE 2 OUT for the recording with the equalizer and SURROUND effects. . For other OUT jacks, the settings of the VOLUME, SURROUND, BALANCE, and graphic equalizer do not have any effect on recording. Monitoring the recorded sound If you have connected a tape deck having separate record and playback heads to the TAPE 2 jacks, you can monitor the recording results, While recording or dubbing, press the TAPE 2 MONITOR button. To listen to the source sound again, press the button again. 22 Note on tape dubbing Tape dubbing is possible only in the following directions: From (playback side) To (Recording side) FUNCTION selector to be pressed Tape deck connected to TAPE 1 IN Tape deck connected to TAPE 2 OUT DAT deck connected to DAT OUT TAPE 1 DAT deck connected Tape deck connect to to DAT IN TAPE 1 or 2 OUT DAT
-
 1
1 -
2
-
3
-
4
-
5
-
6
-
7
-
8
-
9
-
10
-
11
-
12
-
13
-
14
-
15
-
16
-
 17
17 -
 18
18 -
 19
19 -
 20
20 -
 21
21 -
 22
22 -
 23
23 -
 24
24 -
 25
25 -
 26
26 -
 27
27 -
28
-
29
-
30
-
31
-
32
-
33
-
34
-
35
-
36
-
37
-
38
-
39
-
40
-
41
-
42
 |
 |
