Sony STR DH500 Operating Instructions - Page 13
Getting Started, 1: Installing the speakers - model number
 |
UPC - 027242753556
View all Sony STR DH500 manuals
Add to My Manuals
Save this manual to your list of manuals |
Page 13 highlights
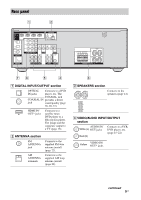
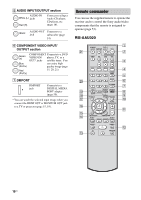
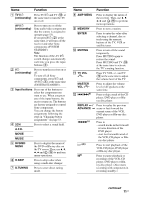
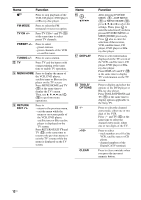
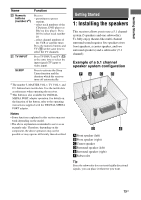
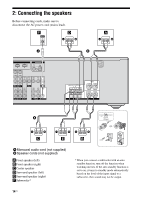
Getting Started Name Function T Numeric buttons (number 5a)) U TV INPUT Press to - preset/tune to preset stations. - select track numbers of the CD player, DVD player or Blu-ray disc player. Press 0/10 to select track number 10. - select channel numbers of the VCR or satellite tuner. Press the numeric buttons and TV (M) at the same time to select the TV channels. Press TV INPUT and TV (M) at the same time to select the input signal (TV input or video input). SLEEP Press to activate the Sleep Timer function and the duration which the receiver turns off automatically. a)The number 5, MASTER VOL +, TV VOL +, and H buttons have tactile dots. Use the tactile dots as references when operating the receiver. b)This button is also available for DIGITAL MEDIA PORT adapter operation. For details on the function of the button, refer to the operating instructions supplied with the DIGITAL MEDIA PORT adapter. Notes • Some functions explained in this section may not work depending on the model. • The above explanation is intended to serve as an example only. Therefore, depending on the component, the above operation may not be possible or may operate differently than described. Getting Started 1: Installing the speakers This receiver allows you to use a 5.1 channel system (5 speakers and one subwoofer). To fully enjoy theater-like multi channel surround sound requires five speakers (two front speakers, a center speaker, and two surround speakers) and a subwoofer (5.1 channel). Example of a 5.1 channel speaker system configuration AFront speaker (left) BFront speaker (right) CCenter speaker DSurround speaker (left) ESurround speaker (right) FSubwoofer Tip Since the subwoofer does not emit highly directional signals, you can place it wherever you want. 13US
-
 1
1 -
2
-
3
-
4
-
5
-
6
-
7
-
 8
8 -
 9
9 -
 10
10 -
 11
11 -
 12
12 -
 13
13 -
 14
14 -
 15
15 -
 16
16 -
 17
17 -
 18
18 -
19
-
20
-
21
-
22
-
23
-
24
-
25
-
26
-
27
-
28
-
29
-
30
-
31
-
32
-
33
-
34
-
35
-
36
-
37
-
38
-
39
-
40
-
41
-
42
-
43
-
44
-
45
-
46
-
47
-
48
-
49
-
50
-
51
-
52
-
53
-
54
-
55
-
56
-
57
-
58
-
59
-
60
-
61
-
62
-
63
-
64
 |
 |