Sony STR-DH540 Operating Instructions - Page 61
System Settings menu, Operating without using the OSD, Input Edit, Audio Input Assign, Name
 |
View all Sony STR-DH540 manuals
Add to My Manuals
Save this manual to your list of manuals |
Page 61 highlights
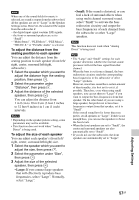
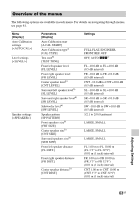
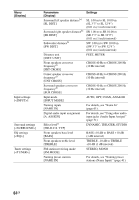
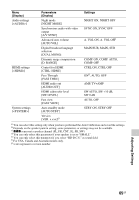
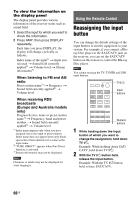
x Input Edit Lets you set the following items for each input. • Watch: Displays an input to the Watch menu. • Listen: Displays an input to the Listen menu. • Watch+Listen: Displays an input to both the Watch and Listen menus. x Audio Input Assign Lets you set the audio input jack(s) assigned to each input. For details, see "Using other audio input jacks (Audio Input Assign)" (page 51). x Name In Lets you enter a name of up to 8 characters for inputs and display it. It is more recognizable having the equipment named on the display than the jacks. 1 Select "Name In", then press . 2 Select the input you want to name, then press . 3 Press V/v repeatedly to select a character, then press b. You can move the input position backward and forward by pressing B/b. 4 Repeat step 3 to input a character one by one, then press . The name you entered is registered. System Settings menu You can adjust the settings of the receiver. x Language Lets you select the language for the messages on the screen. • English • French • German • Spanish x Auto Standby Lets you set the receiver switch to standby mode automatically when you do not operate the receiver or when there is no signals input to the receiver. • On: Switches to standby mode after approximately 30 minutes. • Off: Does not switch to standby mode. Notes • This function does not work when "FM" or "AM" input is selected. • If you use the Auto standby mode and the Sleep Timer at the same time, the Sleep Timer has priority. Operating without using the OSD You can operate this receiver using the display panel even if the TV is not connected to the receiver. AMP MENU V/v/B/b, RETURN O Using the menu on the display panel 1 Press AMP MENU. The menu is displayed on the display panel of the receiver. 2 Press V/v repeatedly to select the menu you want, then press . 3 Press V/v repeatedly to select the parameter you want to adjust, then press . 4 Press V/v repeatedly to select the setting you want, then press . Adjusting Settings 61GB
-
 1
1 -
2
-
3
-
4
-
5
-
6
-
7
-
8
-
9
-
10
-
11
-
12
-
13
-
14
-
15
-
16
-
17
-
18
-
19
-
20
-
21
-
22
-
23
-
24
-
25
-
26
-
27
-
28
-
29
-
30
-
31
-
32
-
33
-
34
-
35
-
36
-
37
-
38
-
39
-
40
-
41
-
42
-
43
-
44
-
45
-
46
-
47
-
48
-
49
-
50
-
51
-
52
-
53
-
54
-
55
-
 56
56 -
 57
57 -
 58
58 -
 59
59 -
 60
60 -
 61
61 -
 62
62 -
 63
63 -
 64
64 -
 65
65 -
 66
66 -
67
-
68
-
69
-
70
-
71
-
72
-
73
-
74
-
75
-
76
-
77
-
78
-
79
-
80
 |
 |