Sony TCD-D7 Primary User Manual - Page 16
Recording, Notes, Record, Successfully
 |
View all Sony TCD-D7 manuals
Add to My Manuals
Save this manual to your list of manuals |
Page 16 highlights
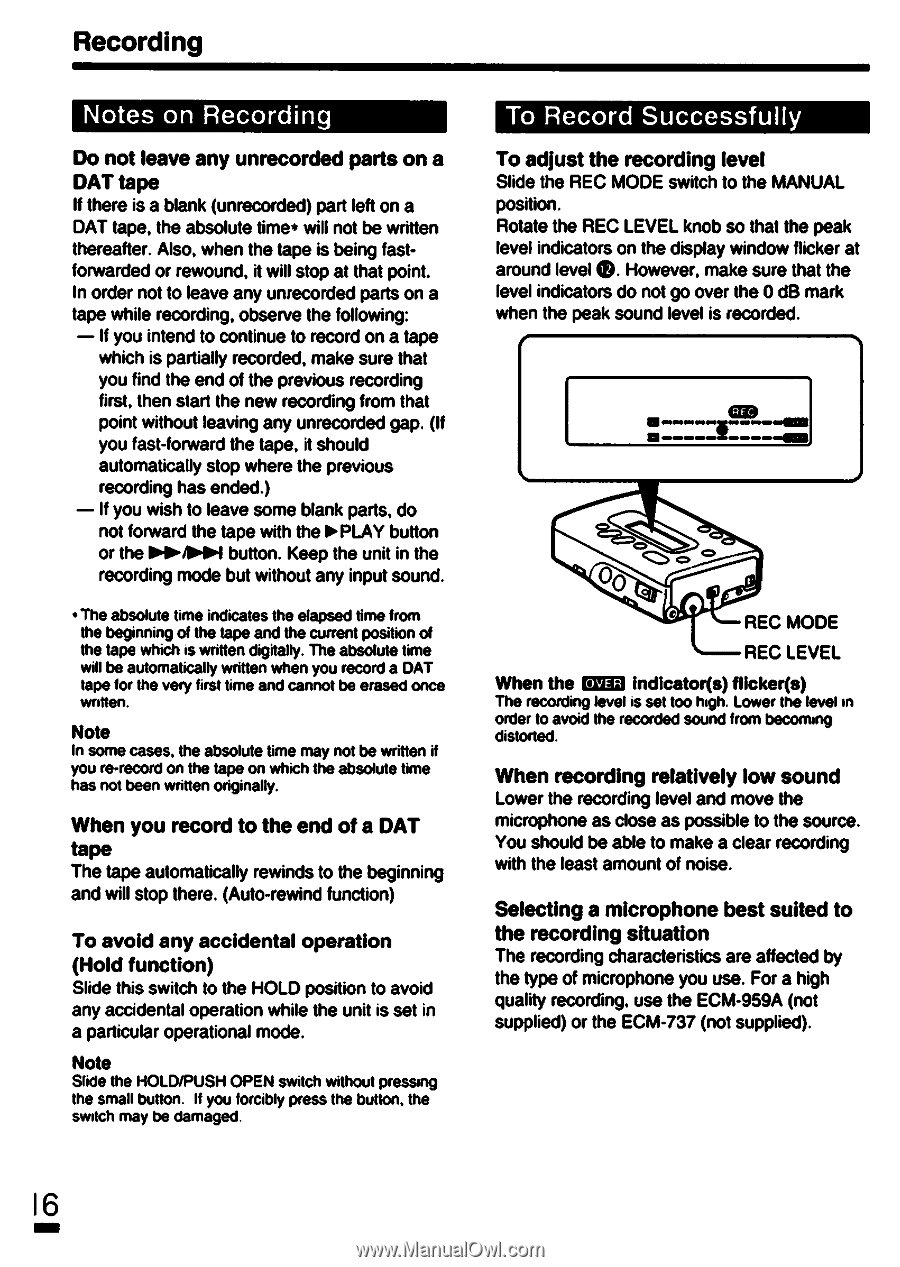
Recording Notes on Recording Do not leave any unrecorded parts on a DAT tape If there is a blank (unrecorded) part left on a DAT tape, the absolute time* will not be written thereafter. Also, when the tape is being fastforwarded or rewound, it will stop at that point. In order not to leave any unrecorded parts on a tape while recording, observe the following: - If you intend to continue to record on a tape which is partially recorded, make sure that you find the end of the previous recording first, then start the new recording from that point without leaving any unrecorded gap. (If you fast-forward the tape, it should automatically stop where the previous recording has ended.) - If you wish to leave some blank parts, do not forward the tape with the PLAY button or thellologNiol button. Keep the unit in the recording mode but without any input sound. • The absolute time indicates the elapsed time from the beginning of the tape and the current position of the tape which is written digitally. The absolute time will be automatically written when you record a DAT tape for the very first time and cannot be erased once written. Note In some cases, the absolute time may not be written if you re-record on the tape on which the absolute time has not been written originally. When you record to the end of a DAT tape The tape automatically rewinds to the beginning and will stop there. (Auto-rewind function) To avoid any accidental operation (Hold function) Slide this switch to the HOLD position to avoid any accidental operation while the unit is set in a particular operational mode. Note Slide the HOLD/PUSH OPEN switch without pressing the small button. If you forcibly press the button, the switch may be damaged. To Record Successfully To adjust the recording level Slide the REC MODE switch to the MANUAL position. Rotate the REC LEVEL knob so that the peak ®. level indicators on the display window flicker at around level However, make sure that the level indicators do not go over the 0 dB mark when the peak sound level is recorded. e a...l..b......... O c, Oo REC MODE REC LEVEL When the MD inclicator(s) flicker(s) The recording level is set too high. Lower the level in order to avoid the recorded sound from becoming distorted. When recording relatively low sound Lower the recording level and move the microphone as close as possible to the source. You should be able to make a clear recording with the least amount of noise. Selecting a microphone best suited to the recording situation The recording characteristics are affected by the type of microphone you use. For a high quality recording, use the ECM-959A (not supplied) or the ECM-737 (not supplied). 16
-
 1
1 -
2
-
3
-
4
-
5
-
6
-
7
-
8
-
9
-
10
-
 11
11 -
 12
12 -
 13
13 -
 14
14 -
 15
15 -
 16
16 -
 17
17 -
 18
18 -
 19
19 -
 20
20 -
 21
21 -
22
-
23
-
24
-
25
-
26
-
27
-
28
-
29
-
30
 |
 |