Sony VGC-VA10G User Guide - Page 110
Secure the drive to the drive holder with screws, through the holes on each side of the drive holder.
 |
UPC - 027242685789
View all Sony VGC-VA10G manuals
Add to My Manuals
Save this manual to your list of manuals |
Page 110 highlights
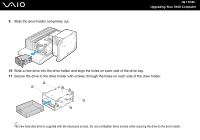
9 Slide the drive holder completely out. n 110 N Upgrading Your VAIO Computer 10 Slide a new drive into the drive holder and align the holes on each side of the drive bay. 11 Secure the drive to the drive holder with screws, through the holes on each side of the drive holder. ✍ The new hard disk drive is supplied with the necessary screws. Do not overtighten these screws when securing the drive to the drive holder.
-
 1
1 -
2
-
3
-
4
-
5
-
6
-
7
-
8
-
9
-
10
-
11
-
12
-
13
-
14
-
15
-
16
-
17
-
18
-
19
-
20
-
21
-
22
-
23
-
24
-
25
-
26
-
27
-
28
-
29
-
30
-
31
-
32
-
33
-
34
-
35
-
36
-
37
-
38
-
39
-
40
-
41
-
42
-
43
-
44
-
45
-
46
-
47
-
48
-
49
-
50
-
51
-
52
-
53
-
54
-
55
-
56
-
57
-
58
-
59
-
60
-
61
-
62
-
63
-
64
-
65
-
66
-
67
-
68
-
69
-
70
-
71
-
72
-
73
-
74
-
75
-
76
-
77
-
78
-
79
-
80
-
81
-
82
-
83
-
84
-
85
-
86
-
87
-
88
-
89
-
90
-
91
-
92
-
93
-
94
-
95
-
96
-
97
-
98
-
99
-
100
-
101
-
102
-
103
-
104
-
 105
105 -
 106
106 -
 107
107 -
 108
108 -
 109
109 -
 110
110 -
 111
111 -
 112
112 -
 113
113 -
 114
114 -
 115
115 -
116
-
117
-
118
-
119
-
120
-
121
-
122
-
123
-
124
-
125
-
126
-
127
-
128
-
129
-
130
-
131
-
132
-
133
-
134
-
135
-
136
-
137
-
138
-
139
-
140
-
141
-
142
-
143
-
144
-
145
-
146
-
147
-
148
-
149
-
150
-
151
-
152
-
153
-
154
-
155
-
156
-
157
-
158
-
159
-
160
-
161
-
162
-
163
-
164
-
165
-
166
-
167
-
168
-
169
 |
 |

110
n
N
Upgrading Your VAIO Computer
9
Slide the drive holder completely out.
10
Slide a new drive into the drive holder and align the holes on each side of the drive bay.
11
Secure the drive to the drive holder with screws, through the holes on each side of the drive holder.
✍
The new hard disk drive is supplied with the necessary screws. Do not overtighten these screws when securing the drive to the drive holder.