Sony WX-4500X Operating Instructions - Page 5
During CD/MD playback, Installation/Connections manual.
 |
View all Sony WX-4500X manuals
Add to My Manuals
Save this manual to your list of manuals |
Page 5 highlights
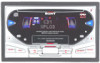
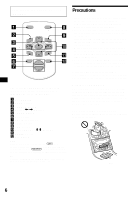
Refer to the pages listed for details. CD/MD : During CD/MD playback TAPE : During tape playback RADIO : During radio reception MENU : During menu mode a Frequency select switch (located on the left side of the unit) See "Frequency select switch" in the Installation/Connections manual. b DSO button 20 c SCRL (scroll) button 10 d Display window e Receptor for the card remote commander f EQ7 button 20 g CD Z (eject) button 9 h DSPL (display mode change) button 10, 11, 16 i OFF (Stop/Power off) button* 8, 9, 13 j SOUND button 19, 21, 22 k MENU button 9, 10, 11, 12, 13, 14, 15, 16, 20, 21, 22 l SA (spectrum Analyzer) button 22 m SEEK/AMS buttons (-/+) CD/MD 9 TAPE 13 RADIO 15 MENU 9, 10, 11, 12, 13, 14, 15, 16, 19, 20, 21, 22 n Jog roller Jog roller usually functions as a volume control except in some adjusting modes. CD/MD 11, 12 RADIO 15, 16, 17 MENU 9, 10, 11, 12, 13, 14, 15, 16, 20, 21, 22 o ATT button 19 p MODE (o) button CD/MD 10, 11 TAPE 13, 14 RADIO 14, 15 q SOURCE (Power on/CD/MD/Tape/ Radio) button 9, 10, 11, 13, 14, 15, 19, 20, 21, 22 r Reset button 8 s TAPE Z (eject) button 13 * Warning when installing in a car without an ACC (accessory) position on the ignition switch After turning off the ignition, be sure to press (OFF) on the unit for 2 seconds to turn off the clock display. Otherwise, the clock display does not turn off and this causes battery drain. m SEEK/AMS SEEK/AMS n To select upwards To select leftwards/. To select rightwards/> To select downwards In menu mode, the currently selectable directions are indicated with a "v" in the display. continue to next page t 5
-
 1
1 -
 2
2 -
 3
3 -
 4
4 -
 5
5 -
 6
6 -
 7
7 -
 8
8 -
 9
9 -
 10
10 -
 11
11 -
12
-
13
-
14
-
15
-
16
-
17
-
18
-
19
-
20
-
21
-
22
-
23
-
24
-
25
-
26
-
27
-
28
-
29
-
30
-
31
-
32
-
33
-
34
-
35
-
36
-
37
-
38
-
39
-
40
-
41
-
42
-
43
-
44
-
45
-
46
-
47
-
48
-
49
-
50
-
51
-
52
-
53
-
54
-
55
-
56
-
57
-
58
-
59
-
60
-
61
-
62
-
63
-
64
-
65
-
66
-
67
-
68
-
69
-
70
-
71
-
72
-
73
-
74
-
75
-
76
-
77
-
78
-
79
-
80
 |
 |
