Stihl MS 180 C-BE Product Instruction Manual - Page 39
Taking Care of the Guide, Shroud - 16
 |
View all Stihl MS 180 C-BE manuals
Add to My Manuals
Save this manual to your list of manuals |
Page 39 highlights
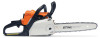
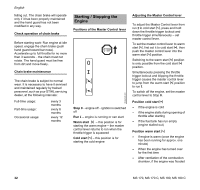
English 143BA057 KN Taking Care of the Guide Bar 2 1 3 N Turn the bar over - every time you sharpen the chain and every time you replace the chain - this helps avoid one-sided wear, especially at the nose and underside of the bar. N Regularly clean the oil inlet hole (1), the oilway (2) and the bar groove (3). N Measure the groove depth - with the scale on the filing gauge (special accessory) - in the area used most for cutting. 143BA026 KN Chain type Picco Rapid Rapid Rapid Pitch Minimum groove depth 3/8" P 0.20" (5.0 mm) 1/4" 0.16" (4.0 mm) 3/8"; 0.325" 0.24" (6.0 mm) 0.404" 0.28" (7.0 mm) If groove depth is less than specified: N Replace the guide bar. The drive link tangs will otherwise scrape along the bottom of the groove - the cutters and tie straps will not ride on the bar rails. Shroud Remove shroud The shroud catch may vary depending on the version. Version A N Use a suitable tool to open the catch by turning it 90° to the left N Lift off the shroud Version B N Turn lever 90" to the left N Lift off the shroud Refitting the shroud 143BA056 KN Install parts in reverse order. MS 170, MS 170 C, MS 180, MS 180 C 37
-
 1
1 -
2
-
3
-
4
-
5
-
6
-
7
-
8
-
9
-
10
-
11
-
12
-
13
-
14
-
15
-
16
-
17
-
18
-
19
-
20
-
21
-
22
-
23
-
24
-
25
-
26
-
27
-
28
-
29
-
30
-
31
-
32
-
33
-
 34
34 -
 35
35 -
 36
36 -
 37
37 -
 38
38 -
 39
39 -
 40
40 -
 41
41 -
 42
42 -
 43
43 -
 44
44 -
45
-
46
-
47
-
48
-
49
-
50
-
51
-
52
-
53
-
54
-
55
-
56
-
57
-
58
-
59
-
60
-
61
-
62
-
63
-
64
-
65
-
66
-
67
-
68
-
69
-
70
-
71
-
72
-
73
-
74
-
75
-
76
-
77
-
78
-
79
-
80
-
81
-
82
-
83
-
84
-
85
-
86
-
87
-
88
-
89
-
90
-
91
-
92
-
93
-
94
-
95
-
96
-
97
-
98
-
99
-
100
-
101
-
102
-
103
-
104
-
105
-
106
-
107
-
108
-
109
-
110
-
111
-
112
-
113
-
114
-
115
-
116
-
117
-
118
-
119
-
120
-
121
-
122
-
123
-
124
 |
 |
