Stihl RMA 370 Product Instruction Manual - Page 14
Mulching, Mounting the Handlebar - mulching kit
 |
View all Stihl RMA 370 manuals
Add to My Manuals
Save this manual to your list of manuals |
Page 14 highlights
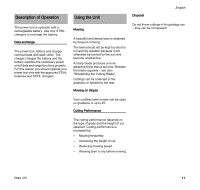
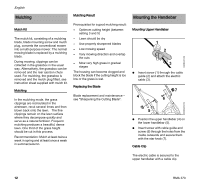
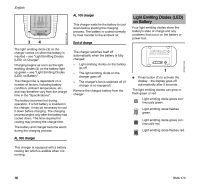
English Mulching Mulch Kit The mulch kit, consisting of a mulching blade, blade mounting screw and mulch plug, converts the conventional mower into a multi-purpose mower. The normal mowing blade is replaced by a mulching blade. During mowing, clippings can be collected in the grassbox in the usual way. Alternatively, the grassbox can be removed and the rear ejection chute used. For mulching, the grassbox is removed and the mulch plug fitted, see instruction sheet supplied with mulch kit. Mulching In the mulching mode, the grass clippings are recirculated in the airstream, recut several times and then blown back onto the lawn. The fine clippings remain on the lawn surface where they decompose quickly and serve as a natural fertilizer. Frequent mulching produces a beautiful, dense lawn. One third of the grass height should be cut in this process. Recommendation: Mulch at least twice a week in spring and at least once a week in summer/autumn. Mulching Result Prerequisites for a good mulching result: - Optimum cutting height (between setting 3 and 5) - Lawn should be dry - Use properly sharpened blades - Low mowing speed - Vary mowing direction and overlap the cuts - Mow very high grass in gradual stages The housing can become clogged and block the blade if the cutting height is too low or the grass is wet. Replacing the Blade Blade replacement and maintenance - see "Sharpening the Cutting Blade". Mounting the Handlebar Mounting Upper Handlebar 1 2 9929BA001 KN 3 N Insert screw (1) through the cable guide (2) and attach the electric cable (3). 7 4 6 9929BA032 KN 5 N Position the upper handlebar (4) on the lower handlebar (5). N Insert screw with cable guide and screw (6) through the holes from the inside outwards and secure them with the star knob (7). Cable Clip The electric cable is secured to the upper handlebar with a cable clip. 12 RMA 370
-
 1
1 -
2
-
3
-
4
-
5
-
6
-
7
-
8
-
 9
9 -
 10
10 -
 11
11 -
 12
12 -
 13
13 -
 14
14 -
 15
15 -
 16
16 -
 17
17 -
 18
18 -
 19
19 -
20
-
21
-
22
-
23
-
24
-
25
-
26
-
27
-
28
-
29
-
30
-
31
-
32
-
33
-
34
-
35
-
36
-
37
-
38
-
39
-
40
-
41
-
42
-
43
-
44
-
45
-
46
-
47
-
48
-
49
-
50
-
51
-
52
-
53
-
54
-
55
-
56
-
57
-
58
-
59
-
60
-
61
-
62
-
63
-
64
-
65
-
66
-
67
-
68
-
69
-
70
-
71
-
72
 |
 |
